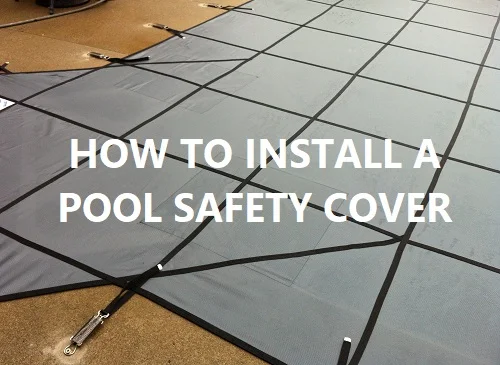
How To Install A Pool Safety Cover
SwimmingPoolSteve.com is user-supported. In order to keep this resource about pools and spas available for free to all readers I earn commissions for purchases made through links on this page. For more information see the full disclaimer page. By using this website you are agreeing to the terms and conditions.
Installing a safety cover on a pool is something that most do-it-yourself enthusiasts should be able to accomplish. This process does require the use of some heavier
tools, such as small hammer drill for easier installations, and more complex installations can potentially require sledgehammers, grinders and a much larger hammer
drill. If you are not afraid of a little labor and have the ability to take fairly precise measurements then you can easily install your own cover.
Why would you want to install your own safety cover?
The simple answer to this is to save money. To have a pool professional sell you a cover we need to
come to your house, take measurements, write up the order, send it in, cash your deposit, pick up the cover, come to your house and install it, answer your questions
and finally cash the balance payment. On an average safety cover installation you would be looking at anywhere from $500 to $1500 in fees you are paying for these
services. With a little instruction anyone can measure a pool for a safety cover and installing takes less than one day (2-3 hours for a professional). Installing a
safety cover is actually one of the easier pool projects compared to installing a new liner, installing pumps, filters or heaters, finding leaks, fixing tile etc. and
can really make getting a new safety cover more affordable for you.

What Is The Difference Between A Safety Cover & A Lock-In Cover
Pool safety covers are one of the three common styles of pool covers - Lock in covers and tarp & waterbag are the two other common winter cover types. Lock in covers
often get confused with safety covers just because the name sounds similar. A lock in cover is either made completely of vinyl (just like a pool liner) or a poly tarp
material with a vinyl bead. A lock in cover connects to a track that is installed along the coping edge of a vinyl liner pool. A safety cover installs into the deck
surrounding the pool via brass grommets that are drilled into the deck

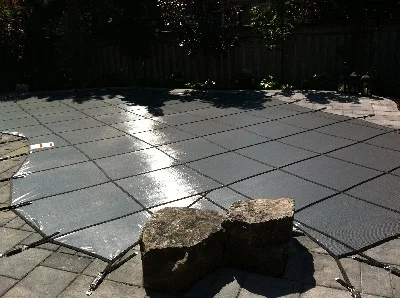
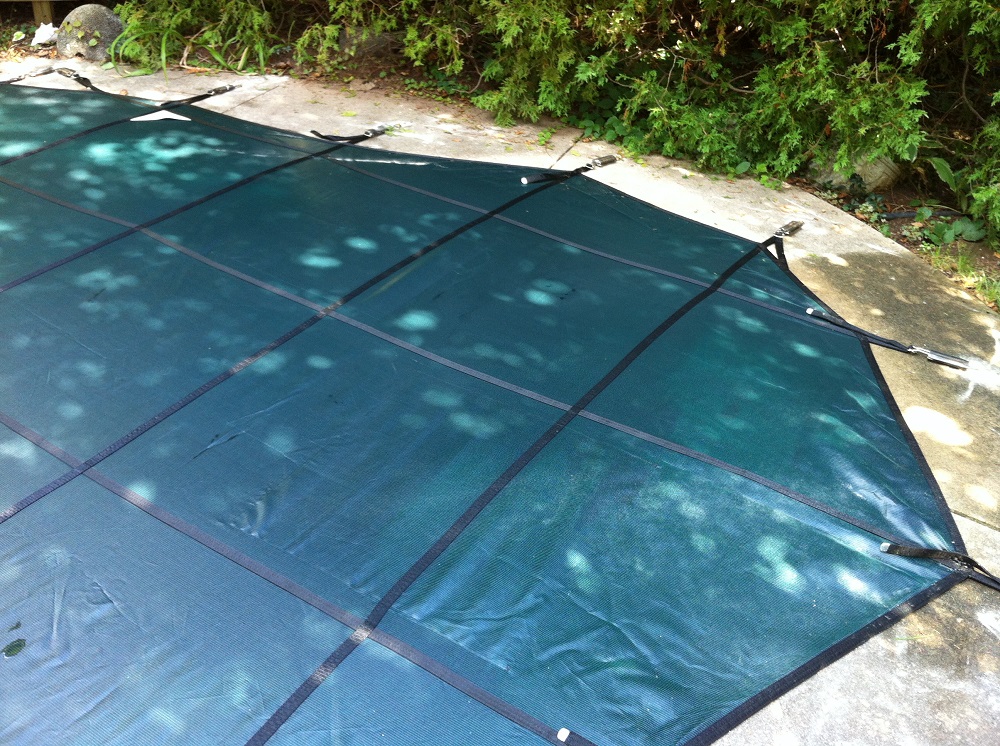
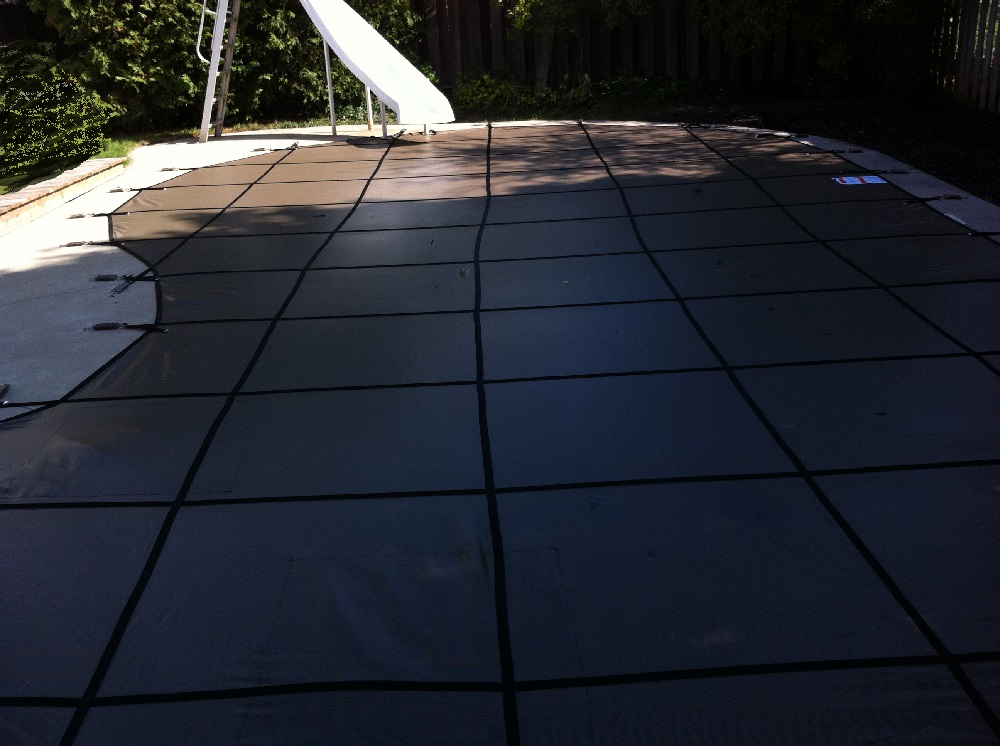
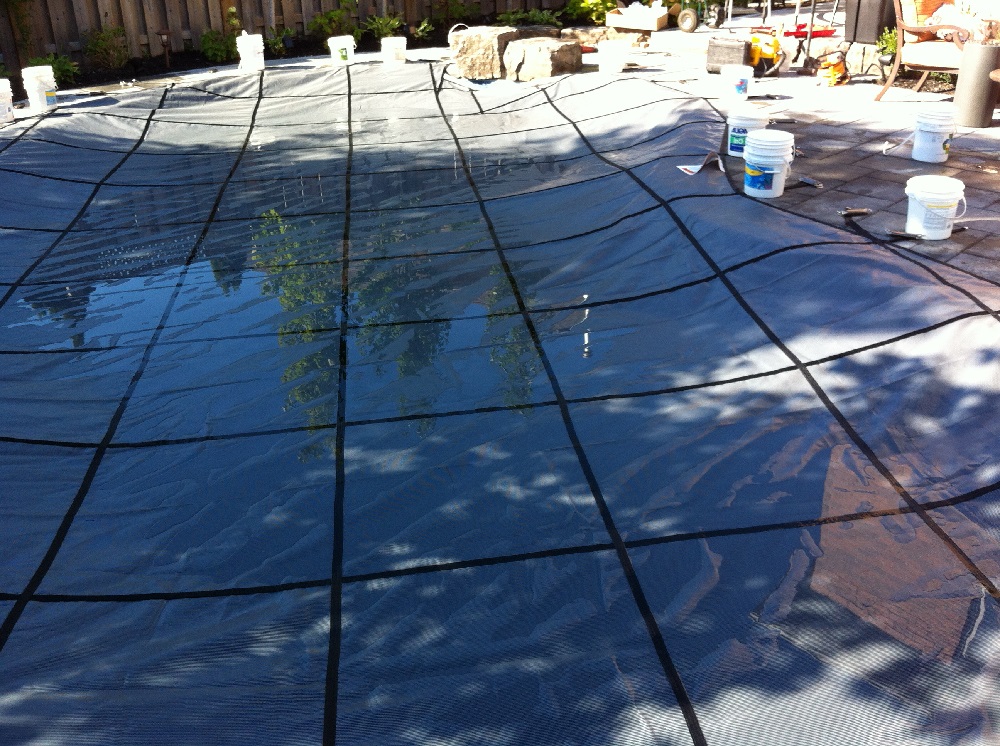
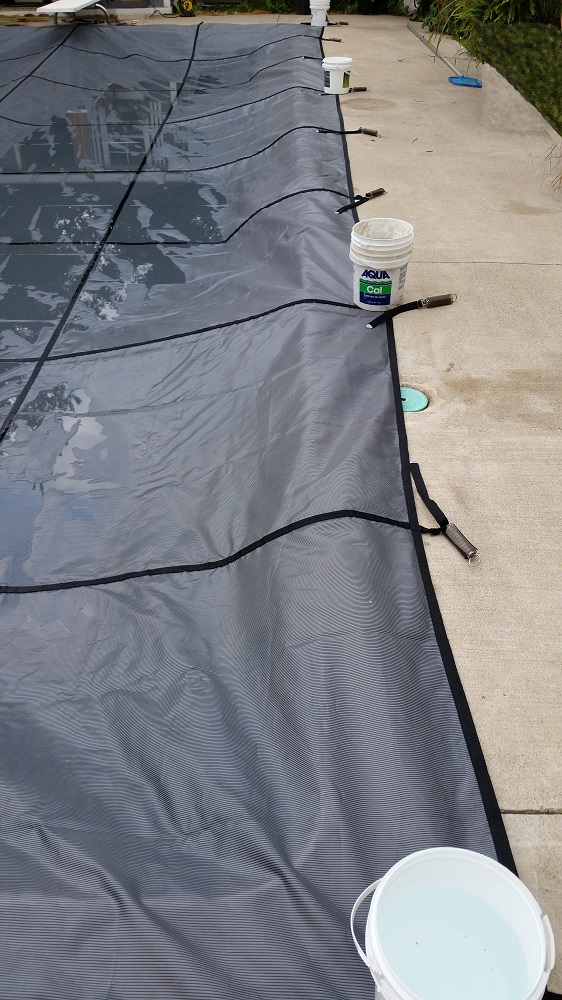
This is an example of the difference between lock in covers that connect into a coping track around the top of the pool wall versus a pool safety cover that is a
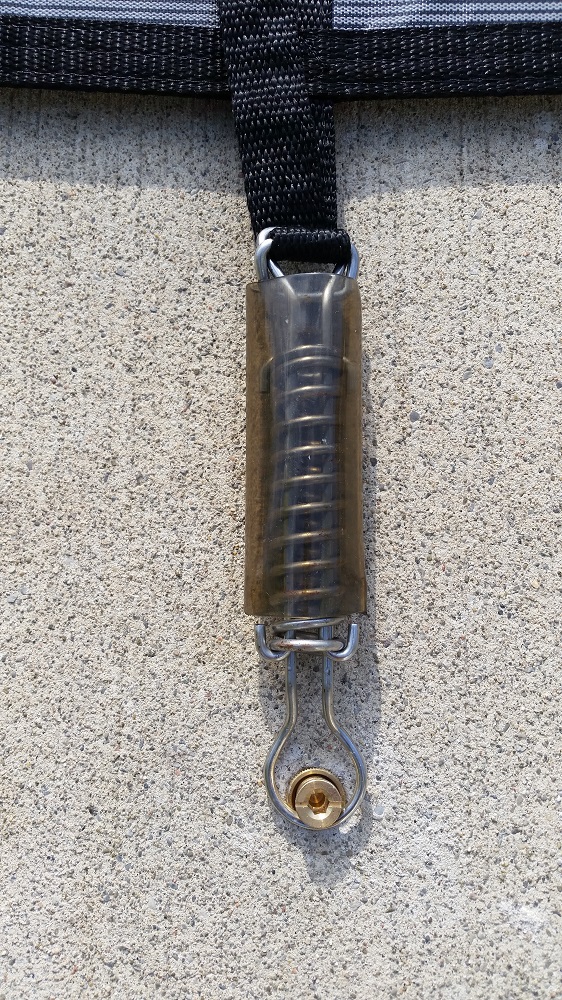
spring loaded cover that spans flat over the top of the pool and connects into the pool deck with anchors that are drilled into place. Safety covers are not intended
for day to day use securing the pool area - they are for extended periods of time where the pool will be closed such as with winterization.
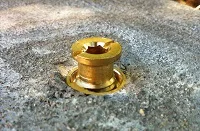
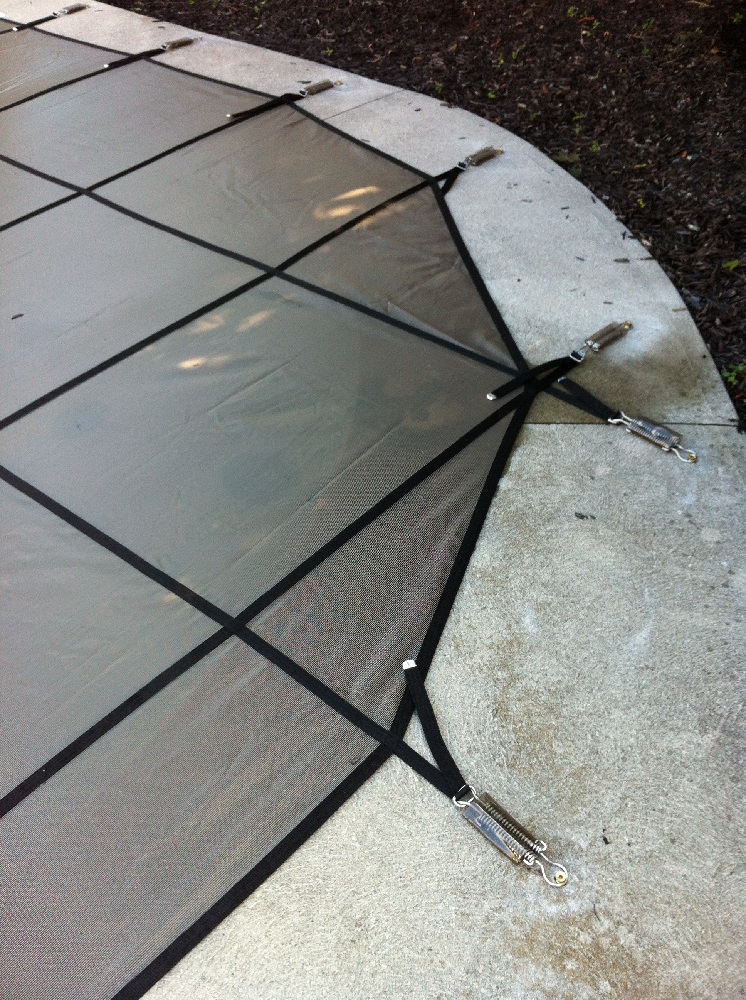
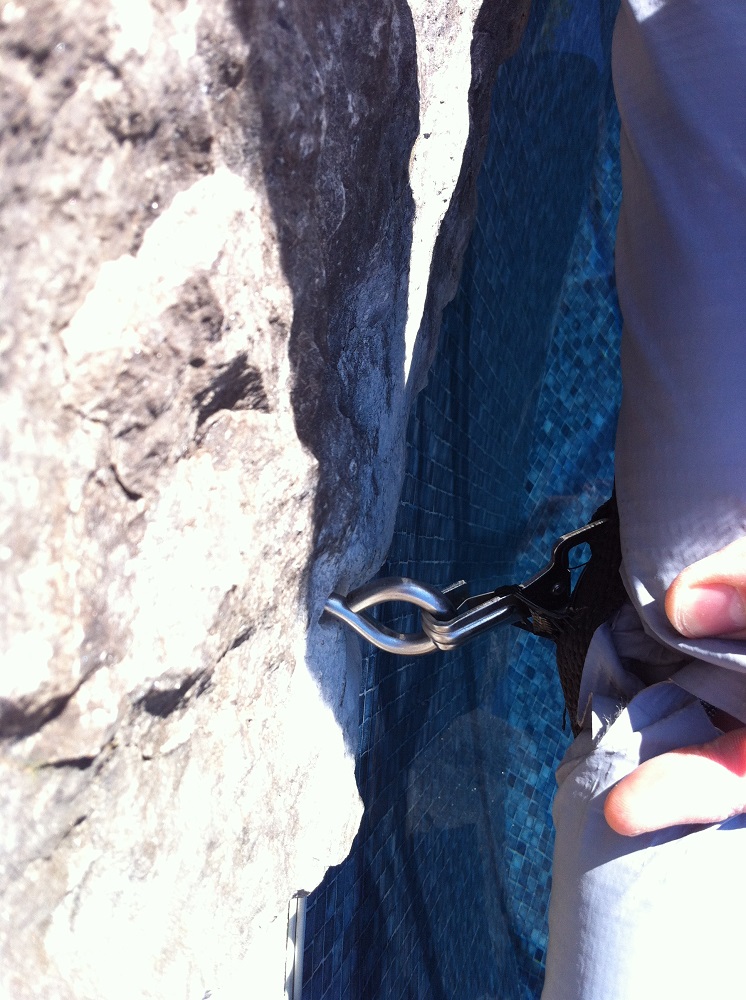
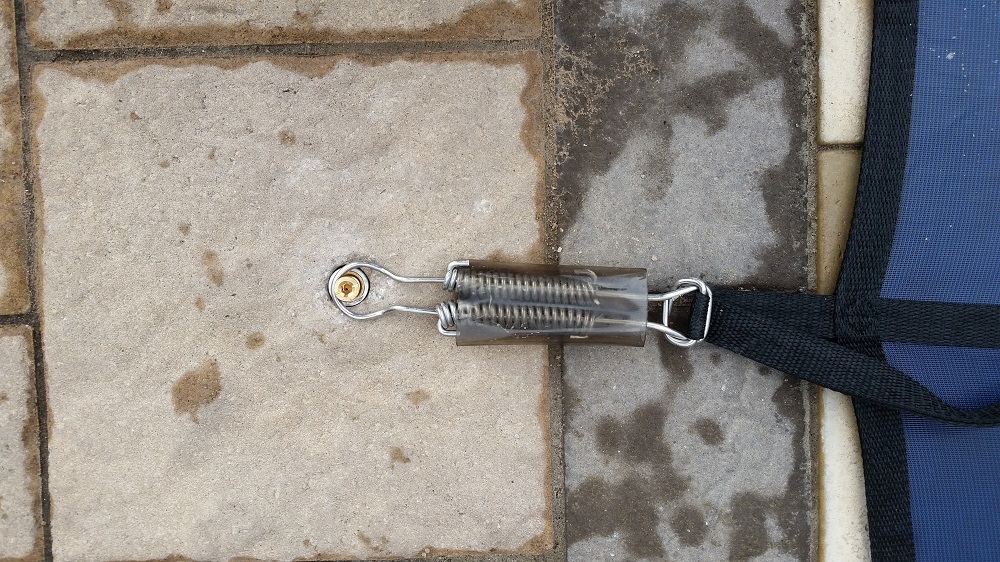
 A brass grommet is drilled into the pool deck, with specific hardware options for installing anchors into any type of deck surface - concrete, interlock stones, grass
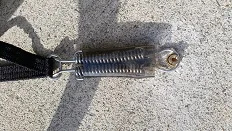
and gardens as well as hardware for connecting to waterfalls or water features that encroach onto the pool edge. Using a leverage bar tool the cover is put under
spring tension by a series of heavy duty springs that are connected to straps on every seam. During the swimming season the grommets tighten flush with the deck.
A brass grommet is drilled into the pool deck, with specific hardware options for installing anchors into any type of deck surface - concrete, interlock stones, grass
and gardens as well as hardware for connecting to waterfalls or water features that encroach onto the pool edge. Using a leverage bar tool the cover is put under
spring tension by a series of heavy duty springs that are connected to straps on every seam. During the swimming season the grommets tighten flush with the deck.
How Hard Is It To Install A Safety Cover
There is a sliding scale of difficulty for installing safety covers on swimming pools that depends on the features of the pool. In order to understand the scope of
the project to determine if this is something that you are able to do you will need to have a better understanding of what factors make a pool cover potentially
difficult to install:
Shape of the pool - Pools that are made up of entirely straight lines and are symmetrical will be the easiest to install. If the pool has any rounded edges or
asymmetry this will increase both the cost and difficulty of installing your own cover. A rectangle pool would be an example of an easy cover, and one that would be
much less expensive since it is a standard shape. This is referred to as an "off the shelf" pool cover and will come in standard sizes. Order the size for your pool
and you are ready to install it. If the pool has any asymmetry, radius walls or curves of any kind, then this is called a freeform pool and will require a custom
cover measurement. A custom cover will cost significantly more than an off the shelf cover, and you will need to be able to perform an A-B plot measurement of the
pool. An A-B plot is not necessarily hard, but much more difficult than measuring the length and width of a rectangle.
Type of deck material - The standard for "easy" safety cover installations is any type of concrete. Concrete pool decks, whether broomed, stamped or other, are
easier to install than any pool with paving stones, interlock brick or any kind of natural stone. There is also a significant cost difference for the hardware
required for installing into a concrete deck versus installing into pavers or stone. It can cost as much as an additional $750 just for hardware upgrades for safety
covers installed into something other than concrete. A concrete anchor installs about 1.5" deep into the pool deck with a 3/4" drill bit. Interlock stakes are
installed over 12" deep and require a larger 7/8" bit or 1" bit depending on the supplier that you choose. Do not attempt to install concrete anchors into a stone or
interlock deck (as many installers did 20 years ago when these covers first hit the market) as this will absolutely damage the pool deck and ultimately make the cover
not safe - which defeats the point of it entirely. If you have interlock you may end up needing a sledge hammer and steel grinding disc for if things are not going
smoothly, plus the chance to damage the deck exists as cracking stones is a definite possibility. Conservatively, interlock installations are twice as difficult as
concrete installations.
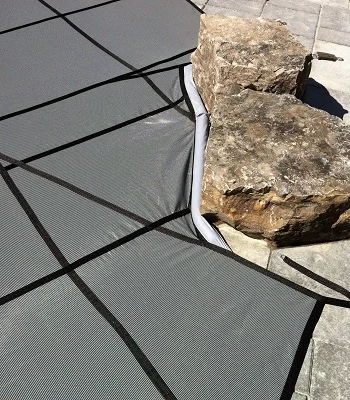
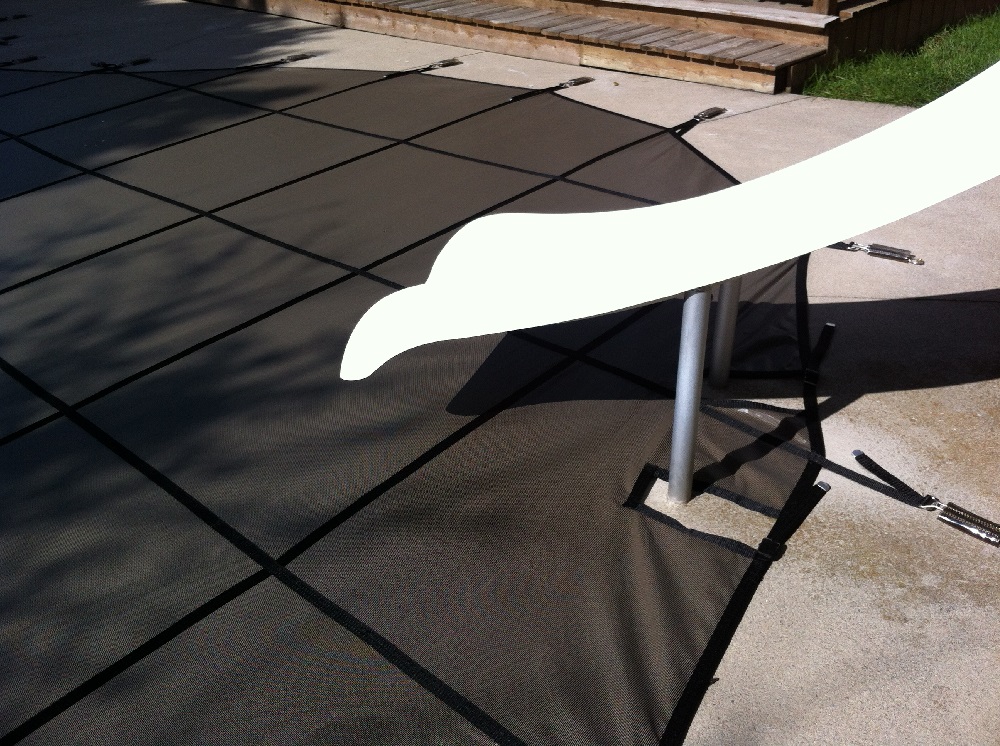
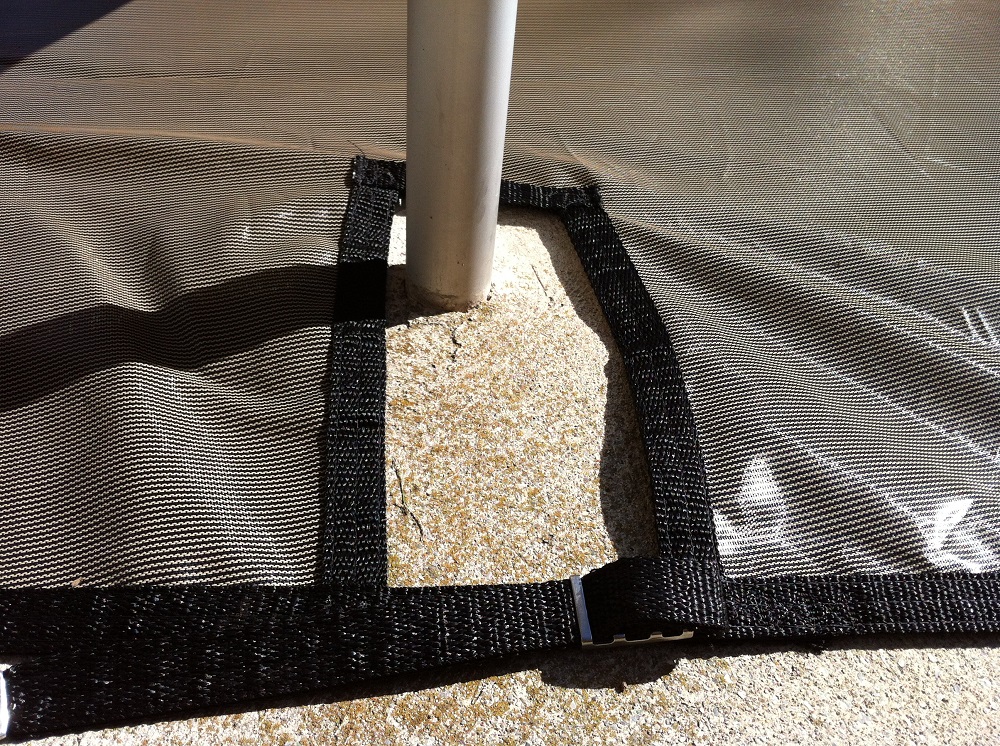
Intrusions on the pool deck - A pool deck that has no intrusions within 3 feet of the pool edge is ideal from an installation standpoint. If there is a slide,
permanent railing, raised wall, waterfall or diving board base within 24-36" of the pool edge then this may increase both the cost, and difficulty of the installation.
Every alteration made to the cover, such as cutouts for slide legs or a diving rock will cost you a few hundred dollars as well as requiring some very careful
measuring on your part. If the cutouts are placed in the wrong area your cover will not fit the pool properly - and returns for alterations to the cover can be costly
and time consuming.
Pool steps - If the pool has in-wall steps that are outside of the perimeter of the pool area this will increase the difficulty and cost of your cover. There
are a select few off the shelf covers that include step sections of general size and location. Pool steps are often 4', 6' or 8' wide so sometimes you can get an off
the shelf cover that has just what you need. In most cases having steps will require your cover to be custom made which increases the cost and wait time for the cover
as well as increasing the difficulty of the measuring process somewhat.
Types Of Pool Safety Covers
Pool safety covers can come from any one of a dozen or more manufacturers in Canada and the USA and each has their own technology, terminology, warranty and quality of
materials and construction. In general safety covers will be available in 3 different thickness and quality of materials:
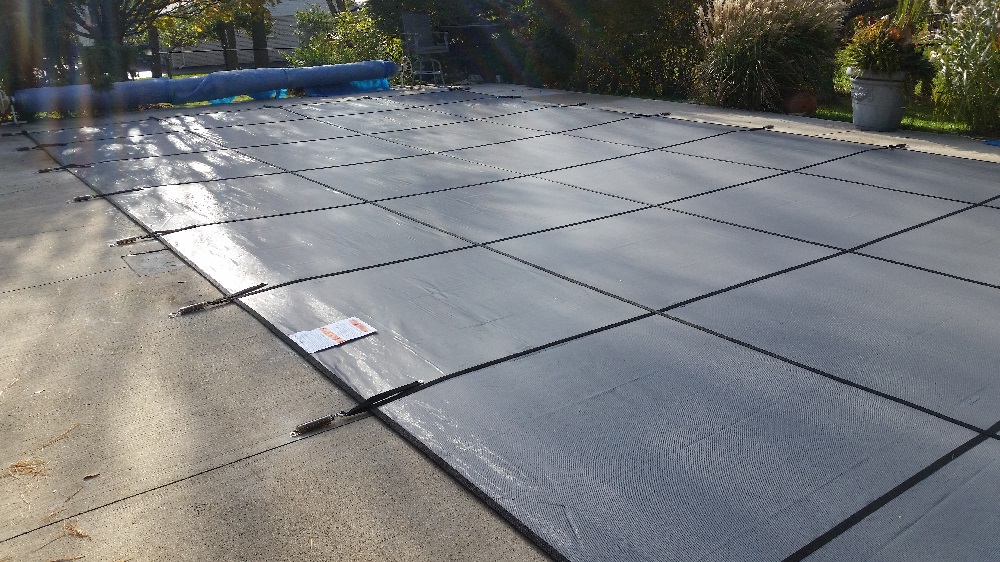
Mesh safety covers are the industry standard for safety covers and make up the vast majority of safety covers on the market. These lightweight covers are easy
to clean and store, as well as being a breeze to put on or take off the pool. Thin enough to see through the cover from the right angle and in the right light these
light duty safety covers were the first ones to reach the market. If you are not sure which cover it is that you should get this is probably the one you are looking
for. Commonly this cover will let 5% of sunlight into the pool and is sometimes referred to as a 95% cover. With these covers snow and water will melt through into
the pool below but leaves and debris will dry up and blow away.
Heavy duty mesh covers are exactly the same as the lighter mesh material except thicker and heavier. Commonly allowing only 1% of light into the pool these
covers are sometimes referred to as 99% covers. Water will still drain through as with the lighter material - these covers simply are thicker and more durable (and
more expensive).
Solid safety covers are not a mesh material but instead a solid material designed to prevent 100% of light from reaching the pool. Solid safety covers also
have a mesh screen (and usually filter) for allowing some water to enter the pool. This will prevent too much water from standing on the cover and destroying the
hardware (springs and grommets).
So which cover is the right choice for your pool? Well that will depend on what your priorities are. A mesh safety cover protects the pool from children or pets
being able to fall in. It also stops leaves from falling in. If that is what you are looking for then the basic mesh cover will do. You will have silt in the pool
in the spring, and the cover is light duty so if you were to walk out on it you will end up getting wet up to the knees as it will bow under your weight - but none of
the covers are actually meant to be walked on.
A heavy duty mesh cover is good for backyards with lots of falling branches and debris. It will withstand greater for punctures and tears as well as allow less debris
to get blown into the pool from underneath the edges of the cover. Heavy duty mesh covers will typically also carry a longer warranty from the manufacturer.
A solid cover is overkill for most pools but if you are looking for the absolute maximum level of protection for the pool (and for the people around the pool) then a
solid cover is the best. They are heavy, hard to install, difficult to store and cost a lot more money than mesh covers - but if you want your backyard area secure
and your pool protected, a solid cover is a good choice.
How To Measure A Pool Safety Cover
There are two different kinds of safety cover measurement that can be done and the one that you will need to use will depend completely on the shape of the pool that
you have. Only a few pool shapes are simple enough that you can get away with a single tape measurer and some linear measurements. Most pools will require an A-B
plot measurement which is used to create a custom cover for your pool. Certain manufacturers may have specific measurement guidelines that you will need to meet
however most will follow a very similar process.
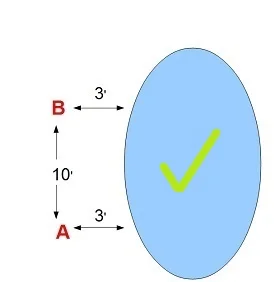
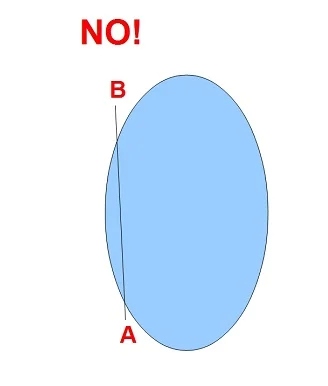
The process of measuring an A - B plot for a new pool cover involves measuring to certain points around your pool from two different reference points known as "A" and
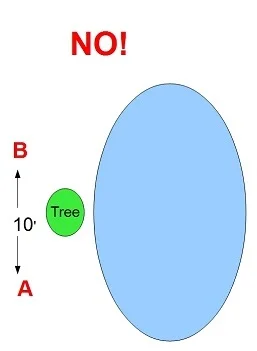
"B". These two reference points must be a minimum of 10' away from each other and both should be a minimum of 3' away from the edge of the pool wall. These numbers
represent the minimum values however there are no maximum values other than what each individual manufacturer has the ability to work with. By having two fixed points
of an exact, known distance apart, a 3-D rendering of your pool can be created. Think of it like a real-life size game of connect the dots. They take the "dots" from
two reference points and lay them over top of one another. Where these two drawings overlap is the true shape and orientation of your pool.
Ideally you would place your two reference points along the long wall of the pool however this is not always possible. Obstructions in the yard like trees, rocks can
pose a challenge and you will need to determine the correct place to measure your pool from that is unique to your pool.
Each reference point must be able to reach all points around the pool perimeter in a direct, uninterrupted straight line without crossing behind the other reference
point!
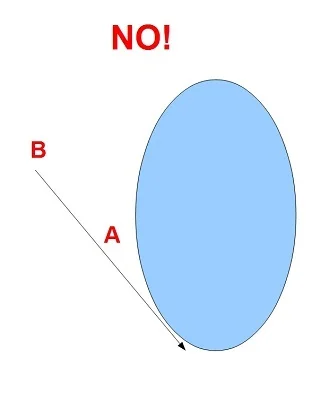
If you set up your A and B reference points in an area where they do not each have a clear line of sight to each area of the pool or such that you will cross to the
outside of the other reference point in order to get some of the measurements you need to set up your reference points in another location. Almost every pool has the
ability to be measured with a standard A - B grid however it is possible that due to the layout of your yard this is simply not possible - in 25 years and thousands of
liners and cover measurements I have encountered this only one time. For the vast majority of pools this will be a straightforward process.
Plotting Out The A - B Grid
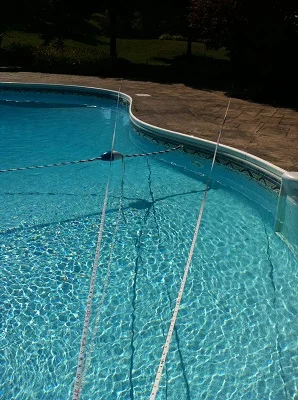
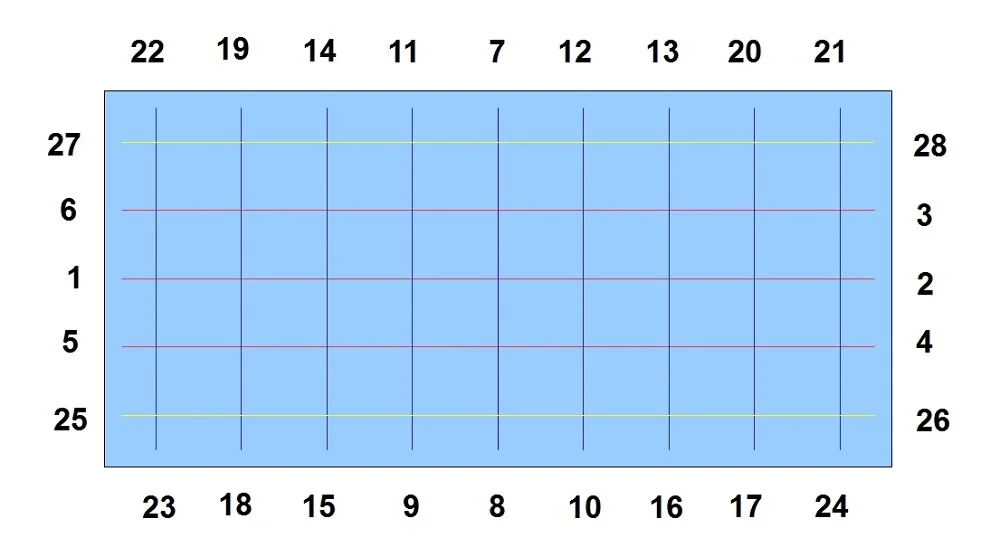
On an average sized swimming pool you will need to mark and measure somewhere between 25 and 50 points around the pool. These points should be marked with something temporary like tape, or preferably chalk, and you will measure to each one of these points from both the A and the B reference points. The amount of points you measure around your pool, and the location of these points will depend on the shape of your pool.
Much like with a simple connect-the-dots drawing you will be providing "dots" to the cover manufacturer. If there is an area on your pool with tight radius bends or uncommon shapes simply add more points around these areas to reduce the likelihood of errors in the measurements. Long straight wall sections can have less plot points than curves and radius bends.
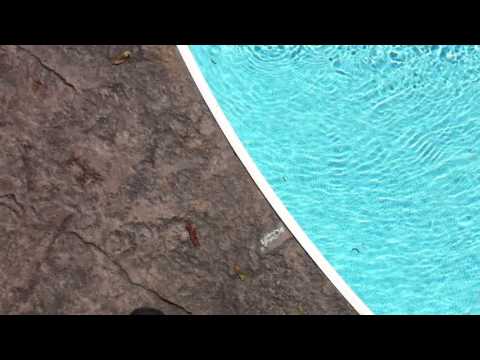
Below are two more video walkarounds of freeform pools with the A - B grid points marked out with chalk
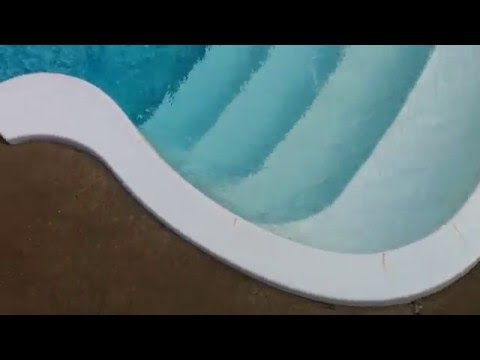

As you can see with three examples above there is little mystery in how to plot the points around a pool. The biggest challenge is choosing the location for the A and B reference points - and actually getting the tape measurers to stay where you want them. The spot of choice to put the reference points is in the grass adjacent to the pool if there is any. Simply slide a long screwdriver through the zero end of the tape measurer and push firmly into the ground. Use the first tape measurer installed to stretch out to find the exact location of the second reference point (minimum of 10' away ideally). Securing the reference points to a wooden deck is fairly easy as a discretely placed screw for each tape measurer will not leave any noticeable permanent marks. If your entire deck area is concrete you need to try to work with any grass, garden or soil areas that are close to the pool in addition to cracks or expansion joints in the concrete where you might be able to put a screw or nail.
The A and B fixed points of reference must be securely attached and remain exactly in position - moving less than 1/4" during the entire measuring process. If the reference points move then you must start the measuring process over again.

In order to measure an A & B grid for a pool cover you will require two 100' long tape measurers like this one. This style is reliable and easy to use for the purpose. You must use two tape measurers as the measurements for both reference points must be taken at the same time (with accuracy greater than 1/4") so it is not likely you could effectively measure a pool cover with only one tape measurer. Steel tape measurers of any kind are not suitable for this task and the same goes for shorter tape measurers - if you want to install your safety cover yourself then relegate yourself two owning two 100' long flexible tape measurers.
Taking The Measurements For A Safety Cover
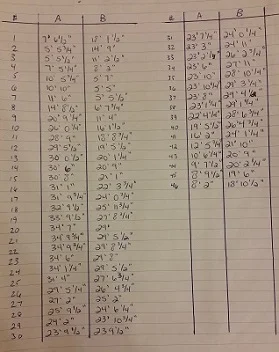
Now that you have marked plot points all of the way around your pool and have attached two 100' tape measurers to reference points A and B you are ready to start
writing down numbers. You can download a measurement sheet from any manufacturer on their website - some are easy to follow and others appear very convoluted. Here
is an example of an A - B sheet for Safety Covers From Latham
In addition to writing down the A and B measurements you will need to also draw a basic sketch of the pool. This will help for you to make some basic notes and do
some labeling to areas of the pool that will help the manufacturer to understand fully what they need to do to make a perfect fitting cover. The sketch does not need
to be fancy in any way - just draw the shape large and clear so that you can write in reference points. In total you need to write in:
1) Points 1, 10, 20, 30, 40, & 50
2) The location of A and B relative to the pool
3) The exact distance between A and B (between 10 and 20' ideally)
4) The location of any exclusions (steps, slides, diving boards)
Exclusions - Exclusions are any alterations that the cover needs that are specific to your pool such as a diving board base or slide legs within 24" of the pool
wall. In-wall steps are also an exclusion that needs to be measured also but these are included with the regular perimeter measurements. If you have an exclusion such
as slide legs then simply take an A and B measurement to the front, center of each and draw these points in on your sketch. The same goes for a waterfall exclusion -
simply draw it on the sketch and take additional measurements to this face of the waterfall. If the waterfall face is uneven simply put your points closer together
and give the manufacturer extra measurements.
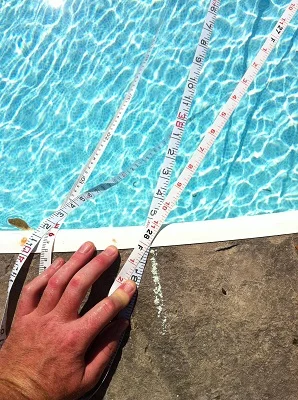
Accuracy is very important with these measurements, to within 1/4" so be sure to take your time and measure carefully. Be sure your tape measurer does not get hung up
or twisted and be sure your fixed A and B points will not move when you pull on the tape measurer.
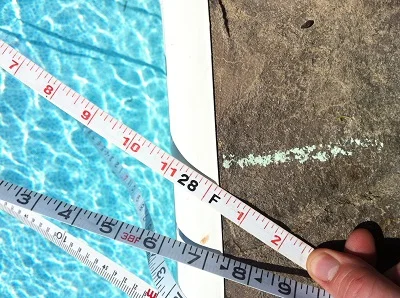
In the adjacent picture the measurement would be read as 27' 11" just so long as you read all of the measurements in the same fashion.
There is a small amount of judgment call needed in measuring these plot points but if you measure to the edge of the pool and measure each mark the same way you
should be fine.
Once you have completed the A and B measurements you need to take a few more individual measurements to give the manufacturer the ability to cross check their
dimensions once they have entered your plot points into the CAD program. In addition to 5 or so cross dimensions you should also try to provide overall length and
overall width of each section of the pool.
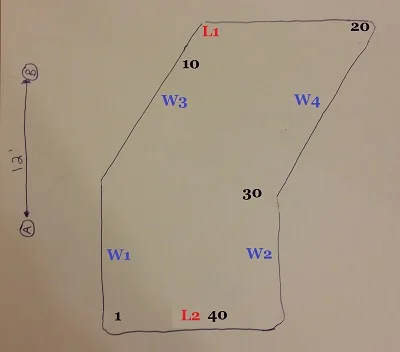
These cross-reference measurements are not done with A and B - just measure the distance directly between these points on the pool and include these in the order sheet
that you supply to the manufacturer.
Example:
1 - 10 = 33' 2 1/4"
1 - 20 = 35' 5"
1 - 30 = 17' 5 3/4"
1 - 40 = 9'9"
W1 - W2 = 18' 0 1/2"
W3 - W4 = 17' 11 3/4"
L1 - L2 = 36' 6"
These handwritten safety cover measurements are just an illustration to show you that measuring for a pool
safety cover doesn't need to be complicated. The cross reference measurements that you take need to essentially measure the overall length and the overall width of
the pool - you can choose whichever plot points to measure between to get these reference points.
It is important to take note of any permanent obstructions that are on the deck of the pool as you will have to note these in the sketch of the pool as well as take A
and B measurements to these obstructions. If there is a 6' long waterfall with an uneven face you would mark 6 - 12 plot points on the face of the waterfall and take
A and B measurements to these points. Mark these down as W1 through W12 and take a few pictures of the face of the waterfall in case the manufacturer requests more
information. In addition to taking A and B measurements you should also take a few linear measurements of the waterfall such as the total width and total length. Too
much information is better than not enough when it comes to custom fitting a safety cover to your pool.
Options For Safety Covers
Safety covers have a lot of options that you can order them with depending on your budget and the requirements of your pool. It is very important that you are able to
determine the correct hardware and the correct construction for your cover so that it covers your pool safely. The following list of options are all available from
most safety cover manufacturers:
Cover thickness - As detailed above most safety cover manufacturers will have a thin mesh, a thicker mesh and at least one version of a solid safety cover.
Grid size - Grid size refers to the size of the cover grid panels which is usually 3' and 5' (roughly). A 5' grid safety cover will have less straps (and less
holes in the deck) than a 3' grid safety cover. A 5' grid cover would cost a little less money than a 3' grid cover however the larger panel sections can allow for a
little more sag in the cover. Most custom covers will require a 3' grid spacing, without an option for 5', but simple shapes like rectangles will have the choice
between the two.
Deck installation hardware - If you have a concrete deck you will need to order the cover with concrete anchors. If you have interlock, pavers, patio stones or
natural stones you will need paver stakes (which are quite a bit more money than concrete anchors). A wood deck requires wood deck anchors. Grass or garden areas
need to order lawn tubes. Use your pool plot points to indicate differences in deck medium (points 17-24 lawn tubes, 35-40 interlock stakes etc.)
Pool steps - If you have a set of pool steps there will be a small upcharge for an extra flap to cover this area also. Simply measure around the stairs as part
of the perimeter plot of the pool measurement and include the shape and orientation on your sketch of the pool.
Reduced deck mounting - Usually 3' of deck area around the pool is required to install a cover. If there is less than this amount then you can order the cover
with additional straps installed that lets you drill the grommet right at the edge of the cover instead of 12-24" past the edge of the cover. Itemize limited deck
space on your pool sketch and note it referencing the A - B plots (points 12-20 require reduce deck mount straps).
Padding - There are two types of padding available on safety covers. If you have a waterfall where a cutout will be you can add padding to the cutout that is
similar to a pool noodle sewn into the edge. This padding helps to achieve coverage of random shaped waterfalls and prevent unsightly and potentially dangerous gaps
at these locations. The other type of padding is a rub pad on the underside of the cover that can be sewn in to prevent damage from rubbing. These are important to
have in any place where there is a sharp edge on the pool deck. Corners of steps, sharp interior radius and pool decks and coping with sharp stone edges should all be
protected with underside padding.
Waterfalls - If you need a cutout for a waterfall or diving rocks this will usually also require you to drill into the face of the waterfall and attach anchors
- which can be challenging. Some manufacturers have a cable system using aircraft cable while others use heavy duty hook and eye anchors. Taking a few pictures of
your waterfall will go a long way in helping the manufacturer determine how to make your cover in these areas.
Tools Needed For Installing Pool Safety Covers
If you are installing your own pool cover you will require some construction tools. Having the right tool to do the job is very important as this will ensure a
quality, safe, installation of your cover. The tools needed for installing into wood decks are the least expensive and lightest duty followed by concrete pool decks
next. Installing into interlock or paving stones requires fairly heavy duty equipment by comparison to the other two.

Brass concrete anchors, which are the standard for installing into concrete pool decks of all kinds, require a 3/4" masonry drill bit from almost all manufacturers. While the hole itself will only be drilled just over 2" deep, buying a longer drill bit can help your back out as you will be drilling between 25 - 50 holes into concrete.

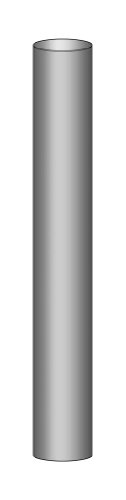
Interlock and paving stone decks are either set on compacted screenings or onto concrete. This drill bit is a 1" SDS Max Shaft

This is a SDS Plus Hammer Drill

This is a hammer drill with the larger SDS Max
While this information is for reference you may find it more cost effective to rent the tools that you need to install your safety cover from your local hardware store. Many will also have drill bits for rent as well making this a good option if available to you. If you have to buy the drill to install the cover then at least the cover is still going to cost less than having a professional install it - plus you get to keep the new drill!
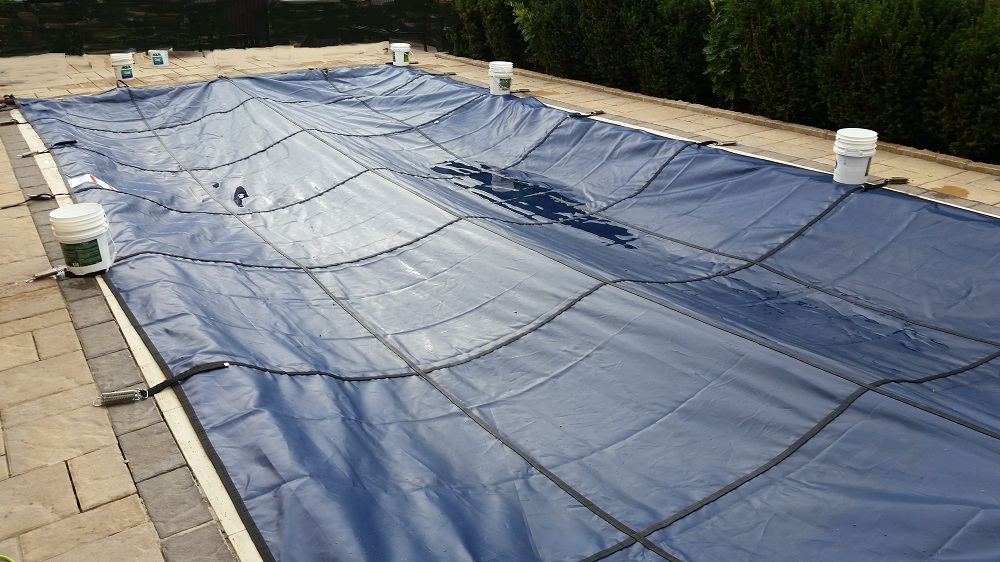
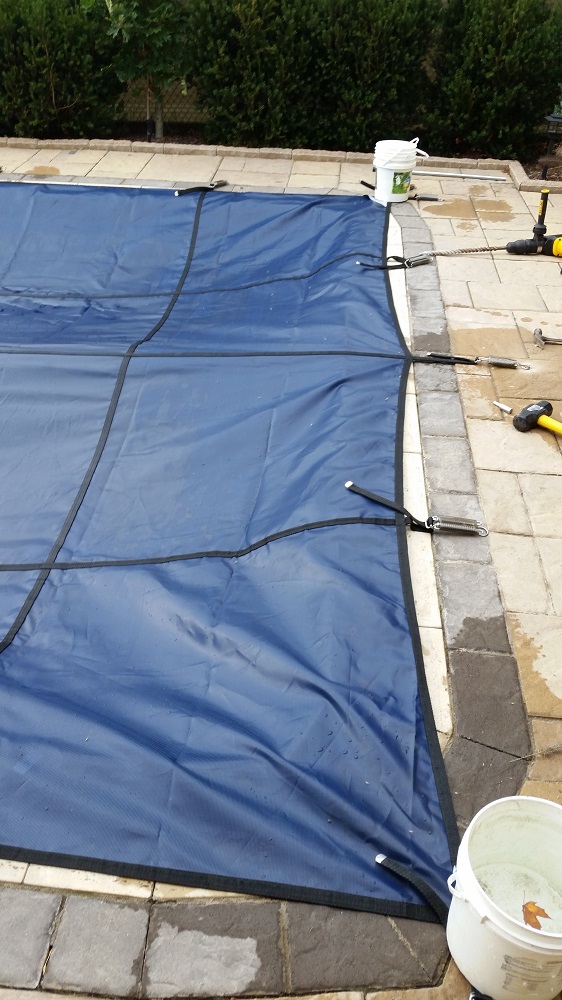
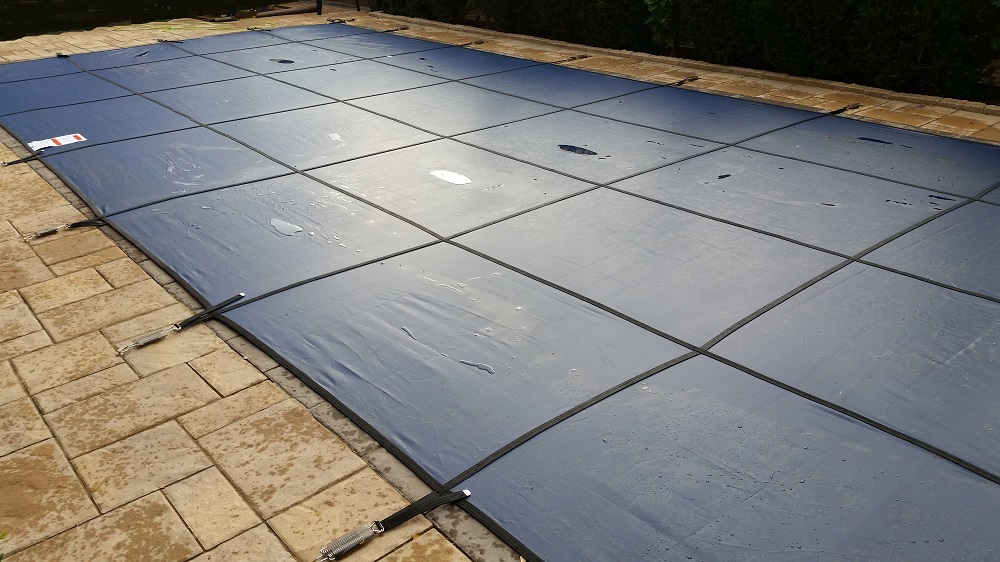
Installing A Swimming Pool Safety Cover
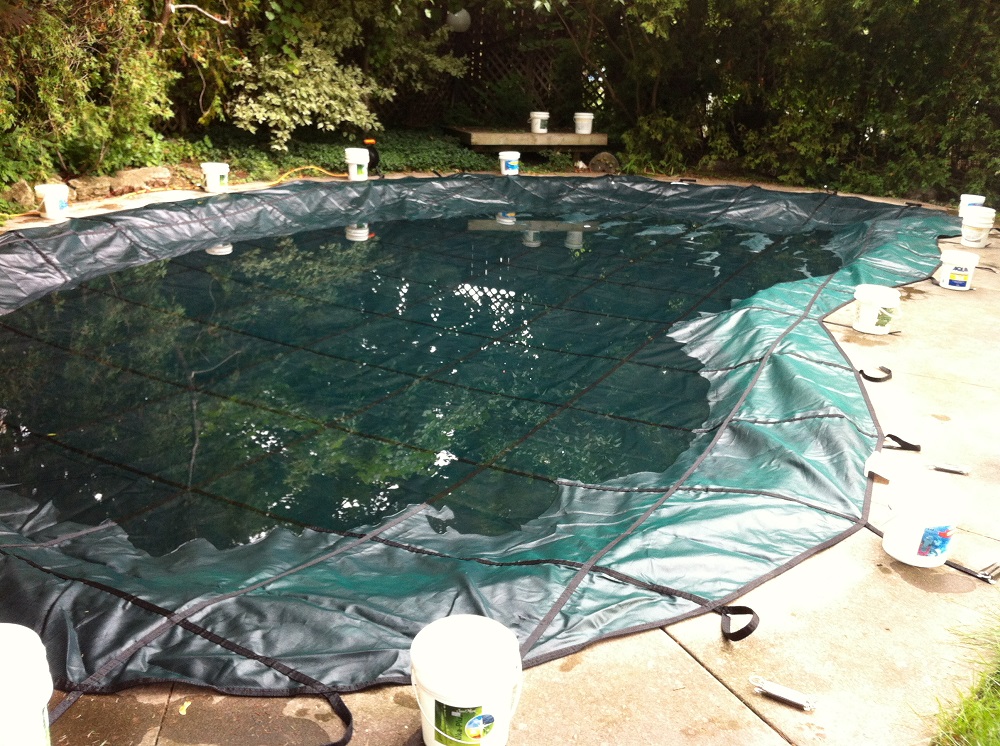
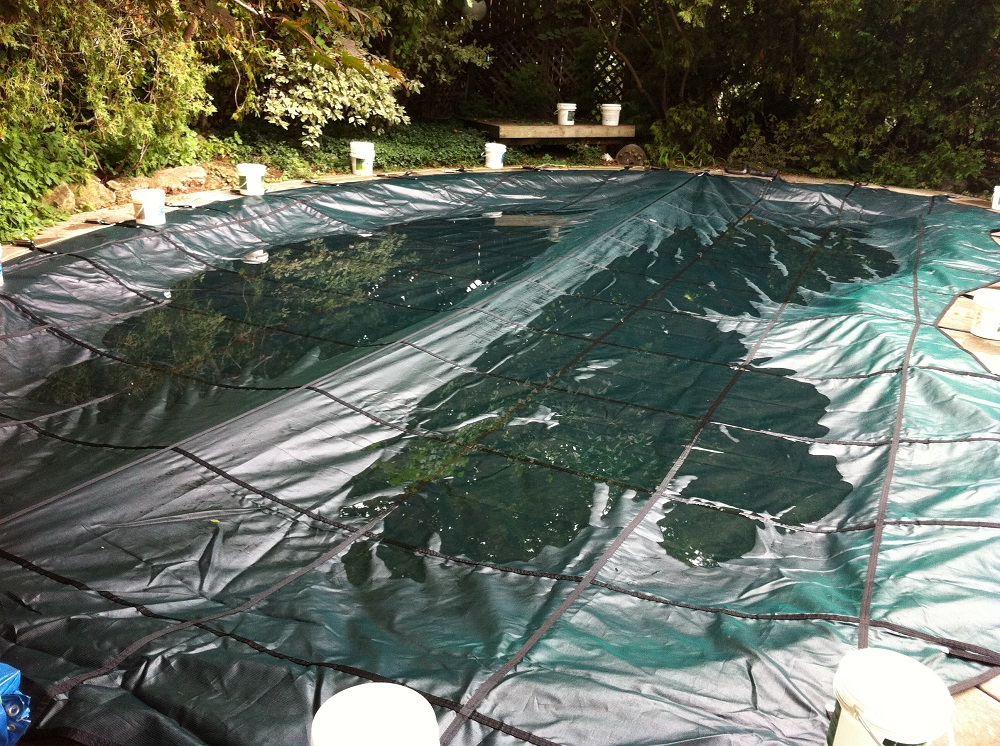
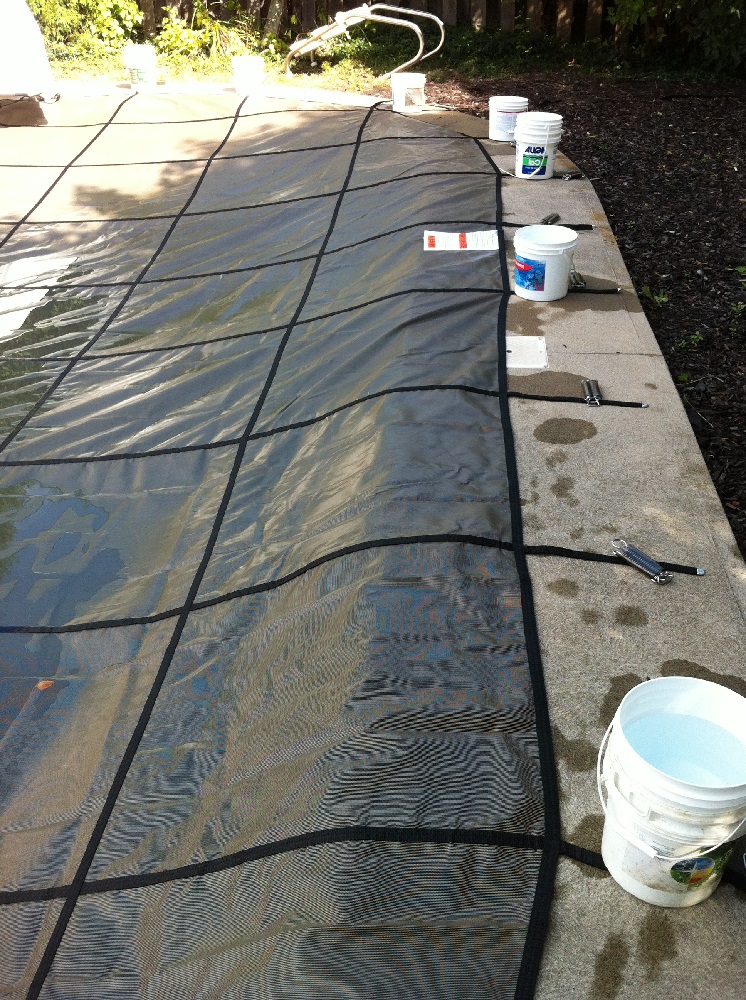
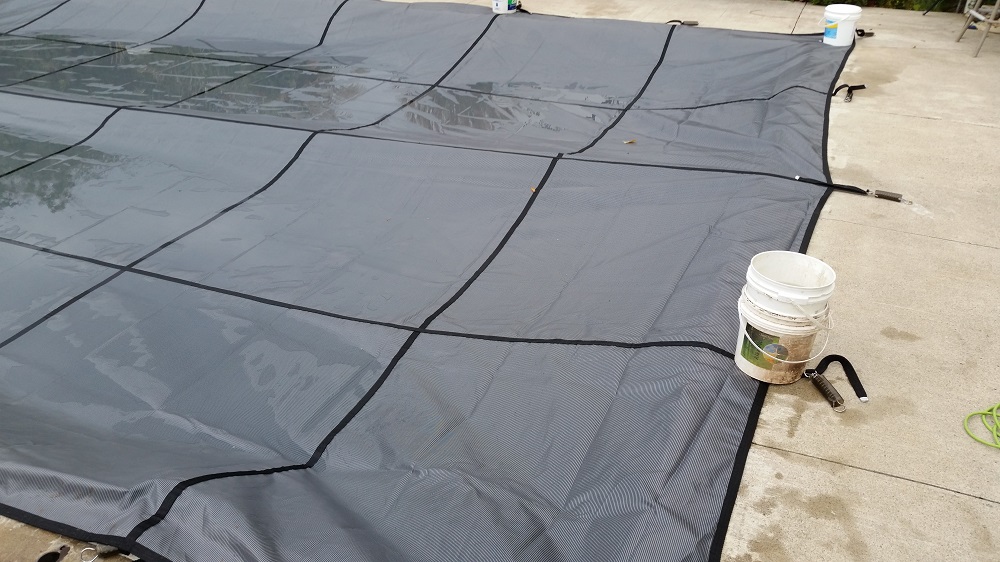
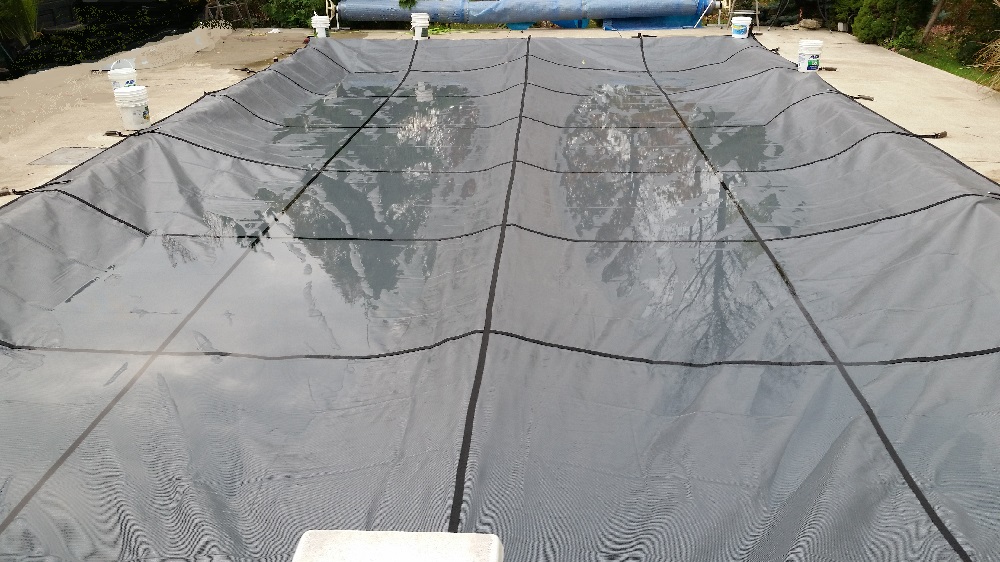
When it comes time to install the cover there is surprisingly little magic involved. The process starts with laying the pool cover over the pool and holding it in
place with buckets filled with water. You will need anywhere from 12 - 24 buckets in total. The cover will have the tendency to float on top of the water and you use
the weighted buckets to sit on the straps which will allow you to stretch the cover out in every direction.
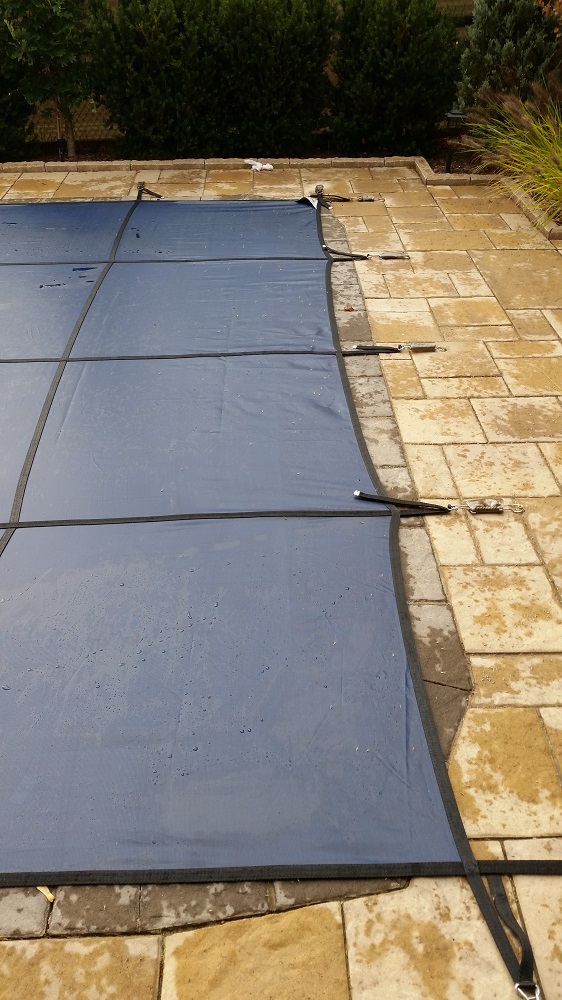
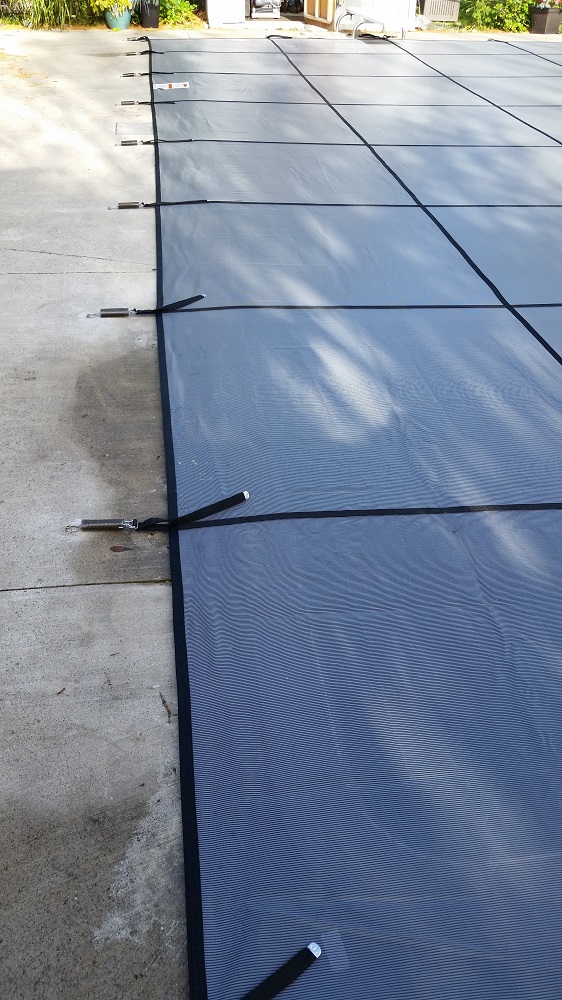
This process of laying out the cover is one of the very most important parts of the cover installation. The very first two holes that you drill will dictate the final
orientation of the cover and the better you stretch the cover into place, the less guesswork involved with drilling those first two holes.


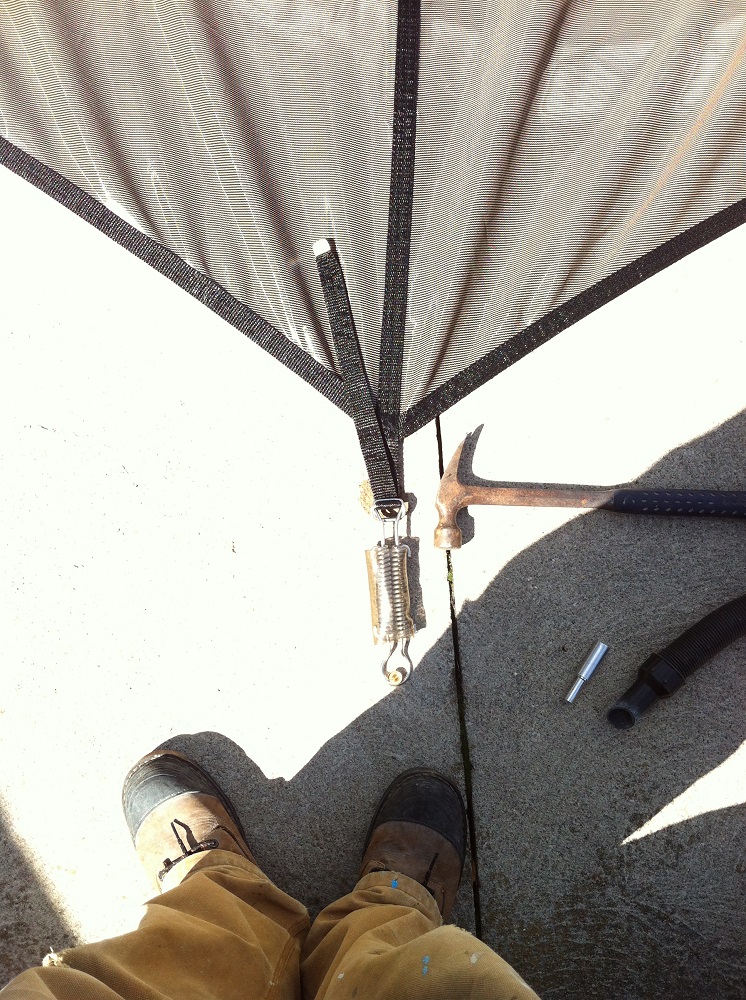
As a starting point leave about 6" to 8" of strap before the spring as this will give you some room to adjust the spring tighter or looser as needed. With the spring connected to the strap you want to drill the first two holes 12" away from the end of the spring, possibly even more, to allow for all of the slack hanging down onto the pool surface. After the cover has less slack on it you can drill the holes closer to 6" to 8" from the end of the springs for the remaining holes you drill. Once you have drilled these first two holes there is only a small amount of adjusting of the cover you will be able to do - take your time here to get the best orientation possible!
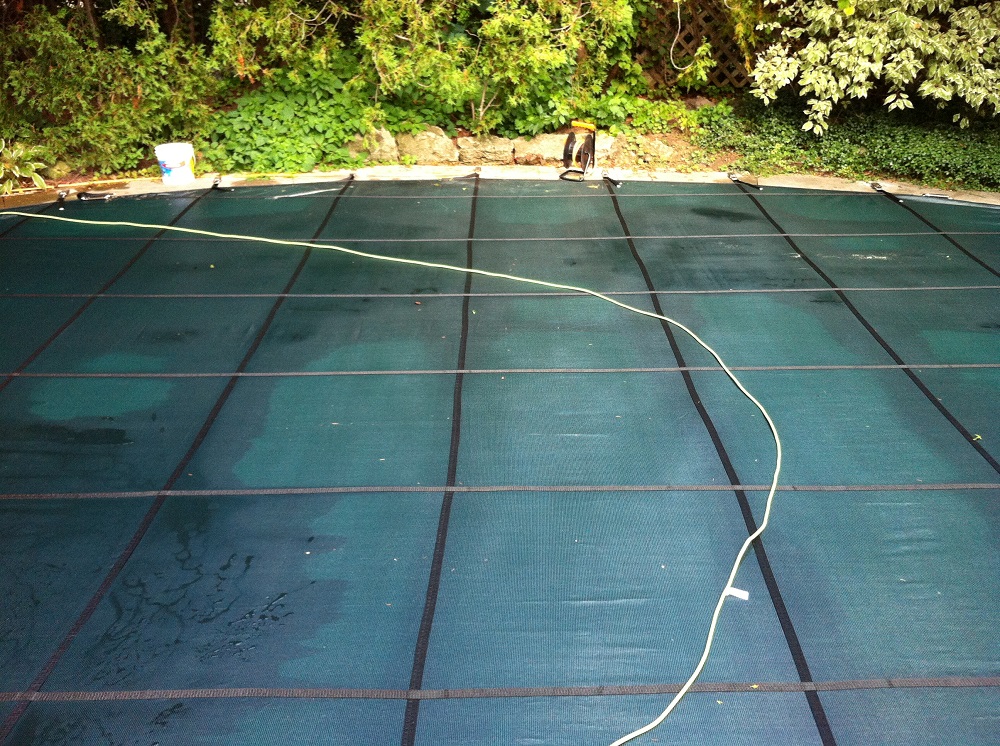
After the first long strap is installed you will then drill the long strap holes on either side of this middle strap. By continuing to alternate back and forth like this you will always be working the cover installation towards the corners. Once you have the main lengthwise straps installed (between 3 to 5 straps - 6 to 10 holes total) you need to switch to the widthwise straps starting with the center of the pool and working outwards from there. Similar to the first lengthwise straps you want to alternate sides on the pool as you drill the holes and connect the cover.
You should only ever drill a hole after the strap next to it has been connected - if you drill too many holes without alternating sides of the pool the cover may end up with a wrinkle that you will not be able to lose
Regardless of the shape of the pool this is the general process that you should follow when drilling the holes for the safety cover. The only time that you would vary from this method would be to compensate for an exclusion of some kind such as slide leg cutouts or a waterfall cutout. Since a cutout can really only go in one spot and even a few inches one way or another may cause a permanent wrinkle in the cover you might benefit from starting from these fixed locations if your pool has these.


When installing into an interlock or paving stone deck ideally you want to install the stakes into the joint sections where the stones meet. While you can install directly through interlock stones there is a chance the stone will crack. If the interlock stake enters the ground at even a slight angle this can put pressure on the side of the stone and chipping or cracking can happen. When installing into grout joints it is likely that there may be some movement in the brick which can break the grout joint as pictured. This would be considered normal for installing into an interlock deck and re-sanding will minimize the look of the shifted stone.


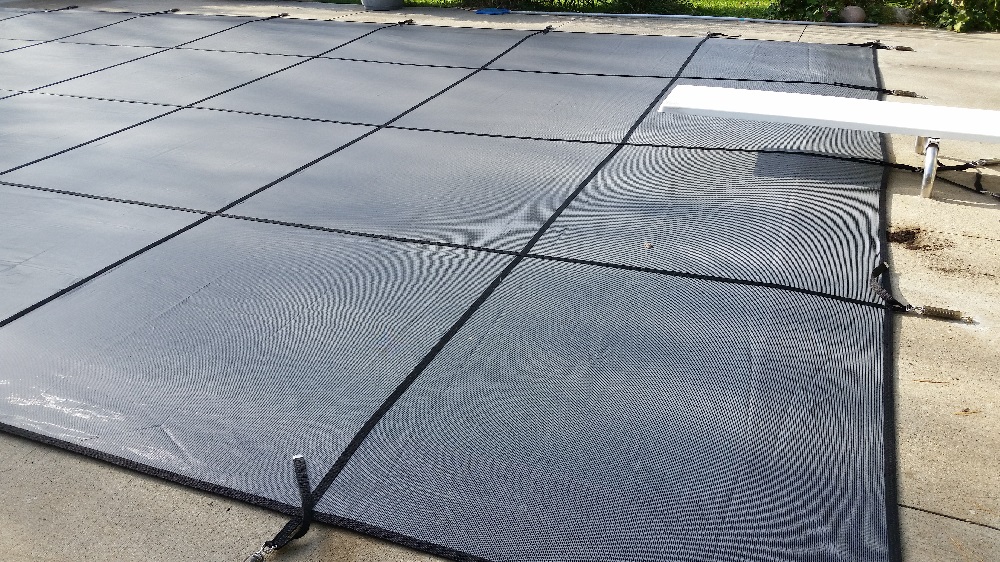
A "Y" strap allows you to install a spring and grommet on either side of the diving board instead of a single one under where the diving board is. This quick and easy workaround simply requires one more grommet and spring than a regular cover - plus the addition of a D-link or connector and a fabric strap.
Buy A Pool Safety Cover Online
These covers come including brass grommet inserts for installation into concrete pool decks of all kinds, a hex key grommet tool, a cover storage bag, the
installation bar and heavy duty stainless steel springs with plastic sleeves. If you are installing into interlock or paving stone decks you will need to order
paving stone & interlock stainless steel or aluminum grommet stakes.

If you have a rectangle pool without steps then this is a great cover option available to order online. These covers are available in blue and green in color.
14x28' Safety Cover
15x30' Safety Cover
16x32' Safety Cover
18x36' Safety Cover
20x40' Safety Cover
If you are installing your cover into a paving stone, natural stone or interlock stone deck then you will need to purchase these interlock stake tubes that will drive down into the ground and prevent the force force from the cover from lifting the stones. These are 18" long and come in a package of 3 - and you will need an anchor for every strap that your pool cover has.

For pool safety cover installations into lawn, grass, garden or dirt decks then you will require these Aluminum Lawn Stakes

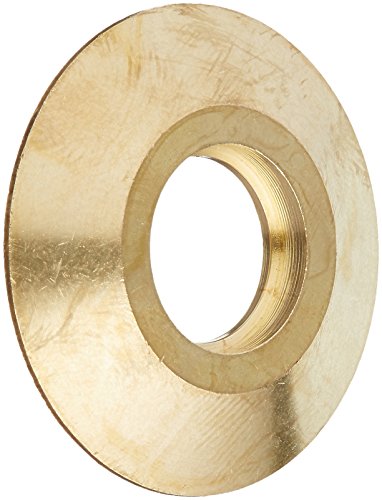
This is a package of 10 replacement brass Anchors for Pool Safety Covers
After you drill the concrete grommet anchors into the deck you need to tamp the anchor into place. Since the anchors are made from brass you can not hit them directly with a hammer as you will crack them or cause them to become misshapen. This Pool Safety Cover Anchor Tamping Tool

For installing a safety cover on a pool with a wooden deck you will require these Wood Deck Anchors For Pool Safety Covers
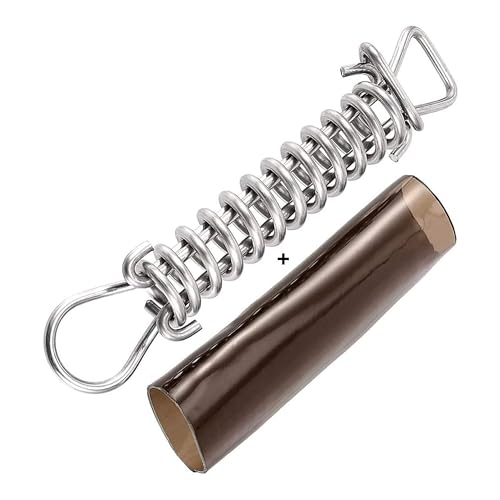
If you need to order replacement springs for your pool this is a 5 Pack Of Safety Cover Springs
Some brand of swimming pool safety covers do not require buckles in order to connect the spring to the cover however many do. These are replacement Stainless Steel Buckles
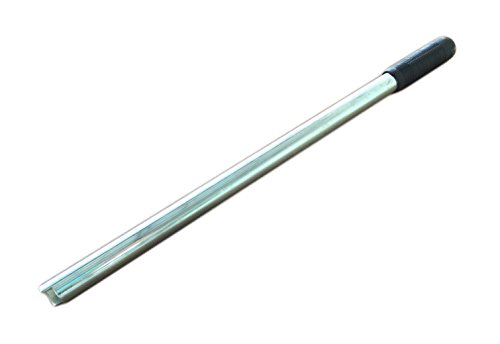
Putting the cover on and taking it off the pool requires the use of this leverage bar with a notched end. This allows you to put the cover springs under tension without risking any of your fingers in the process. If you have lost your install bar then order another - you can't properly install the cover without one.

One of the first things to get lost or fail and require replacement are the Spring Cover Shields

For raising and lowering the grommet heads you will need a Safety Cover Hex Key
It is very common for the grommet to cause chipping, scarring or cracking to the deck area immediately surrounding the head of the grommet. The skill of the installer, the age of the concrete and the age of the drill bit all will be contributing factors to chipping. If your pool deck has a problem with this, or if you just want to make sure you pool cover looks as good as possible then consider adding these Safety Cover Anchor Collars
Top content from www.SwimmingPoolSteve.com
Pool and spa chemistry crash course
New pool owner guide
The Swimming Pool Steve blog
Have a question - ask Steve

Swimming Pool Steve is an award winning, second generation swimming pool specialist from Ontario Canada and one of the most trusted voices in the swimming pool industry. With over 20,000,000 views on the Swimming Pool Steve YouTube Channel, winner of the Pleatco Pool & Spa Industry Leadership award and author of hundreds of pool and spa articles both online and in print. Steve is committed to helping pool and spa owners as well as pool and spa industry workers learn more about the technical side of building, renovating, repairing and maintaining all types of swimming pools and spas. Follow Swimming Pool Steve on Facebook, Twitter and YouTube.
Paid PDF Books From Swimming Pool Steve
 Steve's Pool Survival Guide
The Swimming Pool Steve Pool Survival Guide is intended to help pool owners understand their pool and pool equipment better, understand water chemistry, water testing and chemical corrections to the water, troubleshoot the most common pool problems and have confidence in interacting and caring for their pool in the fastest possible frame of time. Also covers pool safety, things to avoid and how to operate your pool more efficiently.
 Salt Water Recommendations
Are you considering upgrading to salt water in your pool? In this paid PDF Steve talks about which pools should avoid using salt water. Find out concerns about using salt in your pool but also the potential benefits of salt water. Finally hear which specific brand and model of salt chlorine generator Steve thinks is the best option currently available to pool owners and how to choose the right size salt system for your pool.
 New Pool Heater Buyer's Guide
In this guide Swimming Pool Steve will help you to better understand your heater options as well as which would be best suited for your pool. Learn about BTU output and sizing of both gas/propane heaters as well as electric heat pumps for residential swimming pools. You will also learn about which specific brands and models of currently available pool heaters Steve likes to recommend. If you are thinking of adding a new pool heater to your equipment pad this buyer's guide would be a useful resource to help you make a more informed buying decision.
 New Pool Installation Value Guide
This is a value shopping guide written by Swimming Pool Steve to help home owners hiring for a new pool installation to get the maximum value for their investment with tips about how to protect your interests during the vetting, hiring and pool installation process. Anyone serious about having a pool installed will find value in this guide. Pool installers will sell the pool package that is best for them - not for you! Become an informed value shopper with this PDF guide.
Endorsed Brands From Swimming Pool Steve
The following links and products are to affiliates of the Swimming Pool Steve website. These are brands, products and services hand selected by Steve for endorsement. Please note that these endorsements can include monetary compensation, affiliate links and referral fees to Swimming Pool Steve, however there is zero additional cost to you should you use one of these products or services. Income generated from these links helps to keep this pool and spa resource available for everyone. To have your product or service considered for listing here as an endorsed brand email SwimmingPoolSteve@gmail.com.
Amazon Disclosure Statement - As an Amazon Associate I earn from qualifying purchases.

www.PoolPartsToGo.com
New Black + Decker variable speed pumps are available online from www.PoolPartsToGo.com and they are a drop in replacement for many popular pump models including Pentair Superflo and Hayward Super Pumps. With an adjustable platform base, union connections included and a very strong warranty these pumps offer an impressive value to pool owners.
- Swimming Pool Steve