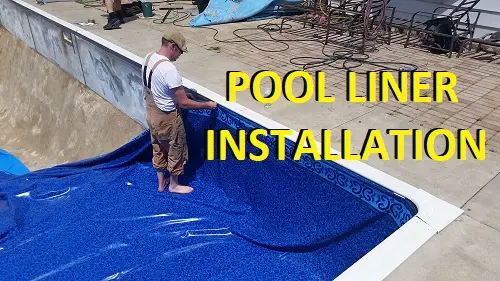
How To Install A Pool Liner
SwimmingPoolSteve.com is user-supported. In order to keep this resource about pools and spas available for free to all readers I earn commissions for purchases made through links on this page. For more information see the full disclaimer page. By using this website you are agreeing to the terms and conditions.
Installing a vinyl pool liner is something that is easier than you might expect - assuming you knew the process to use. While any liner renovation project has the
potential to go sideways, in the way that a problem can be encountered that is unforeseen, most vinyl pool liners install quickly and easily.
Large pool companies will have liner installation crews of two people who will install a minimum of two new liners every day. To take on a liner replacement project
yourself is actually a very realistic plan, and financially rewarding, assuming that you have some basic construction skills and familiarity with basic hand and power
tools. While there is no replacement for years of field experience, if you are determined to change your liner one way or another then this guide will be extremely
valuable to the successful completion of your goal.
As a pool technician who currently installs over 100 vinyl liners per year, with over 25 years of experience in the field, I am certain you will find some valuable
information contained in this detailed walkthrough of "how to install a pool liner".

How To Install A Vinyl Pool Liner - Expert Tips From Over 1000 Liner Installations
Will this guide help me to install a liner in my own pool?
Installing a new vinyl liner in a pool is something that an intrepid pool owner can take on as a do-it-yourself project. Installing the liner is actually quite easy in
terms of a DIY project especially considering how much money you can save over the course of what can be considered to be one weekend of work in the backyard. The
potential for these savings is very alluring to some pool owners however be cautioned that if you install the liner incorrectly you may find yourself back in the
position you are in now - needing a new liner. If you have decided to install your own liner then this guide will serve to highlight some of the major areas of
concern that you might encounter along the way. Having this first hand account of commonly encountered issues, in chronological order, will be a huge advantage in
making your DIY liner installation successful.
How hard is it to install a pool liner?
Being a commercial vinyl pool liner installer is a more difficult process than installing a single liner since you are required to have knowledge outside of what it
takes to install the liner itself, and are held accountable for each liner installation to be cosmetically perfect. Some liners are more difficult than others to
install and this is a very important factor that you must consider. You need to identify how complicated your liner installation will be and weigh this versus your
technical ability to decide if you should try to install the liner or hire a professional to do it. The vast majority of inground vinyl liner pools are fairly
straight forward and can easily be taken on as a DIY liner replacement project.
Installing two or three liners per day without any wrinkles or problems requires years of experience in the trade. Installing a single liner, in your own pool, for the
expressed benefit of saving thousands of dollars is fairly easy by comparison. While there is of course problems that you could encounter, many of them are only
cosmetic such as wrinkles in liner, and many pool owners looking to save money would gladly trade a thousand dollars for a few innocuous wrinkles on the floor. If
measured and installed properly you will not have wrinkles, which is of course ideal, and this guide will help you to accomplish this - but if you were to encounter a
problem installing your own liner, a wrinkle, or wrinkles, will be the most common problem.
What can make a liner installation more complicated?
In order to identify how difficult your liner will be to install consider that a basic pool liner will be symmetrical in shape, one constant depth throughout, and have
one skimmer and one return faceplate. This would be common for aboveground pools, onground pools and very basic inground vinyl pools. Symmetrical pools such as
square, rectangle, oval, round and octagon shapes are generally easier than asymmetrical and freeform shapes. Measuring a symmetrical pool is a linear process and hard
to get wrong. Measuring a freeform pool requires a more difficult measuring process with a greater potential for errors in measurement values. Additionally the more
peripheral devices that your pool has the more potential for problems you can encounter. In order from the least difficult to the most difficult to deal with are:
1) additional returns
2) second skimmer
3) single main drain
4) in-wall lights
5) dual main drains
6) in-wall steps (shallow end)
7) in-wall steps (deep end)
8) large / difficult to negotiate waterfalls
To provide some context to these items anything up to and including number six can be completed without the assistance of an expert. If you have a set of in-wall
stairs in the deep end of your pool, or if you have a large waterfall that will make it very difficult to measure or reach the liner you may want to consider
consulting a professional for your liner installation.
Materials needed to install a typical vinyl pool liner
30mil vinyl liner (20mil for aboveground pools)
25 wooden clothes pegs separated, spring removed (optional)
2 full rolls standard duct tape
1 can of WD-40 or penetrating oil
New skimmer gasket & faceplate
New returns gasket & faceplate
If walls require repair you may need:
1 can galvanized steel rust paint
1 can galvanized steel primer
If floor repairs are required you may need:
Fine washed sand
Vermiculite or zonolite
Type 10 / type 1 portland cement
Where to buy pool liners, faceplates and gaskets?
The liner, skimmer and return faceplates and gaskets could be purchased from a local pool supply store as they can help you to make sure that you get the right parts
to fit your pool. You can take either a digital picture or the actual old faceplates with you to the pool store to help you find the right replacement parts.
If you are confident that you can find what you need online you can likely
purchase it there for less than from the local supplier. There is an advantage to dealing with local suppliers even if the price is higher for some people as they can
be a helpful resource for your project - as well as be available should you encounter a problem during the installation like discovering the liner is damaged or is not
the one that you ordered. In these situations a local supplier should be able to get maximum results for you where as an online store can be more difficult to escalate
issues with your order. If you are not sure how to proceed then email Steve with your questions.
Tools needed for installing a pool liner
Razor knife or exacto blade
Phillips screwdrivers (#2 and #3 sizes)
Standard screwdriver
100' tape measurer (2 for freeform pools)
Large wet/dry shop vacuum (2 for large pools) or a liner vacuum
How To Measure A Pool Liner
 The first step you will need to take to start the liner replacement process is to measure your pool for
a new liner which will be manufactured and shipped to you. This manufacturing process can take as
little as one or two weeks in the off season or as much as six to eight weeks or more during the spring and late summer season. Measuring the liner involves following
a template supplied by the company that you order your liner from. The liner measurement template will be specific to the shape of your pool and will take into account
length, width, orientation and corner radius as well as a profile of the slopes, floors, wall height and depth.
The first step you will need to take to start the liner replacement process is to measure your pool for
a new liner which will be manufactured and shipped to you. This manufacturing process can take as
little as one or two weeks in the off season or as much as six to eight weeks or more during the spring and late summer season. Measuring the liner involves following
a template supplied by the company that you order your liner from. The liner measurement template will be specific to the shape of your pool and will take into account
length, width, orientation and corner radius as well as a profile of the slopes, floors, wall height and depth.
The liner manufacturer you use will answer questions that you have about how to correctly use the liner measurement sheet that they will provide for you. All you will
need to do is tell them the shape of your pool, or email a picture detailing the overall shape and corner dimensions so they can determine which measurement sheet you
need. Some liners are made by hand and others use computer controlled processes which require a series of input measurements to make the liner. To make sure that you
measure your liner properly follow the liner measurement sheet provided by your supplier exactly.
Measuring the pool properly is key to having a wrinkle free install. Symmetrical pools, especially straight wall pools, are the easiest to measure as you simple
measure each linear wall or floor surface. Measuring any other shape of pool will require you to use an A-B plot using two separate tape measurers which is a process
with much more room for error.
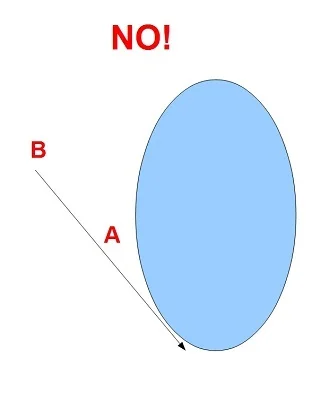
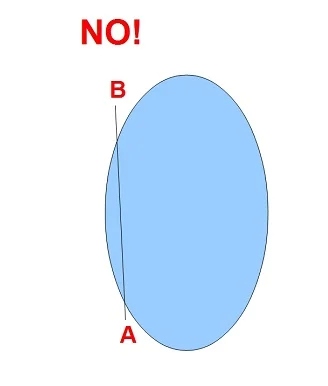
How to measure with an A-B plot
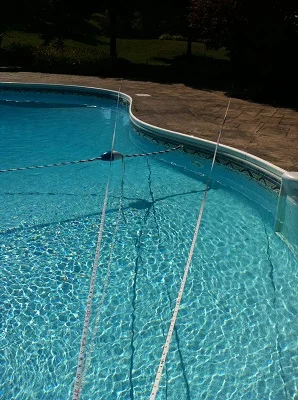
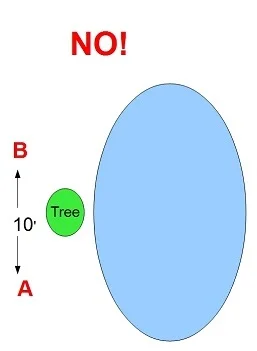
Put a nail or stake in the ground at two points mid-way along the long side of your pool exactly ten feet apart and at least three feet from the edge of the pool. Now mark around the perimeter of your pool deck with chalk every two feet in straight wall sections and tighter together in areas where you need to follow the contour of the pool.
You are playing a giant game of connect the dots with your pool and the marks that you have will be the dots that get connected together. With that in mind be sure that any point of significance in the contour of the pool has a mark on it and a mark within a few inches on either side. This will give your liner manufacturer more than enough information to render your pool shape with computer software.
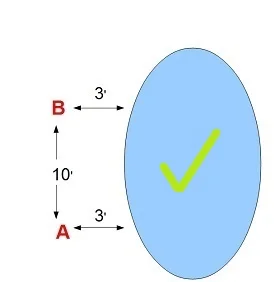
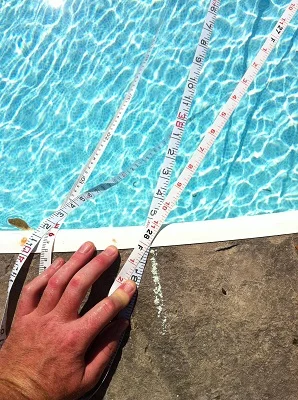
The process is to simply measure every point that you marked on the pool deck with both tape measurers that are ten feet apart with one tape denoted as "A" and the other as "B". Be sure that you also include marks on the plot that show the liner manufacturer what is happening on the bottom of the pool floor.
For example you would have one point on the plot where the shallow end break (slope) starts and the shallow end pad ends. Another mark will be where the deep end pad starts. From these two marks on your plot they will be able to determine the exact orientation, length and slope of the long slope in your pool. You will also need to include on your plot points the side slopes and the back slope of the pool.
Common Measurements That Pool Liners Need
If your pool is symmetrical and made up entirely of straight walls then you can likely measure the liner with a single taper measurer. Like in the case of a rectangle
pool simple measure the length of each of the four wall segments, then measure width wise and lengthwise in three places to determine if the walls are parallel or not.
Finally a corner to corner measurement to get the square. In most cases however measuring the liner will not be this easy. Only a handful of liner shapes can be
measured this way - most will require a more in-depth measurement process called an A-B plot.
While the shapes change the goal remains the same when measuring the liner. You are essentially trying to measure a giant, three dimensional bowl, and in order to do
so you will need to establish certain key points in the pool that your liner manufacturer will need to be able to create a liner that fits.
Perimeter - As part of your measurements you will be required to provide a perimeter measurement of the top edge of the pool and this measurement will act as a
double check for the numbers that you supply to the liner manufacturer so take your time and be as exact as possible with the perimeter measurement of your pool.
Wall height - Measure the height of the wall in the shallow end in six to ten different places (from the floor to the coping track that retains the liner).
Record your wall height as the shortest of all of these measurements as the liner will stretch into place and any longer value will result in too much wall material
and ultimately a wrinkle in the finished product.
Overall depth - Make sure you measure from the floor of the deep end to the coping track. It can be easier to measure from the floor to the waterline and then
add the measurement from the waterline to the coping track. Take 2" off the total depth measurement of your pool to help make sure that you do not have wrinkles. A
small amount of stretch in the liner is actually helpful in this regard.
Square - Measure corner to corner in rectangle pools, diameter in round pools, or between any opposite points on your A-B plot to assist with square measurements
Shallow end breakpoint - The point at which the shallow end floor ceases to be flat and begins sloping towards the deep end hopper.
Deep end pad - The floor of the deep end of the pool.
Side slopes / Back slopes - If the pool has a deep end hopper the side slopes are the left and right floor section that goes from the bottom of the wall panels
to the deep end floor pad. The back slope is the slope on the back wall of the pool deep end.
Measuring the pool full versus empty
The two methods available to you to measure the pool are with the pool full and with the pool empty. In most cases the pool will be measured when mostly full as this
helps to protect the pool structure. Draining the pool, combined with the wrong set of circumstances, can cause severe damage to the pool so there is a tradeoff
between measuring the pool easier, versus a small potential risk of damage to the pool. Measuring the pool full is only marginally more difficult than empty.
All measurements in the pool should be taken as precisely as possible and rounded down where
applicable to avoid having too much liner. The only tricky measurements are the pool depth and slopes when you are measuring a pool full of water. Attach a key ring
with a few keys on it or something with weight to the zero end of the tape measurer. Have someone hold a pole over the middle of the pool by laying it on the deck and
standing on it while a second person throws the weighted end of the tape measurer over the pole. The person with the pole would stand along the side of the deep end
extending the pole over the water while a second person stands by the diving board and takes measurements. You will be able to situate the tape over the deepest part
of the pool and slowly let the weight pull the tape to the bottom of the pool. Once resting on the bottom you can measure the height to the current water level and
then in a separate measurement from the water level to the point where the liner hooks into the coping to give you your total depth in the deep end.
Remember that you are measuring to the pool coping track, not the height of the pool deck when you are measuring overall depth
Take as much time as you need to be certain you have accurate measurements for your pool liner. If your measurements are off then you could find yourself unhappy come
installation day. When you submit your measurements the liner manufacturer will confirm with you that they have been verified and the liner is in production and if any
of the measurements that you have given do not add up they will ask you to re-measure key points again.
Tips before installing a new liner
Installing a new vinyl liner is a great DIY project, but caution must be used to ensure that you do
not overlook something that will cause problems after the liner has been installed. For example if
you install a new vinyl liner you must first be sure that your coping is in good condition and will
last for at least as long as the new liner will. If you install a new liner now and the coping fails in a
few years you will likely need to replace the liner again as well as the coping. Once a liner is
installed you can not uninstall it for extensive repairs. All plumbing, structural, rust, coping and
deck issues must be dealt with prior to installing the liner.
Since you are not a pool expert you may not notice or recognize parts of your pool that will require
repair before a new liner installation. Consider inviting a few contractors to give you
estimates on how much it would cost to replace your vinyl liner as well as a list of their
recommendations for what the pool needs. This will give you a great idea of the condition of your
pool and any work that you should attend to before installing a new liner. You then also have a head start should you change your mind and decide to pay a professional
for this project instead of doing it yourself.
Consider having an expert inspect your pool
At the very least you need to have a physical inspection of your coping as well as a pressure test of
your plumbing system to make sure that your pool will last as long as your new liner. You could
also call a local contractor to inspect the pool after you remove the liner. A $100 service call to
ensure that you do a quality job installing your own liner can go a long way to ensuring that you
still end up saving money. Ideally you would have a pressure test done before you install the liner
and then a visual inspection of the empty pool with the liner removed. The pressure test is the most
likely item to fail an inspection as small leaks are common in aging pools. The coping would be the
next most likely potential problem however a physical inspection is easy enough to perform and
reliable enough to accurately determine if the coping is in good shape in most cases.
The installation of your liner needs to happen over a short period of time. There is risk involved
with having a swimming pool empty so you want to leave your pool empty for as short of a period
as possible while installing your new liner. Ideally you would begin the draining process on one
day, prepare and hang the liner the second day and complete the liner by cutting out the fittings and
shutting off the liner vacuum on the third day. This short timeline is critically important to adhere to if you have a compacted sand floor in your pool. Pool floors
are concrete, vermiculite or sand and it can be very difficult to differentiate between them even after you have removed the liner. Storms and heavy rainfall can
easily wash out the slopes in your pool so plan your project when good weather is in the long term forecast. In a state of emergency you can line the slopes of your
pool with poly plastic to try to limit the water damage.
Plan ahead and be prepared to complete your project in three days or so for optimum chances for a successful DIY project. If you have a sump pit adjacent to the pool
as many vinyl liner pools have then you would want to run the pump in the sump pit continuously throughout the duration of the liner replacement project. You can also
pick up pressure test plugs from your local pool supply store and pressure test the pool yourself if you are familiar with this type of plumbing work. Pressure testing
is fairly easy but can be potentially dangerous if you are not experienced with pressure testing so an expert might be a good, and relatively low cost alternative to
pressure testing yourself. Most of the cost is in fixing the leak should one be found so paying for a pressure test is not usually a large expense.
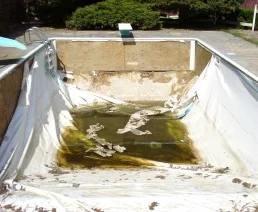
The Pool Liner Removal Process
Drain the pool with a submersible pump or gas powered pump. A garden hose submersible pump
will take three days to a week to empty a pool where as a submersible 2" pump will empty a pool in
one to two days. A gas powered pump with a 3" or 4" discharge can empty your pool in as little as
an hour but are difficult to get the bottom foot or two of water out. As you drain the pool use a garden hose to wash the walls and floor down. This small tip will
make a huge difference in how dirty and disgusting you will get in the next step especially if your pool is green and gross. Please note that ANY electrical equipment
used around a pool must be electrically GFI protected - no exceptions. Pools and electricity are not a good mix and the long slippery slopes are a recipe for disaster.
Do not take any chances and be sure to understand electrical safety when working around water.

With a vinyl liner pool you must maintain about six inches to one foot of water in the shallow end
to protect the deep end slopes from damage. The point at which you begin to drain the pool lower
than this the pool now has an elevated level of risk that it is being exposed to. Serious rain or water
can damage the pool structure so do not drain your pool lower than this until you are ready to
proceed with replacing the liner. Since there is a waiting period from the time you measure the pool until the time you can install the new liner, potentially the
pool could sit empty for a few weeks in the interim. For this reason it is preferable to measure the pool for a liner with still a foot or so of water in the shallow
end. This way the pool remains protected until you are ready to drain, prepare and install the new liner. Sand bottom pools are specifically prone to damage from rain
if left empty.
There are many ways to drain a pool however there are a number of hidden obstacles involved with
the process that can hamper your progress. Most pools have leaves and other organic debris in them
by the time you are replacing the liner. Removing the leaves and debris prior to draining may seem
like an unnecessary exercise on the surface, but removing all the leaves will make the draining
process a lot easier once you get down to the deep end hopper.
If the water is clean and clear like it should be then a regular small submersible pump will finish the job once your bigger pump loses its prime. Making sure you get
as much water out with the larger pump you are using before it loses prime is important. If the pump loses its prime early it will be much more difficult to get it
started and primed again since it will need to draw the weight of the water up from pool to get started.
Some water proof rubber boots or hip-waders are a good idea for the draining process. This way
you can get down into the pool when there is a foot or less of water and assist the pump with
keeping its prime. Leaves and debris will plug the pump and the suction hose readily. You may
need to clear the pump of debris a few times as the concentration of organic debris goes up as the
amount of water in the pool decreases.
Small submersible pumps are not a problem but larger submersible and all gas powered pumps pull with enough force to be extremely dangerous and you should use caution
when working around suction intakes.
Cutting out the old pool liner
The liner will be cut out in pieces and rolled up to be disposed of. Start on the floor on the shallow
end and cut into long strips around four feet wide. After you roll up a section of old liner you can
stand it on end and lean it on the pool wall to drain any excess water out before transportation.
The process of cutting out the liner will continue by cutting along the seams to separate the liner
into manageable sections. Be extremely careful near the slopes of the pool, most especially since
you will be using a razor knife to cut the liner up. It is not recommended to step on the liner when
cutting out along the slopes. Ideally you will lift the liner and step underneath it into the concrete or
sand floor as this will allow some additional traction. Great care must be used as any algae or slime
developing under the liner may be hidden from view but almost certainly too slippery to keep your
balance should you step on a section like this under the liner.
Walk down the long slope from the shallow end towards the deep end hopper cutting in front of you
as you go and walking along the section where the slope meets the wall. It is best to have a strong
rope that you can hold while another person or two anchors the other end. This allows you to walk
down and cut the liner out from around the main drain and drag it up into the shallow end and be
cut and rolled up for transportation. Just be sure the water level in the hopper is at least a few
inches lower than your rubber boots.
 Often you can lay down on your stomach and reach down over the edge of the pool and cut down
near the bottom of the wall seam around the entire pool. This would allow you to remove the entire
wall section of the liner in only a few sections and you could do this while the deep end is still
draining. Of course when hanging over the edge of the pool great care must be taken to ensure that
you do not fall in. Once the pool is empty you will get a greater appreciation for how far a fall into
the pool would be. Swimming pools have the general appearance of looking shallower than they
are when full of water.
Often you can lay down on your stomach and reach down over the edge of the pool and cut down
near the bottom of the wall seam around the entire pool. This would allow you to remove the entire
wall section of the liner in only a few sections and you could do this while the deep end is still
draining. Of course when hanging over the edge of the pool great care must be taken to ensure that
you do not fall in. Once the pool is empty you will get a greater appreciation for how far a fall into
the pool would be. Swimming pools have the general appearance of looking shallower than they
are when full of water.
Be extremely careful as the vinyl liner cut edge is very sharp and will give you paper cut like cuts
that are certain to get a nasty infection. If you are removing sections of liner that are very old or dry
the liner will have a tendency to break and shatter like glass. Liners in this condition will shatter and
throw sharp shards and can cause severe lacerations. Safety glasses are a must when removing the
old liner.
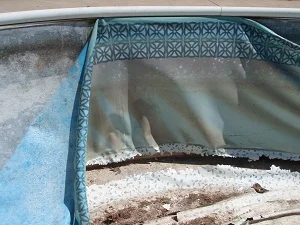
Removing the liner from the coping track
Great care must be taken when removing old liners from the coping track as you do not want
to damage or stretch the existing coping or you may find yourself needing to replace your coping
as well. To get the liner out of the track you will use a lift and pull method which will allow the
liner to slip out easily and smoothly. Do not force this step or risk breaking your coping - finesse is
the key. Be sure to remove any liner lock that is often used to tack in corners before attempting to
remove the old liner.
Cutting the liner around faceplates and flanges
When you are removing large sections of the old liner simply cut around the faceplates for the
returns and skimmer and get to them after the whole liner has been removed. Inspect each fitting
and determine the orientation that the gaskets have been installed before disassembling them.
The gasket orientation changes from pool to pool and manufacturer to manufacturer so your best bet
is to install the same configuration that previously existed for your pool. You can, and should, take pictures of the dismantling process which can help you later if
you forget where the gaskets will go. Be absolutely certain that you keep track of all the screws and which faceplate they came from. The
best method is to leave the screws with the faceplate that they came from individually. Most screws can be replaced if need be but they are stainless steel and a
special thread so it is best not to lose any. If any screws are rusted or difficult to remove then mark on the wall with permanent marker which ones were suspect so
you can deal with them later.
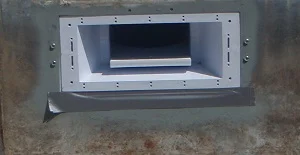
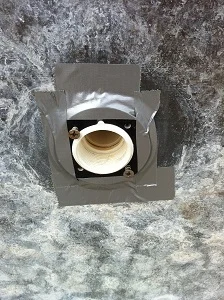
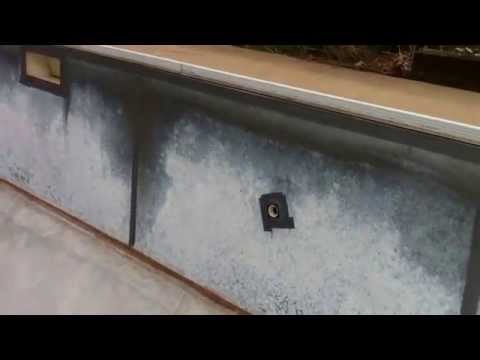
Faceplates & Gaskets For Main Drains, Skimmers & Returns

It is critical that you do not snap off any screw heads so be wary of screws that do not seem to want
to come out if you encounter any when removing the faceplate screws. Snapped screws requires drilling and tapping new screws as well as a skilled hand so do
everything you can to avoid snapping off screw heads on the skimmer, main drain and return faceplates. Before you begin working on the returns and skimmer fittings be
sure to drain pool and remove the old liner completely. This will allow you to focus on the skimmer and returns in a clean and organized work environment. If you have
a set of in wall stairs you will also cut around this area during the draining and liner removal stage and focus in on these areas after. Returns, skimmers, main
drains and
in-wall stairs all employ a two part gasket and flange system that pinches the liner and prevents water from escaping the pool.
In order for this type of system to work each and every screw must be in perfect functioning order.
Any screws that will not bite will allow for a leak. For example a set of in-wall steps could have 80 screws underwater and when installing the new liner if any of
these screws
becomes stripped and will not tighten, you have a big problem on your hands. Use a screwdriver and loosen each of the screws one turn to feel how smoothly and easily
they turn. Stainless screws like these actually have a relatively low shear strength so it is not too hard to break the head off a stubborn screw if it refuses to back
out and you twist a little too hard.
 Ideally the screws will back out smoothly and easily and if this is the case then you can use a
battery powered screw gun if you prefer. Any screw that refuses to move at all should be sharply
rapped with a mallet and tried again. Heat can also help to crack a seized screw however heat can
and will damage plastic components that are located at most skimmer, return and in wall stairs. If
you can get a screw to move a little bit then back it out as far as it will go, even if it is only a half
turn, and soak it in a lubricant such as WD-40. By soaking it when it is backed out and tightening it
back in lubricated a few times often the WD-40 will free up most screws. Try not to stress the
screw to the point that the metal itself twists or distorts as this will most likely cause the screw to
break off.
Ideally the screws will back out smoothly and easily and if this is the case then you can use a
battery powered screw gun if you prefer. Any screw that refuses to move at all should be sharply
rapped with a mallet and tried again. Heat can also help to crack a seized screw however heat can
and will damage plastic components that are located at most skimmer, return and in wall stairs. If
you can get a screw to move a little bit then back it out as far as it will go, even if it is only a half
turn, and soak it in a lubricant such as WD-40. By soaking it when it is backed out and tightening it
back in lubricated a few times often the WD-40 will free up most screws. Try not to stress the
screw to the point that the metal itself twists or distorts as this will most likely cause the screw to
break off.
How to deal with broken or stripped screws
In cases where you are faced with a broken screw you will need to fix this. You can tap and remove the screw using a special reverse thread tool, which can be quite
difficult as stainless steel is extremely strong and difficult to tap into. A better option may be to carefully grind the broken screw off. Instead you can install a
new screw, or two screws, slightly adjacent to the original hole on both sides of the problem screw.
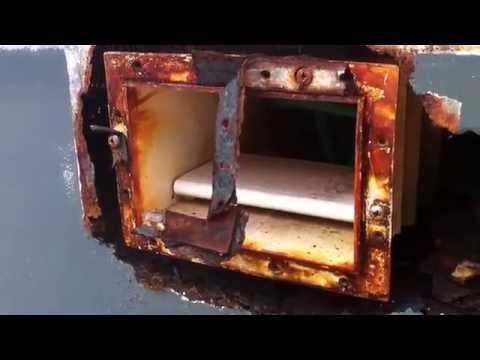
The type of screw that you use must be stainless steel with an aggressive thread. The bite to the new screws will come from the plastic of the fitting you are drilling through as well as the steel wall. You will need to drill a hole through the new faceplate and flange with a drill bit just slightly smaller than the width of the threads of the screws you will be using.
This is a one shot attempt to get the screw to grab into the plastic of the flange so be sure to not over tighten and strip. If done skillfully this on-the-fly repair can save you from having to put the liner install on hold while you replace the problem skimmer or return.
Galvanized steel fasteners like those used to attach the coping above the water level are not suitable for underwater applications underwater and will corrode quickly. Only high quality stainless steel screws should be used for repairs like this - Jacuzzi screws make a great option for repairs.
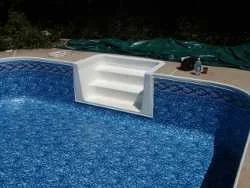
In-Wall Pool Steps Disassembly
It is very common these days to have in wall stairs in your pool with the vast majority of newer vinyl liner pools having them. This will be the most difficult part of the new liner installation process for you if you have them. Be sure to take pictures of the disassembly of your stair gaskets and have a dry rag and permanent marker with you when it comes time to take the stairs apart. The stair flange is usually made up of three parts which are the two side panels and the long panel across the bottom. As each of these pieces is removed you want to label it on the backside indicating its orientation. Top left, top right, bottom left and bottom right are the markings that you would expect to find from the previous installer on the back of these pieces. If the bottom piece is obviously longer than the sides sometimes it will be marked simply left or right.
The goal with these markings is to be able to readily reassemble the stairs exactly as they were previously. Something that you very much want to avoid is losing track of the orientation of the flanges or not have the screw holes lined up properly when you go to install the new liner. Take note of whether there is a gasket installed under the flange on either side of the liner. There are a few different configurations some with gaskets and some without. If you reinstall the stairs the way they have been installed up until now then you have a reasonably good chance of a successful installation.
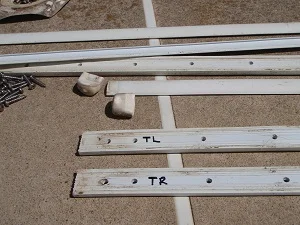
Be absolutely sure not to lose any of the screws, gaskets, end caps or flanges or you may need to do a great deal of work to install completely new flanges and gaskets for your stairs. If you need to make gaskets you can use sticky weatherstripping tape the same width as the gasket flange. Try to use as thin a weatherstripping tape as possible. Ideally something between an eight and a quarter of an inch in thickness at most. Flat rubber gaskets are also common and can be reused if they are in good condition. In almost every case if you do not remove the stair flange until you are ready to install the new liner you do not need to replace the stair gasket. If you remove the front faceplates carefully the gasket will remain stuck to the wall. Unless the gasket is damaged just reuse this gasket. Replacing the gasket creates more potential for leaks than benefits in removing and replacing it. The less you do to the stairs and stair gasket the better.
Wall Inspection & Repair
With the water out and the liner taken away you can now for the first time really inspect and evaluate the condition of your pool. It should be rust and crack free on the walls and floor and be free of any foreign material or sharp areas which could damage the liner. You may notice areas on the pool walls where there are rust circles in various places.
Each of these areas is a place where you had a small pinhole leak in your old liner. All rust needs to be scraped off the walls with a trowel or paint scraper. Grinding can be used put should be done only when absolutely required since it produces millions of tiny slivers of steel and casts them around the pool which are very difficult to clean up - especially on sand bottom pools.
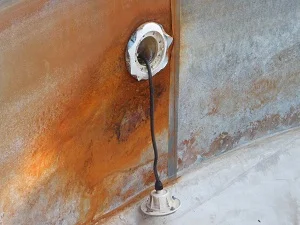 Once you have taken all the sharp edges off of the rust on the walls you will rinse them down and
let dry. Once dry you will give all rust spots a coat of galvanized steel primer and then let dry.
For minor rusting you would need to only scrape and remove any and all loose rust and take down any high edges that could potentially harm the new liner. It would be a
good idea to paint these areas also with galvanized steel rust paint to minimize further spreading of the rust. For serious rust spots or damage apply two layers of
the rust paint. In extreme cases rust will lead to
structural failure you need to patch wall sections with an oversized patch made from galvanized
steel equally as thick as the original wall. Be sure to grind or feather the edges of any patches as
sharp edges will cut the new liner like soft butter. For a final layer of protection you can place three
layers of duct tape over seams and edges. You can rivet patches into place and use construction grade adhesive to secure a maximum strength bond.
Once you have taken all the sharp edges off of the rust on the walls you will rinse them down and
let dry. Once dry you will give all rust spots a coat of galvanized steel primer and then let dry.
For minor rusting you would need to only scrape and remove any and all loose rust and take down any high edges that could potentially harm the new liner. It would be a
good idea to paint these areas also with galvanized steel rust paint to minimize further spreading of the rust. For serious rust spots or damage apply two layers of
the rust paint. In extreme cases rust will lead to
structural failure you need to patch wall sections with an oversized patch made from galvanized
steel equally as thick as the original wall. Be sure to grind or feather the edges of any patches as
sharp edges will cut the new liner like soft butter. For a final layer of protection you can place three
layers of duct tape over seams and edges. You can rivet patches into place and use construction grade adhesive to secure a maximum strength bond.
What types of floor materials do vinyl pools have?
The floor will be mortar cement, vermiculite cement or compressed sand. Sand will be the easiest to determine as you will leave footprints in it as you walk. It may appear to have a slight crust from the compression from water weight, but investigation will reveal that it is sand. If you have a sand bottom then you must be meticulous when you do your final cleaning and grooming before hanging the liner. Sand will easily hide sharp items. To reshape the sand sprinkle with water and trowel smooth and note it is not uncommon to need up to an additional 1/2 yard of clean sand to top the floor off with if the floor is in particularly rough condition.
If you have a vermiculite floor it will look like concrete and even feel like concrete. You will be able to determine vermiculite by its compressive strength. Vermiculite concrete is much lighter and much weaker than traditional concrete. If you can indent the floor with your heel then you have vermiculite. If you have concrete it will be apparent in its hardness and resistance to puncture. A screwdriver can be hammered right through vermiculite but would not penetrate concrete.
Vermiculite has a shiny gold-like property to it and you should be able to see these pieces shimmering in the sunlight
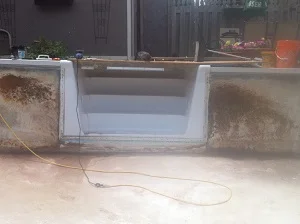
How to patch a vinyl pool floor
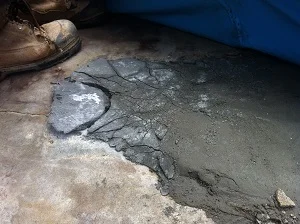
All cracks and inconsistencies in the floor of the pool need to be addressed before hanging your liner. If there is any elevation gap on the edges to the cracks, the ridge must be scraped down or ground down. You are not trying to make the cracks waterproof - the point of the floor repair is to prevent anything sharp from damaging the liner. A vinyl pool floor can look pretty bad to the eye but will actually work very well once the liner is in the pool. Just be sure to protect the liner from anything that might damage it.
You must repair floor cracks with the same material that your floor is originally made from or it will delaminate. Fix sand floors with sand, vermiculite based concrete with vermiculite mortar, and concrete with concrete. Mixing these materials can lead to separating of the two floor materials, or shaling and delamination, which can ultimately damage the liner in the future. To clarify some terminology here a grout bottom, a smooth bottom and mortar concrete used to trowel the pool floor all mean exactly the same thing - a full strength concrete with only sand as an aggregate (no stones) is troweled smooth for the pool floor.
When patching concrete use a portland cement like type N portland cement (also called type 1, type 10, type GU and regular portland cement, regionally) mixed with 2 parts of sharp, clean washed sand (like the kind used for brick setting mortar). You can also use premixed mortar products, as-is, for patching grout bottom vinyl pools however Do not use cement patch with vinyl polymers often labeled as "patch" or "floor patch" mortar. For vermiculite concrete pool floors Vermiculite floors follow the same mix except substitute fine grade vermiculite in place of half of the sand by volume. Finally, be sure to wet the area directly before applying new concrete patch to help the new concrete to bond to the old concrete. If you want a stronger bond between your new concrete patch and the old concrete floor you can use wood glue, water and portland cement mixed together until thick like a paste. Paint this paste onto damp concrete before applying your new concrete patch overtop. When done correctly this can result in a mechanical bond nearly 80% the strength of uniformly poured concrete.
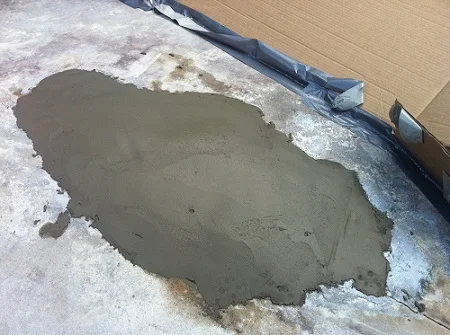
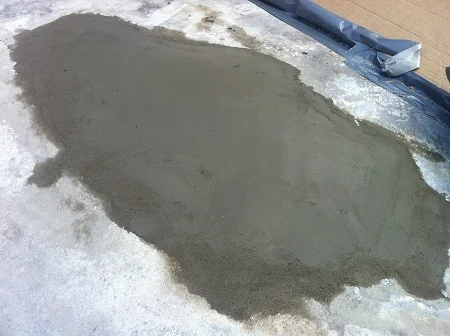
You do not need to be a certified mason to effectively patch a vinyl pool floor. If you can manage to get the concrete bonded and fairly level then you will have something that looks like the picture on the left. In order to achieve better results the additional step that you may be missing is to marry the edges of the old concrete and the new concrete. This process is done with a sponge float, but can also be accomplished with any sponge or even a damp T-shirt. Simply allow the concrete patch to set until the surface looks different (hazy, less watery) but before it begins to get hard - using a circular motion gently move around the edges of the patch. You do not want to overwork the concrete and raise too much water, but a light brushing with a sponge and then light touch with the trowel to finish will give you some decent results. Wait until the patch dries (overnight) and gently scrape or sand away any sharp edges.
Preparing To Hang The Liner In The Pool
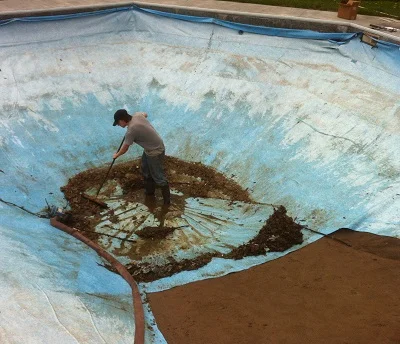
The first step in preparing the pool to install the new liner begins by scraping the entire pool with a
sharp handheld scraping tool. You want to start at the top of the walls and systematically scrape
down the walls, across the floor and into the deep end hopper. This is a long a tedious process that
will ensure that all obtrusions are noticed and removed prior to putting the new liner in. Make note
of any cracks or defects in the floor that you will need to patch. From wall scale and tape, to bumps
in the floor, every part of the pool surface should be scraped down. After scraping the entire interior of the pool surface you can use duct tape to tape all the wall
seams and coping seams in the pool. This is a very important step in order to facilitate installing the liner later. Any loose tape from the previous install should be
scraped and removed before installing new layer of tape.
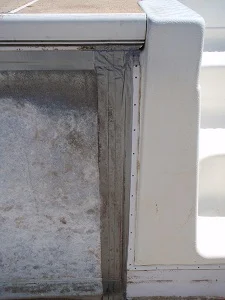
You must also tape the entire perimeter of the top of the pool wall where the coping sits on the wall. Be sure to not let the tape encroach on the liner track section
of the coping. If the tape gets trapped behind the liner bead in the coping track it can cause the liner to slip out of the track in the future. Another tip is to not
stretch the tape when applying it but instead let it rest naturally before sticking it to the wall to prevent it from falling back off. If your walls and coping track
are not completely dry you must either wait until they dry or dry them manually with a vacuum or heat gun. It is very important that the duct tape seal of your pool is
good. If you have too much air drawing through the cracks the liner will not pull into place properly and it will be impossible to properly install the new liner.
When you begin the final stages of preparation before hanging the liner you will need to broom down the entire pool from top to bottom including the walls. Be sure to
sweep the deck area
off as your first step to avoid additional debris being knocked into the pool after you have cleaned
it. At this point you have scraped the entire pool down by hand and taped all wall and coping seams
well. Sweep the deck down around the pool, and then the pool interior from the top down, being
sure to usher all debris that accumulates into the deep end hopper. Limit traffic in and out of the pool from this point onwards. Any time that you must get back into
the pool ensure that your shoes are washed and clean before getting in.
Some very dirty pools will benefit from being extensively hosed down with a garden hose or light duty pressure washer. If you go this route be sure to allow the pool
to dry completely, including the coping track which traps water, before attempting the final liner preparation.
Aboveground and sand bottom pools
Most importantly with sand bottom pools you should leave the liner in the pool as long as possible - hopefully even right up to the day before you want to hang the new
liner if possible. Sand bottom pools and aboveground pools require slightly different floor preparation than concrete
or vermiculite inground vinyl pools. In place of rinsing or sweeping/vacuuming you will need to spend a great deal of time brooming the surface and removing any rocks,
sticks or other foreign debris from the floor. Additionally care must be taken where you step in the pool to avoid disrupting the shape of the sand too much. This is
especially true for the slopes and deep end corners.
 To repair the floor in a sand bottom pool you will need to spot treat any rough areas and divots
with fine washed sand which you will place, wet, tamp and trowel smooth. Start at the deep end of
the pool and work your way towards the shallow end so that you can avoid stepping on the areas
you have just smoothed.
For very poor floor condition pools or an above ground pool you can rough up the surface of the
ground with a concrete rake before troweling. You should still add more sand when roughing up the
surface to ensure that you are able to trowel to a smooth and even surface. Just remember that removing rocks, twigs and other potentially harmful items from the pool
floor is of
primary importance.
To repair the floor in a sand bottom pool you will need to spot treat any rough areas and divots
with fine washed sand which you will place, wet, tamp and trowel smooth. Start at the deep end of
the pool and work your way towards the shallow end so that you can avoid stepping on the areas
you have just smoothed.
For very poor floor condition pools or an above ground pool you can rough up the surface of the
ground with a concrete rake before troweling. You should still add more sand when roughing up the
surface to ensure that you are able to trowel to a smooth and even surface. Just remember that removing rocks, twigs and other potentially harmful items from the pool
floor is of
primary importance.
It is also important to not drastically restructure the shape of the floor and slopes. Since the liner
has already been measured and manufactured you want to keep the pool close to the original shape.
With an inground pool you will be inside the pool when you install the liner. With an above ground
pool you will trowel the entire floor surface smooth and then jump out of the pool. The liner is
stretched across the pool by 2 or more people from the outside. Once in the track you would use a
soft bristled broom to tap the liner at the bottom of the wall to get the wrinkles out of the floor
before turning on the vacuum. You do not get back in the pool after you have troweled the floor
of an above ground pool and the entire installation of the liner is done from the outside to
avoid leaving footprints in the bottom. This is the trick to installing above ground pool liners that allows a perfect and wrinkle free installation. Of course a well
measured liner is critical for this to work. If there is extra material then installing from the outside would not likely work well and the floor could be covered in
wrinkles.
Setting the gaskets and screws
You must spray WD40 or penetrating oil into the screw holes for all the faceplates in the pool. Any
screw hole that is rusty you will need to soak in WD40 and insert and remove the screw a few times
to clear the threads. Vacuum all the screw holes to remove any sand or debris in the bottom of
the hole. Do not skip this step especially with the main drain or you may not be able to tighten the
faceplates to the gaskets if a screw bottoms out too early.
 One method to set the screws is to put two screws in each the returns, skimmer and main drain as far as they can go using almost no force. These screws should be
opposite each other on the returns and main drain and should be the two bottom 2 corners of the skimmer. You could also place a dab of Vaseline on each of the screw
heads to facilitate low friction when the liner is pulled over the screws during installation. The point of leaving the screws in place is so that you can locate the
correct location for the faceplate when you are installing them over the liner. The second method, and one that most experienced installers would use, would be to
omit leaving screws in place under the liner and rely on feeling the holes where the screw will go through the liner. This is also a fine option, but leaving screws
under the liner is likely a little safer of a method to use for someone with no experience installing liners.
One method to set the screws is to put two screws in each the returns, skimmer and main drain as far as they can go using almost no force. These screws should be
opposite each other on the returns and main drain and should be the two bottom 2 corners of the skimmer. You could also place a dab of Vaseline on each of the screw
heads to facilitate low friction when the liner is pulled over the screws during installation. The point of leaving the screws in place is so that you can locate the
correct location for the faceplate when you are installing them over the liner. The second method, and one that most experienced installers would use, would be to
omit leaving screws in place under the liner and rely on feeling the holes where the screw will go through the liner. This is also a fine option, but leaving screws
under the liner is likely a little safer of a method to use for someone with no experience installing liners.
Reference the pictures that you took when you removed the old liner to determine how any gaskets should be installed. Typically the main drain, returns and some
skimmers will have a gasket that needs to be installed at this stage and you will need to use duct tape to hold the gaskets in place if need be. Since shifting
gaskets under the liner could be a major cause for leak concern in the future you may want to silicone the gaskets into place and duct tape over top of them to hold
them securely in the correct position.
There are a number of different ways to prepare the fittings in your pool. Some installers prefer to
not leave screws in place, some prefer to leave only a few and some prefer to leave all in place. The
best idea is to install two screws on each fitting. This will allow you to back two screws out
through the liner after the liner has been installed and slip the faceplate back on using the two screw
holes to align the remainder of the screw holes like a template or jig.
How to prepare in-wall step screws
If you have in wall steps you want to leave two screws installed for each strip that makes up the flange for your stairs. This would typically be the top two screws on each of the two vertical flanges as well as the two screws on either the far left or far right of the bottom flange across the bottom of the stairs.
Be absolutely certain that you have the correct location for the screws by holding up the flange pieces and ensure that all the pieces and holes will line up properly. If you make a simple mistake here you will have a lot of problems getting the stairs installed once the new liner is in place.
You will not be able to see easily which screw should line up with the flange when you go to cut in the stairs so you will be essentially working blind. So long as you make 100% sure that you line up the corresponding flange hole with the screws that you leave in you will be good. The main drain also should have at least two screws set which hold the gasket in place and allow you to locate the correct orientation for the gasket and faceplate that installs over the new liner. All screws should be sunk fully into the receiving hole to minimize the potential to snag and tear the liner.
How To Install A Vinyl Liner
This is it. Be sure that it is a sunny and warm day, even hot, as this will help with the installation of
the liner. Installation on cold and overcast days will make this process much more difficult if not
impossible. You will soon see that hanging the liner itself is only a small part of the overall project.
The vast majority of the time it takes to install a new liner in your pool is the preparation of the
walls and floor surface and the extensive cleaning of the entire pool surface. A stone the size of a pea would look like a baseball that was left under the liner once
you are finished the installation so sweep and clean the pool as many times as you need to in order to be absolutely clean and free of debris. When the pool is
absolutely, positively, impeccably clean and there are no sharp items, tool boxes or anything that can blow into the pool on the pool deck it is time to bring the
liner into the pool.
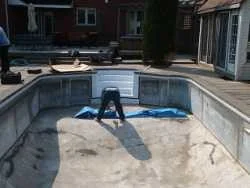
Dolly the liner over to the edge of the shallow end and open the box without damaging it or the liner. Lift and slide the liner into the pool by pressing it up against
the wall as it drops. Liners are surprisingly heavy and difficult to manipulate. Some strong hands for assistance will be a great help to have on this day. If you have
a set of in wall stairs you need a minimum of 2 people to install the liner and 3 would be better.
Dropping the liner in the pool
 Once the liner is out of the box you can no longer jump in and out of the pool without sitting down
and inspecting your shoes for sharp debris. No tools should be in or around the pool or on your
person when working with the liner. Many professional installers will only work in the pool
barefoot when working with a liner.
Once the liner is out of the box you can no longer jump in and out of the pool without sitting down
and inspecting your shoes for sharp debris. No tools should be in or around the pool or on your
person when working with the liner. Many professional installers will only work in the pool
barefoot when working with a liner.
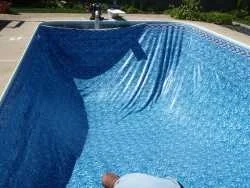
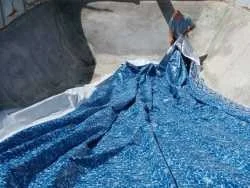 Open the liner and span it across the shallow end.
You should be able to locate the stickers which are placed on the liner to help you locate the shallow
end and the deep end. Be sure to orient the liner so that the deep end and shallow ends are going in
the right direction. You are going to take a section of the deep end of the liner and pick it up and
walk straight down into the deep end to begin opening up the liner. You will then work to locate the two shallow end corners and bring them to their general location
as you continue to open up the shallow end. Tack in the shallow end corners and walls of the liner to start with.
Open the liner and span it across the shallow end.
You should be able to locate the stickers which are placed on the liner to help you locate the shallow
end and the deep end. Be sure to orient the liner so that the deep end and shallow ends are going in
the right direction. You are going to take a section of the deep end of the liner and pick it up and
walk straight down into the deep end to begin opening up the liner. You will then work to locate the two shallow end corners and bring them to their general location
as you continue to open up the shallow end. Tack in the shallow end corners and walls of the liner to start with.
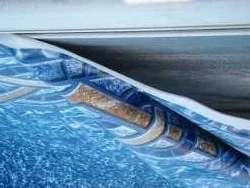
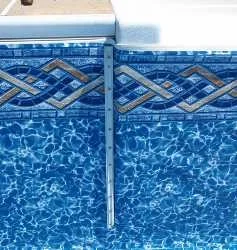
To hang the liner in the track you will bend the bead of the liner ninety degrees and push the bead
straight into the coping. By supporting the weight of the liner with one hand you will be able to
direct the bead into its resting place in the coping easily with the other. While still holding the bead in place with one hand you will release the weight of the
liner with the other. The liner will pull straight down on the bead and the coping will use friction and leverage to hold the liner in place.
 You may find that the liner has a tendency to pop out in areas that you have already installed. The
older and more worn your coping is, the easier the liner will pop out of its place. To assist with
holding the liner in place you can use wooden clothes pegs that have had the springs removed. The pegs have a small taper to one direction and an aggressive taper in
the other. Use the
clothes pegs to wedge the liner gently in place in the coping track while you continue to install
sections of the liner.
You may find that the liner has a tendency to pop out in areas that you have already installed. The
older and more worn your coping is, the easier the liner will pop out of its place. To assist with
holding the liner in place you can use wooden clothes pegs that have had the springs removed. The pegs have a small taper to one direction and an aggressive taper in
the other. Use the
clothes pegs to wedge the liner gently in place in the coping track while you continue to install
sections of the liner.
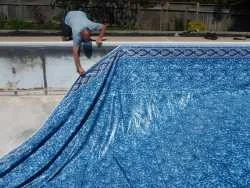 You will start at the shallow end corners and work your way around the entire shallow end. Really analyze
the corners and shallow end short wall to get the best orientation possible between
these two corners. Once you proceed down the long walls of the pool any adjustments that need to
be made will require much more effort. Once you have reached the break of the shallow end slope
on both sides of the pool you will begin the process of hanging the liner in the deep end.
You will start at the shallow end corners and work your way around the entire shallow end. Really analyze
the corners and shallow end short wall to get the best orientation possible between
these two corners. Once you proceed down the long walls of the pool any adjustments that need to
be made will require much more effort. Once you have reached the break of the shallow end slope
on both sides of the pool you will begin the process of hanging the liner in the deep end.
You will start at the edge of that shallow end and work to put in a section of liner every two or three
feet along the long wall. It is best to pick up the liner with your leading arm and hold the weight
while using the other hand to put a section of the liner in the coping that is one or two feet long itself. Obviously safety is a real concern with this step as
falling forwards into the empty pool could be fatal.
Both sides of the pool should be tacked in place at the same rate to equally distribute the weight and
strain on the people picking up the liner. Basically you are trying to get the liner all the way around
the pool deep end every two or three feet. Once you reach the deep end corners you will see how far
that you will need to adjust the liner. Often times you will skip over the deep end corners and tack
in the center of the deep end wall because at some point forward progress along the long walls will
become impossible. By attaching in the center of the deep end wall it will greatly assist with
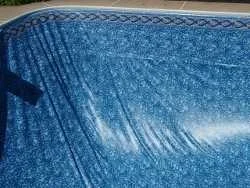
stretching the liner into place in the deep end corners. On a warm sunny day you would benefit by letting the liner absorb some sun at this stage for ten minutes.
The sun will make the vinyl much easier to manipulate and install completely in the coping on the second pass.
Orient the liner for the best possible fit
If you have defined corners in your pool it is not critical that the whole corner gets installed at this point as the corners tend to be tricky. You can install a
section of liner on both sides of the corner that leaves enough slack to install the corner as the last step of getting the liner completely in the track. You can
stretch or lose liner along the long walls by manually manipulating the liner as needed. This will help to shift or rotate the liner slightly to achieve the best
orientation for the liner.
 The corners are one of the best ways to judge whether you have the correct orientation for the liner or whether it needs to be rotated or adjusted further. In pools
like kidney shape look at the liner as it starts down the long slope as this will be the first place to form a large wrinkle if the liner needs to be shifted one way
or the other.
The corners are one of the best ways to judge whether you have the correct orientation for the liner or whether it needs to be rotated or adjusted further. In pools
like kidney shape look at the liner as it starts down the long slope as this will be the first place to form a large wrinkle if the liner needs to be shifted one way
or the other.
Once you feel that you have the deep end corners approximately in the right place you can return to
the shallow end and install the liner in the track all the way around the pool. The more that you get
in place, the easier it becomes to put the rest in. Note that when you install the liner in the deep end
you can not do this from inside the pool. Once the liner is in place you will only go inside the
shallow end to make adjustments before turning on the vacuum.
Installing The Liner Vacuum
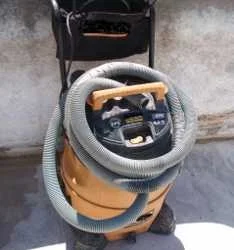
 You now will need to vacuum the air out from behind the liner. To do this you can use an expensive vinyl
liner installation vacuum, or you can simply use a $150 regular run of the mill wet/dry shop
vacuum. A minimum of a five horsepower model is required for suction strength and you will
remove the paper filter from inside the vacuum for the duration of its use. The vacuum hose must be perfectly clean and free of any sharp burs which may damage the
liner. You will wrap duct tape around the end that you will be inserting behind the liner to blunt any sharp
edges. The liner will be forcefully pressed against the hose of the vacuum specifically the end of the
hose so be sure that it will not be able to cut the liner. Do not put rigid plastic vacuum hoses behind
the liner if you use a shop vacuum. If you must, cut the rigid plastic end off of the vacuum hose, then wrap with duct tape to avoid sharp edges.
You now will need to vacuum the air out from behind the liner. To do this you can use an expensive vinyl
liner installation vacuum, or you can simply use a $150 regular run of the mill wet/dry shop
vacuum. A minimum of a five horsepower model is required for suction strength and you will
remove the paper filter from inside the vacuum for the duration of its use. The vacuum hose must be perfectly clean and free of any sharp burs which may damage the
liner. You will wrap duct tape around the end that you will be inserting behind the liner to blunt any sharp
edges. The liner will be forcefully pressed against the hose of the vacuum specifically the end of the
hose so be sure that it will not be able to cut the liner. Do not put rigid plastic vacuum hoses behind
the liner if you use a shop vacuum. If you must, cut the rigid plastic end off of the vacuum hose, then wrap with duct tape to avoid sharp edges.
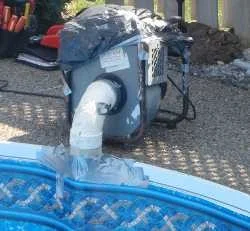
 A liner vacuum can be used anywhere on the pool and is typically used in the deep end wall
somewhere. When using a shop vacuum instead of a liner vacuum you will feed the suction hose down through the top of the skimmer in the deck. The hose will snake from
the top and through the mouth before turning in downwards behind the liner. You want the end of
the hose to be about two feet to three feet down from the top of the pool deck. The hose will S bend
from the vacuum, through the top of the skimmer and through the skimmer mouth and turn down
behind the liner. Once the vacuum is turned on you can adjust the hose so that is lays flat on the
wall behind the liner. Next you will need to cut a piece of cardboard that will have a hole in the
center that the vacuum hose will fit through to seal the area around the skimmer.
A liner vacuum can be used anywhere on the pool and is typically used in the deep end wall
somewhere. When using a shop vacuum instead of a liner vacuum you will feed the suction hose down through the top of the skimmer in the deck. The hose will snake from
the top and through the mouth before turning in downwards behind the liner. You want the end of
the hose to be about two feet to three feet down from the top of the pool deck. The hose will S bend
from the vacuum, through the top of the skimmer and through the skimmer mouth and turn down
behind the liner. Once the vacuum is turned on you can adjust the hose so that is lays flat on the
wall behind the liner. Next you will need to cut a piece of cardboard that will have a hole in the
center that the vacuum hose will fit through to seal the area around the skimmer.
 The goal is to have the cardboard taped to the deck overtop of the skimmer with a hole in the center
where the vacuum hose comes up. The vacuum hose should be taped on all sides to the cardboard as
well to ensure as airtight of a seal as possible. If there is a second skimmer in the pool be sure to
tape off that skimmer as well to ensure that no air is able to get through there. If all looks good you
are ready to start to suck the air out from behind the liner. When you suck air out from behind the liner with the vacuum you will immediately see the liner to start
to pull back into place. It should take between three to five minutes for most of the air to be sucked out from behind the liner. If you do not have most of the air
visibly gone after five minutes you may be leaking air somewhere and you may need to revisit your preparation of the pool and find where the air is going. For large
pools that do not pull back properly a second vacuum may be needed to help get the air out from behind the liner.
The goal is to have the cardboard taped to the deck overtop of the skimmer with a hole in the center
where the vacuum hose comes up. The vacuum hose should be taped on all sides to the cardboard as
well to ensure as airtight of a seal as possible. If there is a second skimmer in the pool be sure to
tape off that skimmer as well to ensure that no air is able to get through there. If all looks good you
are ready to start to suck the air out from behind the liner. When you suck air out from behind the liner with the vacuum you will immediately see the liner to start
to pull back into place. It should take between three to five minutes for most of the air to be sucked out from behind the liner. If you do not have most of the air
visibly gone after five minutes you may be leaking air somewhere and you may need to revisit your preparation of the pool and find where the air is going. For large
pools that do not pull back properly a second vacuum may be needed to help get the air out from behind the liner.
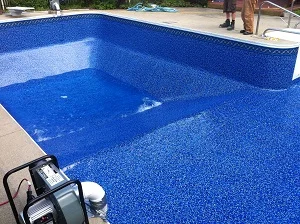
Adjusting The Liner
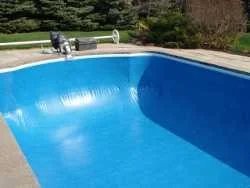 As the air is being pulled out from behind the liner you will need to go into the shallow end and
begin to manually manipulate the floor to get the wrinkles out. While standing near the edge of the pool just kick and pull it gently along the cove where the walls
and floor meet and position it as the vacuum pulls it into place. Knowing when it is time to shut off the vacuum and try setting the liner again, is where skill and
experience would come into play. Without having completed multiple liner changes you will not be able to tell which wrinkles will work themselves out after the pool
fills with water, and which must be attended to now to avoid having unsightly wrinkles in the final product.
As the air is being pulled out from behind the liner you will need to go into the shallow end and
begin to manually manipulate the floor to get the wrinkles out. While standing near the edge of the pool just kick and pull it gently along the cove where the walls
and floor meet and position it as the vacuum pulls it into place. Knowing when it is time to shut off the vacuum and try setting the liner again, is where skill and
experience would come into play. Without having completed multiple liner changes you will not be able to tell which wrinkles will work themselves out after the pool
fills with water, and which must be attended to now to avoid having unsightly wrinkles in the final product.
 If you have excessive wrinkles especially in places like both sides of the long slope of the pool, or in the middle of flat areas of the floor, then you may need to
orient the liner a little more. In some cases it will help to shut off the vacuum for a few minutes to do this and let some air back behind the liner. The flat areas
of the floor in the shallow end should be completely wrinkle free before you start to fill the pool with water as these will be difficult to resolve at a later point.
If the floor of the pool is wet when you hang the new liner you may have trouble shifting and kicking out wrinkles on the floor. If possible let the pool floor dry,
vacuum up puddles and dry sweep the pool as the final point of preparation before hanging the liner. This will assist you with placing and positioning the liner.
If you have excessive wrinkles especially in places like both sides of the long slope of the pool, or in the middle of flat areas of the floor, then you may need to
orient the liner a little more. In some cases it will help to shut off the vacuum for a few minutes to do this and let some air back behind the liner. The flat areas
of the floor in the shallow end should be completely wrinkle free before you start to fill the pool with water as these will be difficult to resolve at a later point.
If the floor of the pool is wet when you hang the new liner you may have trouble shifting and kicking out wrinkles on the floor. If possible let the pool floor dry,
vacuum up puddles and dry sweep the pool as the final point of preparation before hanging the liner. This will assist you with placing and positioning the liner.
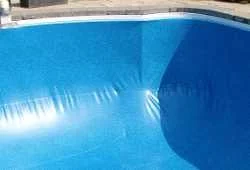
Losing wrinkles in the liner
A skilled eye can look at where a wrinkle is and judge how much the liner needs to shift in order to
reduce or eliminate the wrinkle. To an untrained eye it can even be very difficult to determine which direction the liner needs to rotate in. As an amateur you will
need to rely on some determination and trial and error to make sure you have the best fit possible for your liner. You can try turning off the vacuum and letting air
behind the liner again and then having one or more people stand in strategic places on the liner to hold it in place until the vacuum takes back over.
If you shut off the vacuum at any point the liner will release from the walls and you can try again to orient it better either by shifting it in the track or by standing strategically on the liner to help it hold in the right position until the vacuum grabs it and holds it in place. Position the liner as much as you need to in order to achieve the best fit before beginning and cut-outs like the main drains or stairs. Once cuts have been started you can no longer shut off the vacuum or you will damage your new liner. If you have in wall stairs you will almost certainly need two people standing in the pool and holding the liner in place in front of the stairs to limit the air escaping there.
Cutting in in-wall stairs (dry)
If you have in wall stairs the liner will not pull into place until you have installed the flanges as the air is readily accessing behind the liner here. At first you have the liner spanning across the face of the stair opening. With two people in the pool you must manually push the liner with your foot so that the liner touches the wall near to the floor. This will help to cut of the air getting behind the liner and make the liner pull further into place.
Do not begin installing the stair flanges unless you are completely happy with the orientation of the entire liner. You can not move the liner again once you start cutting in the stairs.
Vertical flanges
 You will need to push the liner into place and feel for the screw heads through the liner of the
screws that you left in place behind the liner. Back the screw out through the liner by pinching it
with one hand and using a screwdriver to back it out slowly before it punctures through the liner.
You are going to install two of the top screws for one of the vertical flanges which you have marked clearly to ensure you orient the flange correctly. With the first
two top screws started then remaining screws will be templated by the flange strip so you should not have any trouble installing the rest of the screws on that piece.
Do both of the vertical flange pieces before doing the horizontal flange strip across the bottom of the stairs.
You will need to push the liner into place and feel for the screw heads through the liner of the
screws that you left in place behind the liner. Back the screw out through the liner by pinching it
with one hand and using a screwdriver to back it out slowly before it punctures through the liner.
You are going to install two of the top screws for one of the vertical flanges which you have marked clearly to ensure you orient the flange correctly. With the first
two top screws started then remaining screws will be templated by the flange strip so you should not have any trouble installing the rest of the screws on that piece.
Do both of the vertical flange pieces before doing the horizontal flange strip across the bottom of the stairs.
Horizontal flange
 While there are many different methods employed by pool professionals a common standard approach to the bottom stair flange is the same as the vertical flanges.
During the liner prep install the two end screws on one of the ends of the horizontal flange. This will allow you to locate the screw hole under the liner which you
will back out through the liner carefully. Once you have the two end screws installed have your helper hold the opposite end of the flange level and you can proceed
one screw at a time across the bottom. When you are about half way across you can take the end of the flange your helper is holding and put it into place. The flange
will have the
tendency to bulge outwards but by putting a little pressure on it at this point it should snap securely
into place allowing you to install the remainder of the screws.
While there are many different methods employed by pool professionals a common standard approach to the bottom stair flange is the same as the vertical flanges.
During the liner prep install the two end screws on one of the ends of the horizontal flange. This will allow you to locate the screw hole under the liner which you
will back out through the liner carefully. Once you have the two end screws installed have your helper hold the opposite end of the flange level and you can proceed
one screw at a time across the bottom. When you are about half way across you can take the end of the flange your helper is holding and put it into place. The flange
will have the
tendency to bulge outwards but by putting a little pressure on it at this point it should snap securely
into place allowing you to install the remainder of the screws.
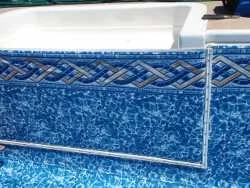
Work slowly and deliberately to make sure that you do not overlook anything or put a screw through the liner in the wrong place. As a final step install the decorative strips over the flange if there are any and carefully cut inside the stair dimension. The point at which you fully attach the flange the liner should pull in tightly all around the pool as you have eliminated the largest air leak. Every screw must be compression tight and any loose screws are sure to leak. If you discover one of your screws is just spinning and will not tighten you can try replacing it with a slightly larger screw (stainless steel) and very carefully tighten it without letting it strip. In a pinch this little trick can be a real frustration saver.
Cutting in in-wall stairs (wet)
An optional different approach to installing the stairs is to do so after the pool has filled up to 12" of water in the shallow end. This method involves a little more prep work but can be considered to be a little easier and a little less risky for a beginner to do as opposed to dry fitting the stairs where you essentially push the liner into place by hand. With a wet fit you install a sheet of plywood over the stairs with a 2x4 or 2x6 piece of wood attached along one edge. You need a piece of coping track slightly shorter than the width of the opening of your stairs which you may have to source from a local pool supply store.
By laying the plywood over the stairs and duct taping the underside completely around the edges you can create a mostly air tight seal. The 2x4 and coping strip are intended to create a temporary place to hook the liner into while the pool is filling. Once the pool has a minimum of 6" of water in the shallow end you can turn off the vacuum and cut out the stairs. In this situation the liner will be pressed tight against the wall by thousands of pounds of water making it easy to locate the screw heads you left installed on each flange section. Since the liner does not shift easily once the water weight is on it this method reduces the chance of installation error.
Filling the pool
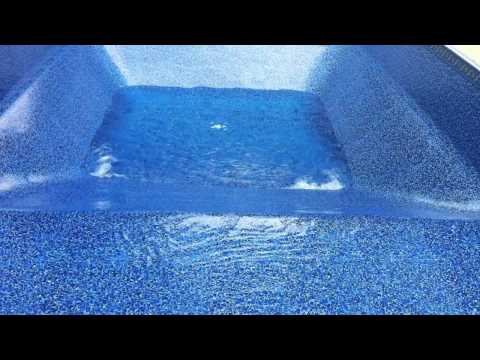
Once filling the vacuum will continue to run until you have at least one foot of water in the shallow end before shutting it off. This will usually be overnight for one night depending on the size of the pool and the rate of flow your water supply has. It is absolutely critical that the vacuum does not shut off for any reason after you have started the water. If the vacuum shuts off for any reason you will find that the shallow end will be pulled out of place by the weight of the water in the deep end and you will need to drain the pool and start over. If you have in wall stairs in the shallow end that you cut in dry this could actually ruin your new liner.
When to turn off the liner vacuum
Often you will put a piece of tape on the wall next to the vacuum hose signifying the water level that you can shut off the vacuum. Once the water hits this mark you can safely shut down the vacuum. Usually this height will be about one foot below the height of the vacuum hose or liner vacuum snorkel. This is especially useful for professional installers so that the pool owner knows precisely when it is safe to shut off the vacuum and the water.
Once there is 6 to 12 inches of water in the shallow end the pool is safe to have the vacuum turned off. You may want to stop the water at this point if you have floor or slope wrinkles in the shallow end as you may be able to remove them by working them towards the walls of the pool with a plunger. Stopping the vacuum and water at this stage will also allow you to install the stair flanges if you are cutting in the stairs wet.
Installing A Main Drain Lid
Installing the main drain and cover
If you have a main drain in the pool you will be installing the faceplate and gasket for it once there
is about eight to twelve inches of water covering the deep end. You will need a slot screwdriver, a
phillips screwdriver, a razor knife, the main drain lid and gasket as well as the main drain flange.
Obviously you need to be careful about a few things while doing this including cutting the liner
accidentally with a tool or slipping and falling on the way down to the bottom of the pool. Wet vinyl
is treacherously slippery and you can in fact get stuck in the bottom of the pool if you do not have
assistance to get out.
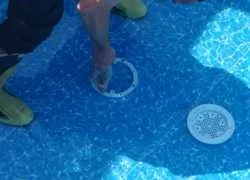 You will locate the screws under the liner by feeling with your fingertips. These should be relatively
apparent assuming you can find the main drain at all. You will locate the first screw head and guide
the tip of your Phillips screwdriver down onto the head. Again be positive that you have the right
location before applying pressure while wiggling the screwdriver. The head of the screwdriver will catch in the corresponding slot on the screw head and the liner
will be trapped in between. You will continue to wiggle and apply pressure until the liner gives way and you are able to slowly back the screw out of the hole. Apply
pressure with your other hand around the screw to stop the liner from lifting as you back out the screw. Be sure to visually memorize the location of the hole as it
can be hard to find again under moving water. You then put the same screw through the gasket and flange and reinsert carefully into the hole. You want to tighten only
a few turns at this point.
You will locate the screws under the liner by feeling with your fingertips. These should be relatively
apparent assuming you can find the main drain at all. You will locate the first screw head and guide
the tip of your Phillips screwdriver down onto the head. Again be positive that you have the right
location before applying pressure while wiggling the screwdriver. The head of the screwdriver will catch in the corresponding slot on the screw head and the liner
will be trapped in between. You will continue to wiggle and apply pressure until the liner gives way and you are able to slowly back the screw out of the hole. Apply
pressure with your other hand around the screw to stop the liner from lifting as you back out the screw. Be sure to visually memorize the location of the hole as it
can be hard to find again under moving water. You then put the same screw through the gasket and flange and reinsert carefully into the hole. You want to tighten only
a few turns at this point.
You will then locate the screw on the opposite side of the main drain and repeat the process. When
you place the second screw in the gasket flange be sure you have it in the correct hole by aligning
the flange and feeling through the liner to see if it lines up properly with the main drain underneath.
Once you have both screws in place you can tighten them down to a gentle snug. This will now
make the flange act as a template for the remaining screw holes. Be sure that every move you make
while working on this step is carefully thought through and executed. A hole in the wrong spot right
now will ruin your whole day.
Double check the main drain gasket has not shifted
Once all the screws are in place you will start by cutting a single slit in what would be the center of
the main drain. The purpose of this is you want to cut as small of a hole as possible but be able to
stick your fingers in and feel if the gasket under this liner is still in the correct place or if it has been
displaced somehow during installation. By taking this additional step you give yourself some
wiggle room to perform an emergency repair if the gasket has shifted when you dragged the liner over the main drain. If you go ahead and cut the whole circle out
right away only to realize that the gasket is pinched you will have a difficult time trying to remedy this problem.
Once you have cut the center out of the main drain you can install the cover lid. Installing this lid is a safety requirement so be sure that you do not skip this
important step. Once the main drain is installed you are good to fill the pool up to 6-12 inches of water in the shallow end.
Vacuum removal
Once you have between 12" (6"-8" absolute minimum) of water in the shallow end you will be
able to shut off the vacuum and remove the hose from behind the liner. You will feel that there is a
lot of pressure on the hose and you will need to gently wiggle it to remove it. Be patient with this
step as it requires a fair bit of patience and skill - not strength. If you let the water level rise too high you will not be able to remove the hose without lowering
the water level in the pool a little. If you ever want a lesson in how heavy water is then try to remove the vacuum suction hose when the
water level has risen and covered even the tip of tit. Be sure to not damage or disrupt the skimmer gasket as you are removing the hose from behind the liner. Once
you have removed the vacuum you let the pool continue to fill.
Vacuum hoses and adding a second vacuum if needed
Using a shop vacuum hose that you cut the rigid end off of works well for changing liners. It is less
stressful on the liner than having a hard end to the vacuum hose and is much easier to remove when
the time comes if the end of the hose has a flexible end to it. If you put the vacuum hose down through the deck into the skimmer you should be looking good, but if
you used a liner vacuum or a secondary vacuum anywhere along the wall of the pool then you will need to pop a section of liner back into the coping.
If you do not have a second skimmer but require the suction from a second vacuum you can install a suction hose anywhere behind the liner. Simply leave a small section
of liner out of the track and sleeve a vacuum suction hose down behind the liner. You then tape all around the hose to make sure you no air escapes from behind the
liner. Be sure to not leave any extra slack or liner here - it should be very tight over the suction hose. If you leave too much slack here at the second vacuum
location you may have too much material to force into the coping after you remove the vacuum hose.
How to put the liner back into the coping track
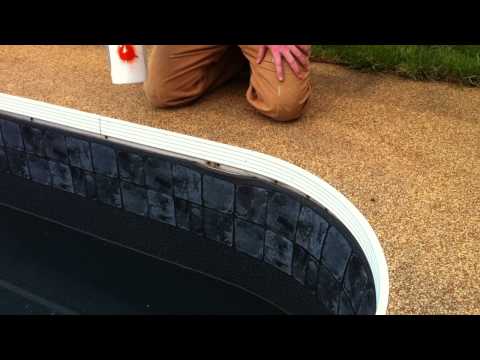
By using boiling water to heat the surrounding areas of liner directly before you stretch it up and into the coping track, you will find it is much easier to get the liner into the track. Keep pouring boiling water on the liner and putting in small sections until you get it all in place. This takes both hand strength and finesse to get the liner in the track. The higher the water level is in the pool, the less stretch you will have in the liner. In a worst case scenario you could drop the water level a little bit if you need to.
Installing return and skimmer faceplates
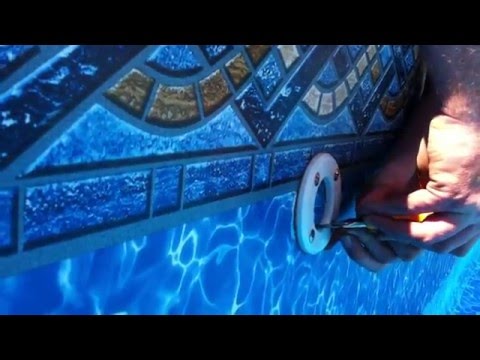
You will install the returns and skimmer gaskets when the water level has reached six inches below the height of the returns. You will install these faceplates in the same fashion as the main drain where you locate the screws under the liner and back them out through the liner gently.
Again. be sure that you have the faceplate oriented in the right direction before committing to putting any holes in the liner.
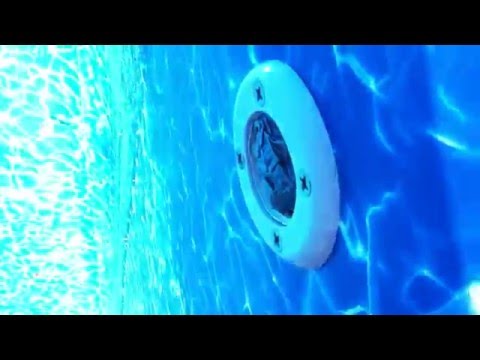
Be careful when tightening to get the screws tight without slipping off your mark and stabbing the liner with your screwdriver which is easy to do. Make sure you have the right sized driver for the situation to help avoid this. Once the return is installed in the correct orientation you can cut a slit in the center of the return and probe with your finger to see if the gasket is seated properly before committing to cut out the center of the return. You can then install the internal eyeball of the return. If you have a threaded eyeball be sure to coat the threads in a silicone based lubricant so you can get it undone at a future time. This one simple trick can save you a ton of frustration come the closing season when you are struggling to unthread the eyeballs from the returns.
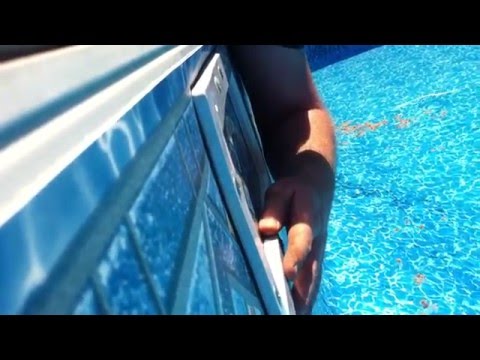
The skimmer faceplate is installed in much the same way where you locate screws under the liner and back them out. The skimmer will usually have additional screw heads which you could confuse for the correct ones as there are also screws holding the skimmer itself to the wall. Be sure to study the skimmer before the liner goes in and reference your pictures if you need to ensure that you do not make a hole in the wrong spot. Tighten all the screws snug before starting in the bottom center and tightening your way up both sides finishing by tightening across the top of the skimmer. Once completed make smooth and even cuts around the inside of the skimmer mouth and remove the center piece of liner. Try to leave the cut edges smooth for cosmetic value. You can now let the pool fill until you are half to three quarters of the way up the face of the skimmer.
Starting up the pool
Once the pool is full you can turn on the circulation and start to enjoy your new pool. As an initial shock treatment you want to throw in one to two cups of granulated chlorine which has been dissolved in a bucket before dumping in the pool. Chlorine can bleach your liner so be wary of heavy concentrations of chlorine sitting on the bottom of the liner. Sometimes as the pool fills it can cause sections of the liner to come out of the track. In most cases with decent coping the liner will sit firmly in the track once installed. If the liner continues to slip out or if the coping is stretching under the weight of the liner you can try using liner retaining strip, t-bar or liner lock, all of which are forms of liner retainer. It is quite common to use something like this in tight radius corners also where the liner can tend to pull out and can be very difficult to get back in place.
If you have not replaced the coping and are using your existing coping it is recommended to install this liner lock all the way around your pool perimeter. As coping ages it tends to stretch and does not hold the liner as well as when it was new. This would be a good precautionary measure to take to ensure that once you get your new liner in place that it stays in place.
Installing A New Vinyl Pool Liner - Frequently Asked Questions
How do you install the new liner over a light?
Lights are a common point of concern for DIY liner installers. The power source needs to be
identified and turned off at the breaker before attempting to work on the light. When installing the
new liner you will treat this peripheral device just like the other gasket and flange devices you are
installing such as the returns and main drain. The light itself simply needs to be disconnected and
the cord end coiled up inside the light niche. Instead of installing one screw on opposite sides of the flange like with the main drain or return fittings with the
light install the top two screws during the liner preparation process. This will make it easier to reach since you will need to lay down on the pool deck and reach
down to install the light flange. Back the two screws through the liner and install the new flange and gasket back into those two screw holes. Verify the light is
oriented correctly by pressing on the liner and feeling the receiver flange underneath. If you have it lined up correctly then the holes in the receiver will be lined
up by the topside flange holes.
When I turn the vacuum on should all the wrinkles disappear?
The majority of the wrinkles should be gone but most importantly the floor wrinkles need to be worked out. Some wrinkles at the bottom of the wall would be considered
normal as the liner needs to stretch into place under pressure from the weight of the water filling the pool. Once it is completely stretched into place all the
wrinkles should disappear. Wrinkles in the middle of the floor or slopes will not easily be moved once the water weight is on them.
Which is the right liner thickness for my pool?
Above ground pools most commonly have a 20mil liner while in ground pools should have a 30mil
liner.
My liner does not have coping or a bead seam on the liner - Why?
In ground pools and some above ground pools have a bead seamed to the top edge of the liner
which is installed into a coping track along the top of the wall in the pool. Many above ground
pools have a different style of liner which has no bead but instead overlaps the top of the wall of
your pool. Once overlapped there is a plastic strip that snaps down over the top of the wall and
holds the liner in place. When installing these types of liners be sure to look at the seam where the
wall meets the floor to ensure that you have a level installation around the circumference of your
pool. If you do not leave enough liner on the walls the weight of the water can cause the wall to
buckle inwards into the pool.
Why won't my liner suck into place when I turn the vacuum on?
If you are using a shop vacuum and not a liner vacuum the vacuum may not have enough power to
pull the liner into place properly. The addition of a second vacuum should help this. Have one
installed through the skimmer and one along the deep end wall. Be sure to duct tape any areas
where air could escape. If you have in wall stairs be sure to have 2 people push and hold the liner
into place around the stairs. The stairs easily could leak enough air so that the liner will not pull
into place properly. You may also need to plug the pipes in the pump room as air might be escaping the pool structure through the open main drain, skimmer and return
pipes.
Looks like the weather is turning bad - Should I still install the liner?
Sun is your friend when installing a new liner. This is more true for difficult or complex shapes, as
well as pools with in wall stairs. It is strongly advisable to install the liner when it will get a lot of
direct sunlight on a warm day. If it is a sand bottom pool that has been troweled and repaired
already you might want to push on and get the liner in place to protect the slopes and the work you
have already completed.
The new liner is in place but I have a stripped screw on a return / skimmer / steps - What to do?
This is basically one of the worst case scenario situations. If the stripped strew is under the water
level then you need to realize that leaving this as-is is not an option. The easiest way to deal with
this difficult problem is to install one or two more screws on either side of the failed screw.
Depending on where this failure happens you will likely need a self tapping screw and go through
the steel wall behind the area you are working on. Go to endless lengths to ensure that no metal
shavings drop onto the new liner. Duct tape sticky side exposed is a great way to protect the liner
from dangerous material like this.
What is a hydrostatic relief valve (HRV) and do I need to worry about this
An HRV is a mechanical spring loaded valve that allows water to enter your pool through the
bottom of the main drain in the event that ground water pressure from the area surrounding the pool
increases. An HRV makes sure the force of the water under the pool does not force and lift the pool
structure out of the ground. This is a critical component for concrete pools but not required in
almost all vinyl liner pool installations. Most vinyl liner pools have them installed but you could
easily replace it with a permanent plug. This would be a good idea since HRV's will fail over time
and can cause the pool to drain unexpectedly. Do not replace your HRV with a plug if your pool
has been converted from a concrete pool to a vinyl pool.
My coping is failing but can I hang the new liner anyway?
No. If the coping will not last as long as the new liner will you should most certainly replace it
before replacing the liner. If the coping is made from aluminum it will last longer than coping made
from PVC which can stretch, distort and crack easily as it gets older.
My coping is embedded in concrete - How do I replace it?
Many coping designs have the concrete from the deck poured into the coping. There is no easy way
to replace this type of coping without doing major renovation to the concrete on the deck. The only
other lower cost solution to this specific common and unfortunate situation is to install a low profile
single track coping on the wall directly below the original coping. This changes the cosmetic look
of the pool slightly but at least it does not cost you $25,000 to replace your entire pool deck and
coping.
I have heard that I can eliminate the main drain - Is this true?
Yes. Many vinyl pool installers are eliminating main drains when installing new liners. Often there
can be leaks associated with main drains in that they house the hydrostatic relief valve as well as
have two plumbing lines attached to them. It is a good opportunity to eliminate a potential leak
point when changing the liner. The pool does operate better with a main drain however if you have
a problem with yours you can eliminate it by permanently plugging all plumbing lines that connect
to the main drain (and in the main drain itself) and then fill the main drain with concrete before
installing the new liner. If you permanently close the main drain be sure to permanently close any
equalizer line that may connect from your skimmer to the main drain.
Top content from www.SwimmingPoolSteve.com
Pool and spa chemistry crash course
New pool owner guide
The Swimming Pool Steve blog
Have a question - ask Steve

Swimming Pool Steve is an award winning, second generation swimming pool specialist from Ontario Canada and one of the most trusted voices in the swimming pool industry. With over 20,000,000 views on the Swimming Pool Steve YouTube Channel, winner of the Pleatco Pool & Spa Industry Leadership award and author of hundreds of pool and spa articles both online and in print. Steve is committed to helping pool and spa owners as well as pool and spa industry workers learn more about the technical side of building, renovating, repairing and maintaining all types of swimming pools and spas. Follow Swimming Pool Steve on Facebook, Twitter and YouTube.
Paid PDF Books From Swimming Pool Steve
 Steve's Pool Survival Guide
The Swimming Pool Steve Pool Survival Guide is intended to help pool owners understand their pool and pool equipment better, understand water chemistry, water testing and chemical corrections to the water, troubleshoot the most common pool problems and have confidence in interacting and caring for their pool in the fastest possible frame of time. Also covers pool safety, things to avoid and how to operate your pool more efficiently.
 Salt Water Recommendations
Are you considering upgrading to salt water in your pool? In this paid PDF Steve talks about which pools should avoid using salt water. Find out concerns about using salt in your pool but also the potential benefits of salt water. Finally hear which specific brand and model of salt chlorine generator Steve thinks is the best option currently available to pool owners and how to choose the right size salt system for your pool.
 New Pool Heater Buyer's Guide
In this guide Swimming Pool Steve will help you to better understand your heater options as well as which would be best suited for your pool. Learn about BTU output and sizing of both gas/propane heaters as well as electric heat pumps for residential swimming pools. You will also learn about which specific brands and models of currently available pool heaters Steve likes to recommend. If you are thinking of adding a new pool heater to your equipment pad this buyer's guide would be a useful resource to help you make a more informed buying decision.
 New Pool Installation Value Guide
This is a value shopping guide written by Swimming Pool Steve to help home owners hiring for a new pool installation to get the maximum value for their investment with tips about how to protect your interests during the vetting, hiring and pool installation process. Anyone serious about having a pool installed will find value in this guide. Pool installers will sell the pool package that is best for them - not for you! Become an informed value shopper with this PDF guide.
Endorsed Brands From Swimming Pool Steve
The following links and products are to affiliates of the Swimming Pool Steve website. These are brands, products and services hand selected by Steve for endorsement. Please note that these endorsements can include monetary compensation, affiliate links and referral fees to Swimming Pool Steve, however there is zero additional cost to you should you use one of these products or services. Income generated from these links helps to keep this pool and spa resource available for everyone. To have your product or service considered for listing here as an endorsed brand email SwimmingPoolSteve@gmail.com.
Amazon Disclosure Statement - As an Amazon Associate I earn from qualifying purchases.

www.PoolPartsToGo.com
New Black + Decker variable speed pumps are available online from www.PoolPartsToGo.com and they are a drop in replacement for many popular pump models including Pentair Superflo and Hayward Super Pumps. With an adjustable platform base, union connections included and a very strong warranty these pumps offer an impressive value to pool owners.
- Swimming Pool Steve