Salt Chlorinator Installation
SwimmingPoolSteve.com is user-supported. In order to keep this resource about pools and spas available for free to all readers I earn commissions for purchases made through links on this page. For more information see the full disclaimer page. By using this website you are agreeing to the terms and conditions.
 If you are looking for information on how to install a salt water chlorine generator on your pool then this article will be extremely helpful in highlighting the
biggest areas of concern. Salt chlorinator installation is a "DIY" level project if you are a handy person however there are a number of technical concerns that must
be addressed before you start dumping salt into your pool.
If you are looking for information on how to install a salt water chlorine generator on your pool then this article will be extremely helpful in highlighting the
biggest areas of concern. Salt chlorinator installation is a "DIY" level project if you are a handy person however there are a number of technical concerns that must
be addressed before you start dumping salt into your pool.
If you are not familiar with me, you should be aware that I have a lot of strong words for salt water in swimming pools. If you have not yet learned about the facts
of salt water and how salt interacts in a negative way with your swimming pool then you need to start by reading this article that starts with a simple question: Is salt water bad for pools?. That article talks in depth about the risks of elevated salt levels in your pool including what steps you
can take to mitigate the risks of damage from salt water. While I speak harshly about salt water, it is actually the misinformation about chlorine derived from salt water that is
my sore spot. If you have done the research, you intend to protect your pool against galvanic corrosion, and you would still like the benefits from salt water then by
all means I support your decision. All too often the potential downside of salt water is skipped over completely when "selling" a salt chlorine generator to an
interested customer.
Installing a salt chlorine generator is not very difficult - Cutting and gluing PVC pipes + balancing your water

So why does anybody hire a pool company to install a salt chlorine system if it is so easy? First, not everyone wants to cut into their pool plumbing system. Maybe
they are not comfortable with cutting and gluing PVC, or perhaps their system is located below water level and the isolation valves leak. The most common reason that
you might want to have a professional install your salt system is simply because if you do it wrong then you can damage your pool and other pool equipment. That alone
is enough to scare most people away from installing their own salt system. Unfortunately hiring a pool company to install your chlorinator for you may not have the
professional results that you are hoping for.
How To Properly Install A Salt Water Chlorinator

Not all professional installations of salt water chlorine generators will be equal. All too often pool owners pay for the installation of a salt system only to encounter serious problems months or years down the road - problems directly as a result of an inadequate installation of the salt system.
If you are like me and believe that if you want something done the right way you need to do it yourself, installing a salt system properly is certainly something you can do.
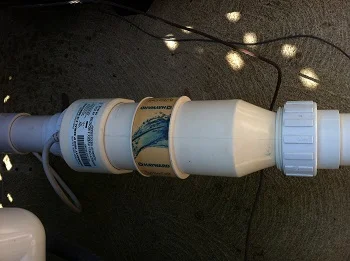
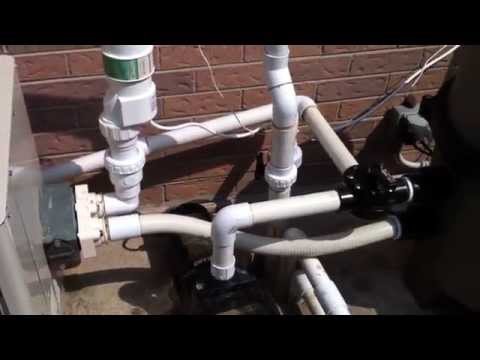
Cell location - The chlorine generation cell must be installed as the last component on the equipment pad directly before the water returns to the pool. Since the cell generates a significant concentration of chlorine you do not want to send this chlorine through your pool equipment, especially your heater. By installing the cell last in line the concentrated chlorine water is sent directly to the pool where it diffuses within the large body of water.
Sacrificial anode - A salt chlorine system increases the galvanic activity in your pool. To help mitigate this risk you need to have a sacrificial anode installed which will help to absorb the brunt of the damage caused from galvanic corrosion in your pool. A zinc disk in the skimmer and pump baskets are not suitable as a stand alone protection against galvanic corrosion in a salt water pool. You should have an inline anode installed in the pump room, and that anode should be tied into the bonding grid of your pool. Zinc disks in the strainer baskets in addition to the inline anode would be a good idea.
Bonded pool equipment - If you are going to increase the salt content in your pool then you need to be sure that your pool, and pool equipment such as pump and heater, are bonded. You should be able to locate a bonding wire that attaches to a bonding lug on your pump and heater. If you do not have one then you should hire an electrician to run an bonding wire from the existing bonding grid for the pool to include your pool equipment (and sacrificial anode). Failure to bond your pool equipment can result in an extremely fast deterioration of metal components such as the heat exchanger within your heater.
Isolate the cell - Installing the salt cell last in the equipment configuration is not enough to fully protect your equipment from damage from the chlorine being generated in the cell. Every time that you turn your pump off there is a delay of a few seconds before the cell stops generating chlorine. This causes a localized cloud of concentrated chlorine that can migrate backwards through the system. Since the cell is usually installed right after the heater this means that the concentrated chlorine will accumulate at the outlet port of your heat exchanger and cause early failure. You should install a corrosion resistant check valve in front of the generation cell to prevent any chlorine from moving backwards through the system and damaging your equipment.
Install in a serviceable location - The salt cell will require periodic maintenance and inspection, as well as removal for the winter if you live in a cold climate area. When you are installing the cell you should choose a location that will make it easy to access, remove, and inspect the cell. If you are installing the cell close to the ground level on the pad then be sure that you have it high enough off the ground that the unions are not touching the floor as this will make it difficult to spin the unions once they begin to age and get sticky. If you have a problem with sticky unions then read this article about how to loosen tight PVC unions
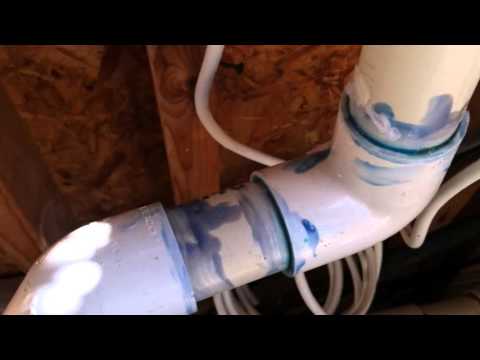
Use primer and glue - Gluing PVC for a pressurized pool system is not the same as gluing ABS for drainage applications. In order for PVC to securely bond when you glue it you must use a PVC primer before applying glue. If you are not sure about which PVC glue and primer is suitable for swimming pool plumbing installations then you can read this article about PVC glue for pool plumbing.
The actual cutting of pipes and gluing the cell in place takes only a few minutes. If you are able to follow all of the steps highlighted above then you will have no problems with your salt system installation. Installing the cell is not hard - knowing where to install it is the important part. Your salt system installation may be easier or harder depending on how tight your pool equipment pad is installed. Most people should aim to install the check valve near to the heater outlet, and the salt cell shortly after this. If there is room on your pad then this is where you would want to install the cell.
The only part not detailed yet is the installation of the control box for the chlorinator. This will need to be located near to the pool equipment and should be installed near to eye level for easy operation and reading of values on the display screen. This control box should also be bonded as part of the bonding grid. It will also require either 110 volt or 220 volt power depending on which brand and model you are installing. While most salt systems will have an external control box there are some models, such as Pentair IntelliChlor system, which have the control panel integrated into the generation cell itself.
Adding Salt To Your Pool
Once you have installed your salt chlorinator then all that remains is to add salt to your pool and power on the system. This is another area where mistakes can
commonly be made. First, you should always have your salt system powered completely off when you add salt to the pool. Salt will take around 24 hours and a few
brushings of the pool floor in order to dissolve. During this time if your system is attempting to run there can be a spike in the salt content that passes through
the cell which can cause a system failure. This is also the same reason that you should never pour salt into the skimmer of your pool. The salt should be dumped
directly into the pool body and brushed with your maintenance pole and brush.
Every brand of salt water system will come with a guideline for how much salt to add to your pool. Additionally there are online resources from some of the big salt system
manufacturers to help you calculate how much salt you should add to hit your desired range:
Pentair Pool Salinity Calculator
CSG Network Water Salinity Calculator
The most important thing that you might overlook when calculating how much salt to add to your pool is what your current salt level is. A swimming pool does not have
zero salt. It already has a salt level anywhere from a few hundred up to a thousand or more parts per million of salt. This is from the sanitizers that you have been
using in your pool up until now. This is significant because if you add too much salt to your pool there is no way to resolve the problem other than to drain away
some of your pool water and refill with fresh water with a lower salt level. When you add to this the sheer amount of salt you need to add to a swimming pool to raise
the level to 3000+ parts per million, you certainly do not want to use any more salt than you need to. Many pool owners are surprised to learn that an average pool
may need anywhere from 350 pounds to 1000 pounds of pure salt. If you need that much salt that is going to take significant effort to go and purchase and lug all the
way back to your pool location. Save yourself the extra work and money and be sure to test the salt level in your pool to determine your baseline sodium reading
before you calculate how much more salt you will need to add.
Need more info on salt pools? You might be interested in this advice about salt water pools
Top content from www.SwimmingPoolSteve.com
Pool and spa chemistry crash course
New pool owner guide
The Swimming Pool Steve blog
Have a question - ask Steve

Swimming Pool Steve is an award winning, second generation swimming pool specialist from Ontario Canada and one of the most trusted voices in the swimming pool industry. With over 20,000,000 views on the Swimming Pool Steve YouTube Channel, winner of the Pleatco Pool & Spa Industry Leadership award and author of hundreds of pool and spa articles both online and in print. Steve is committed to helping pool and spa owners as well as pool and spa industry workers learn more about the technical side of building, renovating, repairing and maintaining all types of swimming pools and spas. Follow Swimming Pool Steve on Facebook, Twitter and YouTube.
Paid PDF Books From Swimming Pool Steve
 Steve's Pool Survival Guide
The Swimming Pool Steve Pool Survival Guide is intended to help pool owners understand their pool and pool equipment better, understand water chemistry, water testing and chemical corrections to the water, troubleshoot the most common pool problems and have confidence in interacting and caring for their pool in the fastest possible frame of time. Also covers pool safety, things to avoid and how to operate your pool more efficiently.
 Salt Water Recommendations
Are you considering upgrading to salt water in your pool? In this paid PDF Steve talks about which pools should avoid using salt water. Find out concerns about using salt in your pool but also the potential benefits of salt water. Finally hear which specific brand and model of salt chlorine generator Steve thinks is the best option currently available to pool owners and how to choose the right size salt system for your pool.
 New Pool Heater Buyer's Guide
In this guide Swimming Pool Steve will help you to better understand your heater options as well as which would be best suited for your pool. Learn about BTU output and sizing of both gas/propane heaters as well as electric heat pumps for residential swimming pools. You will also learn about which specific brands and models of currently available pool heaters Steve likes to recommend. If you are thinking of adding a new pool heater to your equipment pad this buyer's guide would be a useful resource to help you make a more informed buying decision.
 New Pool Installation Value Guide
This is a value shopping guide written by Swimming Pool Steve to help home owners hiring for a new pool installation to get the maximum value for their investment with tips about how to protect your interests during the vetting, hiring and pool installation process. Anyone serious about having a pool installed will find value in this guide. Pool installers will sell the pool package that is best for them - not for you! Become an informed value shopper with this PDF guide.
Endorsed Brands From Swimming Pool Steve
The following links and products are to affiliates of the Swimming Pool Steve website. These are brands, products and services hand selected by Steve for endorsement. Please note that these endorsements can include monetary compensation, affiliate links and referral fees to Swimming Pool Steve, however there is zero additional cost to you should you use one of these products or services. Income generated from these links helps to keep this pool and spa resource available for everyone. To have your product or service considered for listing here as an endorsed brand email SwimmingPoolSteve@gmail.com.
Amazon Disclosure Statement - As an Amazon Associate I earn from qualifying purchases.

www.PoolPartsToGo.com
New Black + Decker variable speed pumps are available online from www.PoolPartsToGo.com and they are a drop in replacement for many popular pump models including Pentair Superflo and Hayward Super Pumps. With an adjustable platform base, union connections included and a very strong warranty these pumps offer an impressive value to pool owners.
- Swimming Pool Steve