Vinyl Pool Floor Repairs
SwimmingPoolSteve.com is user-supported. In order to keep this resource about pools and spas available for free to all readers I earn commissions for purchases made through links on this page. For more information see the full disclaimer page. By using this website you are agreeing to the terms and conditions.
 Vinyl liner swimming pools can have one of many types of flooring material used. When it comes to making repairs to the floor in a vinyl pool you MUST know which kind
of floor material that you have currently and use the same material for any patched areas. All too often pool owners (and some less experienced pool companies) will
use the wrong material to patch the floor in a vinyl pool and this can have a number of adverse reactions:
Vinyl liner swimming pools can have one of many types of flooring material used. When it comes to making repairs to the floor in a vinyl pool you MUST know which kind
of floor material that you have currently and use the same material for any patched areas. All too often pool owners (and some less experienced pool companies) will
use the wrong material to patch the floor in a vinyl pool and this can have a number of adverse reactions:
Delamination - If you patch the floor in your vinyl pool with a dissimilar material to what the floor is made from then this will almost certainly result in a
delamination of the patched area. Even if the patch mix itself is mixed and applied properly and is bonded to the original floor well, the chance of a delamination is
very high due to the different rates of contraction and expansion between dissimilar concrete materials.
Chemical Interactions - There is a type of premixed concrete patch that is widely available at large hardware stores and sold online that is not compatible with
the vinyl liner in a vinyl pool. The product is specifically sold as "patch", "floor patch", "fabric patch" or "aqua patch". These products contain a polymer
additive that reacts when used as a swimming pool floor patch and a crystal growth will form. As the patch grows the liner will distend and in some cases the liner
material will chemically absorb water which will result in buckling and wrinkles along the edge of the patched area.

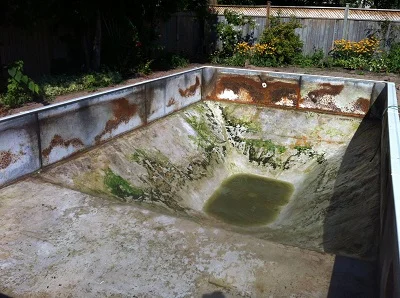
Types Of Vinyl Pool Floors
Identifying the type of floor that you have in your vinyl pool is very important to prevent any failures of the patched areas that you intend to do. When you patch a
vinyl pool floor with the incorrect materials you increase the chance of a delamination of the patch which can look unsightly as well as potentially damage the liner.
Unfortunately, correctly identifying the floor material that was used on your pool can be a little tricky. First, you will not get the opportunity to inspect the
floor until you have drained the water in your pool. If you have a sand bottom pool this can be an issue as the pool should not be drained until you have the new
liner and you are ready to proceed with the repairs and liner installation. In order to determine which type of floor that you have you need to know what the
potential flooring options are:
Sand Bottom - Sand bottom swimming pools are the lowest end floor option in swimming pools. For this reason they are popular for most aboveground swimming
pools and budget inground pool installations. This type of floor can often be identified while the pool is still full as the angles and surfaces of the pool floor and
slopes with have poor definition. You can also sometimes tell if you have a sand bottom pool just from standing in the pool (even when it is full of water) as you can
feel the flooring give underneath of your heels.
Vermiculite Bottom - A vermiculite bottom pool is a mortar mix that uses some sand, and some vermiculite as the aggregates. The more vermiculite that is used,
the weaker the concrete will be. Vermiculite has very high insulation properties, as much as ten times higher than regular mortar, as well as having a slightly spongy
or soft finished texture. This softer finish provides a smooth surface for your liner to sit on which will not wear like a liner can against a grout bottom floor.
Vermiculite concrete will be hard to the touch but will be softer than full grout concrete. The telltale look of vermiculite in a concrete mix is the shimmer of gold
flecks in the finished surface.
Grout Bottom - Grout bottom is another way of saying mortar bottom although grout is the term most commonly used within the industry. Grout, in this case,
refers to a mortar mix of only sand and cement and is sometimes referred to as a smooth bottom finish. Grout bottoms are the most common used in inground vinyl liner
pool construction. While grout is much stronger than vermiculite concrete, vermiculite mixes are an upgrade and usually cost more for installation over grout bottoms.
The downside of grout is that as they age they become sandier and more coarse. As the liner shifts over the pool floor this can wear away against the vinyl like
sandpaper and result in earlier liner failure versus vermiculite flooring.
Sand can have the appearance of being hard like concrete after it has been sitting under the weight of your swimming pool for a decade or two. To determine if you
have a sand bottom you can peel back the liner after you have drained the water from the shallow end of your pool. Upon close inspection you should be able to
determine if you have compacted sand or grout. Compacted sand will be very hard to the touch and can develop somewhat of a solidified crust layer. use a screwdriver
and push it into the floor. If you have a sand bottom pool you will be able to push the screwdriver all the way in. A vermiculite pool floor will be too strong to
push a screwdriver into, but you could most likely hammer the screwdriver through. A grout pool will have a floor as hard as a sidewalk and even hammering a
screwdriver into it will only result in chipping of the surface layer.
Sand Bottom Pools
 If you have a sand bottom pool, or you suspect that you have a sand bottom pool, then you need to be very careful how you go about draining your pool in preparation
for the new liner. Aboveground pools are not a concern, but the slopes of the deep end hopper in a sand bottom pool can be a serious problem if you remove the liner
too early. The weight of the water in the pool helps a sand bottom pool to retain its shape. Once you remove the liner the sand will begin to dry out on the surface
and should you experience any rain the slopes may wash out completely. If this happens you will need to rebuild the entire deep end of your pool and this is certainly
something that you want to avoid. If you have a sand bottom pool then you should try to leave about 6 inches of water in the shallow end of the pool. This will
protect the shallow end floor as well as the deep end hopper from damage.
If you have a sand bottom pool, or you suspect that you have a sand bottom pool, then you need to be very careful how you go about draining your pool in preparation
for the new liner. Aboveground pools are not a concern, but the slopes of the deep end hopper in a sand bottom pool can be a serious problem if you remove the liner
too early. The weight of the water in the pool helps a sand bottom pool to retain its shape. Once you remove the liner the sand will begin to dry out on the surface
and should you experience any rain the slopes may wash out completely. If this happens you will need to rebuild the entire deep end of your pool and this is certainly
something that you want to avoid. If you have a sand bottom pool then you should try to leave about 6 inches of water in the shallow end of the pool. This will
protect the shallow end floor as well as the deep end hopper from damage.
In order to make repairs to a sand bottom pool you will need to have a lot of clean sand, usually between 1/2 yard to a full yard of sand for a standard sized pool. The
type of sand that you want to use is brick sand as this will have the fewest stones and other impurities in it. To make repairs simply add sand as needed and trowel
as though it were concrete. The trick with working on sand bottom pools is that anywhere you step you will leave large foot prints. It is important to work backwards
towards the shallow end so you can climb out when you are finished. Wetting the sand slightly as you place it will help to trowel it and have it stay where you put it
if you are patching on the slopes.
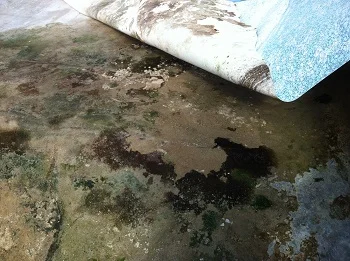
As shown in the picture above sand will develop a skin on it which will grow algae and all sorts of other gross stuff. While it is not required to remove this
material, these areas may show through the liner as an imperfection in the floor. From a minimal standpoint many people will simply add sand to large holes in the
floor and install the new liner. More thorough installers will require an entire new sand bottom be troweled when the liner is installed to ensure a professional
quality look to the finished product. Whether you go this far with your pool will depend on the current sand condition. If the current sand is hard, chunky, or has
stones, sticks or other impurities then it would be a good idea to selectively remove these sections and trowel over with fresh sand.
Vermiculite Bottom Pools
Vermiculite is a natural mineral that when used as a mortar aggregate in place of sand, increases the thermal resistance of the concrete greatly. The vermiculite also
provides a somewhat cushioned finish to the concrete which is excellent for liner longevity versus a rougher grout bottom finish. While vermiculite does have some
advantages, it is considered an optional upgrade with most installers and costs more than a grout bottom. For this reason vermiculite bottom pools are fairly rare
when compared to the other two.

Since vermiculite mix concrete is not available from ready mix concrete suppliers this means that it is mixed onsite by the pool installer. The amount of vermiculite that is used in a mix will depend on the experience of the original installer. Usually some sand and some vermiculite is used as this will provide a suitably strong finished concrete with increased thermal resistance. From a repair perspective you will not be able to determine how much vermiculite was used in the original mix - instead you should aim for a middle of the road vermiculite mix and this should work with any form of vermiculite concrete:
1 part portland cement
1.5 parts sand
1.5 parts fine, medium or coarse vermiculite
By using sand for half of the aggregate, and vermiculite as half of the aggregate, you will achieve a finished strength of concrete that is strong, but still cushioned enough to not act like sandpaper against the bottom of your liner. If the original mix had more or less vermiculite in it then this will still be your best option for patch mix. You should absolutely not use any true mortar products as a patch over vermiculite concrete as this will almost certainly delaminate with a very high risk for the patch itself being sharp when it breaks.
You should mix your vermiculite, portland and sand to a slightly damp consistency. Adding too much water to your mix is the number one mistake that concrete novices will make. Concrete only needs to be slightly damp in order to actuate, and is actually much stronger the less water you add to the mix. Since vermiculite will absorb water it can make balancing your water content difficult. To make it slightly easier you should try soaking some vermiculite in water before mixing it in with the concrete. The water that the vermiculite holds will be almost all that you need to achieve a suitable patch consistency. Always be sure to bond your concrete patch to the existing concrete. If you are not sure about how to bond concrete then you should review this article that covers the basics of working with concrete including how to bond new concrete to old concrete.
Grout Bottom Pools
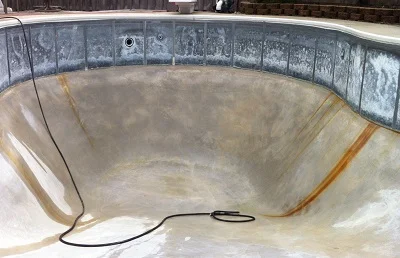 Grout bottom, otherwise known as mortar, is the most common inground vinyl liner floor material. The reason for this is it is easy to apply, works well, lasts a long
time and is not very expensive when compared to specialty mixes like vermiculite. The only trick to doing smooth bottom finishes on vinyl pools is that the cement
finishers need to be fairly good. Troweling sand is much more forgiving than troweling full strength grout or mortar and any imperfections in the finish work will, at
best show through the liner, and at worst can actually damage the liner.
Grout bottom, otherwise known as mortar, is the most common inground vinyl liner floor material. The reason for this is it is easy to apply, works well, lasts a long
time and is not very expensive when compared to specialty mixes like vermiculite. The only trick to doing smooth bottom finishes on vinyl pools is that the cement
finishers need to be fairly good. Troweling sand is much more forgiving than troweling full strength grout or mortar and any imperfections in the finish work will, at
best show through the liner, and at worst can actually damage the liner.
As part of the normal operation of a vinyl pool, the liner shifts slightly, and any rough concrete can cause premature wear to the underside of the liner. Even if the
smooth bottom is done well, as the concrete ages the portland cement will migrate away with water, leaving the sand behind. This normal deterioration of mortar will
eventually leave the floor of the pool rough. When you attempt to clean the pool to install a new liner you may have trouble cleaning the sand away since it will
continue to deteriorate as you wash or broom it. If the mortar in your pool has deteriorated to this point then you may like to consider adding a new smooth bottom
skim coat to the entire pool floor. Make no mistake, this is a lot of work and something that you would need to have a skilled trowel hand to accomplish well. The
alternative is to patch the floor as best as possible, cutting out and patching any really deteriorated areas, and live with the inevitable sandy texture that will be
visible under the new liner.
Patching grout bottom pools is actually very easy to do since all you need to do is have a sand and cement mix patch. Mix the patch with the proportions of 1 part
cement to three parts clean, washed sand for best results. As with the vermiculite mix, you want to only make your mix slightly damp. If you over water the patch mix
this will drastically reduce the finished strength of the patch as well as making it more difficult to finish seamlessly. The biggest mistake that people make when
patching pool floors, other than to use the wrong patch material, is to forget to bond the new concrete to the old concrete. The old concrete needs to be clean and
damp and you need to add a bonding layer between the new concrete patch and the old concrete. You can read more about how to make a bonding mix and how to bond new
concrete to old concrete in this article about how to work with concrete.
What Is A Two Stage Pool Bottom?
A two stage pool bottom is a common term used within the vinyl liner pool industry. A two stage bottom, exactly as it sounds, is a pool floor that is completed in two
separate stages. The first stage is a very rough (usually raked or floated) concrete layer that is added to the entire floor of the pool, usually at the same time the
collar is poured around the outside wall footings and buttresses. Since there is a concrete truck delivering concrete already for the collar, most builders also use
this as an opportunity to add the structural layer to the floor and slopes of the pool. This prevents the floor and slopes from washing away or changing shape in
between when the collar is poured and when the pool is ready to have the liner installed. The second stage of the two stage pool bottom is to add a smooth layer
overtop of the rough floated structural layer.
A two stage bottom can be rough concrete covered by a smooth grout layer, but also can be completed by using a vermiculite mix for the second stage. It would be very
uncommon to have only vermiculite flooring - most vermiculite floors are actually two stage bottoms with a stronger concrete layer underneath. The actual thickness of
the structural concrete layer will depend on the installer building your pool. A thickness of between 1" and 2" is common for the structural concrete layer with the
smooth layer being between 3/8" and 3/4" thick.
If you need to learn more about how to trowel and finish a concrete patch read the Concrete 101 article.
If you would like to learn how to install a new vinyl liner you can read this detailed pool liner installation guide.
Top content from www.SwimmingPoolSteve.com
Pool and spa chemistry crash course
New pool owner guide
The Swimming Pool Steve blog
Have a question - ask Steve

Swimming Pool Steve is an award winning, second generation swimming pool specialist from Ontario Canada and one of the most trusted voices in the swimming pool industry. With over 20,000,000 views on the Swimming Pool Steve YouTube Channel, winner of the Pleatco Pool & Spa Industry Leadership award and author of hundreds of pool and spa articles both online and in print. Steve is committed to helping pool and spa owners as well as pool and spa industry workers learn more about the technical side of building, renovating, repairing and maintaining all types of swimming pools and spas. Follow Swimming Pool Steve on Facebook, Twitter and YouTube.
Paid PDF Books From Swimming Pool Steve
 Steve's Pool Survival Guide
The Swimming Pool Steve Pool Survival Guide is intended to help pool owners understand their pool and pool equipment better, understand water chemistry, water testing and chemical corrections to the water, troubleshoot the most common pool problems and have confidence in interacting and caring for their pool in the fastest possible frame of time. Also covers pool safety, things to avoid and how to operate your pool more efficiently.
 Salt Water Recommendations
Are you considering upgrading to salt water in your pool? In this paid PDF Steve talks about which pools should avoid using salt water. Find out concerns about using salt in your pool but also the potential benefits of salt water. Finally hear which specific brand and model of salt chlorine generator Steve thinks is the best option currently available to pool owners and how to choose the right size salt system for your pool.
 New Pool Heater Buyer's Guide
In this guide Swimming Pool Steve will help you to better understand your heater options as well as which would be best suited for your pool. Learn about BTU output and sizing of both gas/propane heaters as well as electric heat pumps for residential swimming pools. You will also learn about which specific brands and models of currently available pool heaters Steve likes to recommend. If you are thinking of adding a new pool heater to your equipment pad this buyer's guide would be a useful resource to help you make a more informed buying decision.
 New Pool Installation Value Guide
This is a value shopping guide written by Swimming Pool Steve to help home owners hiring for a new pool installation to get the maximum value for their investment with tips about how to protect your interests during the vetting, hiring and pool installation process. Anyone serious about having a pool installed will find value in this guide. Pool installers will sell the pool package that is best for them - not for you! Become an informed value shopper with this PDF guide.
Endorsed Brands From Swimming Pool Steve
The following links and products are to affiliates of the Swimming Pool Steve website. These are brands, products and services hand selected by Steve for endorsement. Please note that these endorsements can include monetary compensation, affiliate links and referral fees to Swimming Pool Steve, however there is zero additional cost to you should you use one of these products or services. Income generated from these links helps to keep this pool and spa resource available for everyone. To have your product or service considered for listing here as an endorsed brand email SwimmingPoolSteve@gmail.com.
Amazon Disclosure Statement - As an Amazon Associate I earn from qualifying purchases.

www.PoolPartsToGo.com
New Black + Decker variable speed pumps are available online from www.PoolPartsToGo.com and they are a drop in replacement for many popular pump models including Pentair Superflo and Hayward Super Pumps. With an adjustable platform base, union connections included and a very strong warranty these pumps offer an impressive value to pool owners.
- Swimming Pool Steve