How To Winterize A Pool Heater
SwimmingPoolSteve.com is user-supported. In order to keep this resource about pools and spas available for free to all readers I earn commissions for purchases made through links on this page. For more information see the full disclaimer page. By using this website you are agreeing to the terms and conditions.
 If you want to learn how to winterize a swimming pool heater you need to accept that if you make a mistake with this process you are likely going to have a broken
heater come spring time. While it is not especially hard to winterize a pool heater, there are a number of steps to the process and missing any one will likely be a
problem. If you are interested in learning how to properly close your heater for the winter season then the information on this page will help you accomplish this.
If you want to learn how to winterize a swimming pool heater you need to accept that if you make a mistake with this process you are likely going to have a broken
heater come spring time. While it is not especially hard to winterize a pool heater, there are a number of steps to the process and missing any one will likely be a
problem. If you are interested in learning how to properly close your heater for the winter season then the information on this page will help you accomplish this.
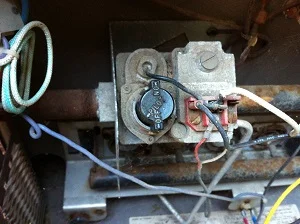
Above all else, if you forget to do everything else listed on this page, just be sure to close the gas valve going to the heater. Your heater actually has two gas
valves - one inside the heater that will have "on", "off" and "pilot" designations usually. You will also have a second valve, usually a brass ball valve, somewhere
on the gas line that feeds to the heater. Most commonly this should be directly beside the heater itself, however it is sometimes located directly after the gas meter
on the line feeding your heater. Either way there is a gas valve somewhere and you need to find it and make absolutely sure that it is closed once you shut down your
heater for the winter. Why do you need to close both gas valves for your heater? If one of them fails, or has a slow leak, this could result in enough gas building
up in the heater that a spark could ignite an explosion.

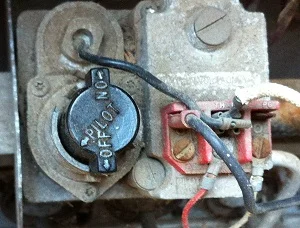
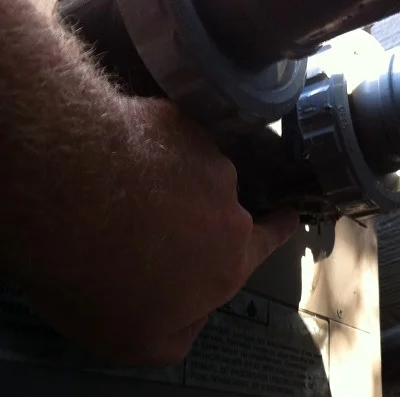
While most internal gas valves in pool heaters are very easy to read in terms of on and off, the style of gas valve shown here from a Hayward ED2 (a popular Canadian
model, uncommon in the USA) is a little ambiguous as to which direction is "off". The valve as pictured here is currently in the "on position" for reference. As gas
valves can fail as they age always be sure to close the primary valve on the gas line in addition to this internal valve.
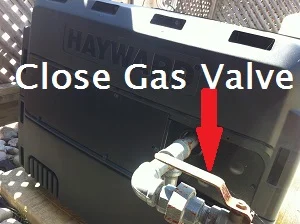
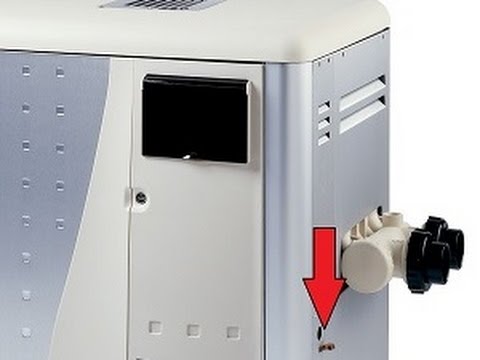
This picture shows the main gas line valve that is installed on the feed line just adjacent to the heater. Most commonly this will be a brass ball valve with a
handle. When the handle is parallel (in line) with the pipe this indicates the valve is open. When the handle is perpendicular ("T") to the pipe this indicates a
closed position. There are also gas valves without a handle that require a large wrench in order to close. As with ball valves, the orientation of the lines on these
types of gas valves will indicate closed when the lines are perpendicular to the gas line, and open when the lines are parallel to the gas line.
Steps Involved With Winterizing A Pool Heater
There are many different brands, makes and models of pool heater on the market: Raypak, Rheem, Jandy, Hayward and Pentair just to name a few of the most popular
brands. Each of these brands has multiple heater style models, as well as multiple sizes of each model. In total there are simply too many to have one definitive
guide. Instead of a definitive guide simply follow these steps that apply to all pool heaters - the actual location of each of these items will be different depending
on which heater you have.
Turn the gas valves off - I know we already discussed this, but it warrants mentioning again. Triple check the gas valves are all closed.
Turn the power off to the heater - Not every heater requires power but if yours does be sure to turn off the electrical breaker before you start to winterize
your heater.
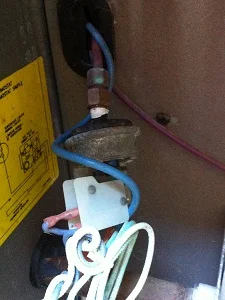
 Open the pressure switch - Not every pool heater has a pressure switch but some do. If your pool has one then you need to open the connection to the pressure
switch to prevent this sensitive (and expensive) piece of equipment from breaking when the water trapped inside it freezes. The pressure switch is normally located
inside the heater and is connected with a 1/4" copper tubing.
Open the pressure switch - Not every pool heater has a pressure switch but some do. If your pool has one then you need to open the connection to the pressure
switch to prevent this sensitive (and expensive) piece of equipment from breaking when the water trapped inside it freezes. The pressure switch is normally located
inside the heater and is connected with a 1/4" copper tubing.
There will be two nuts that connect to the top of the pressure switch and this is where you need to open it. The two styles that exist are either 7/16" or 1/2" in
size. Use wrenches to open these carefully to avoid damaging the nuts or the pressure switch itself. You do not need to remove the switch completely. Opening the
copper tube connection and letting the pressure switch hang from the wires is standard in the pool industry.
The copper line will drain water when you open the connection port.
The remainder of the water will be pushed from the tube when you blow through the heater so no further interaction is needed with the pressure switch. Just open it
and leave it - but be sure to reconnect it in the spring!
 Open the winterization ports (drain cocks) - Every pool heater has winterizing ports, or drain cocks, in multiple locations on the heater. The number of ports
that you have will depend on which heater you have but you will be looking for between 2 to 4 ports in total. The first place to look, as pictured here, is under the
header of the heater where the pipes connect to it. Most commonly you will find one, or two, drain cocks in this location. In addition to the ones on the header there
is usually a drain cock or two on the opposite side of the heater. The drain cocks will either be a standard thread plastic plug or a brass bolt style. For the
purposes of winterizing the heater you want to remove every drain plug that you can find. To avoid losing these very important plugs you can store them in the pump
strainer basket while you are winterizing the heater.
Open the winterization ports (drain cocks) - Every pool heater has winterizing ports, or drain cocks, in multiple locations on the heater. The number of ports
that you have will depend on which heater you have but you will be looking for between 2 to 4 ports in total. The first place to look, as pictured here, is under the
header of the heater where the pipes connect to it. Most commonly you will find one, or two, drain cocks in this location. In addition to the ones on the header there
is usually a drain cock or two on the opposite side of the heater. The drain cocks will either be a standard thread plastic plug or a brass bolt style. For the
purposes of winterizing the heater you want to remove every drain plug that you can find. To avoid losing these very important plugs you can store them in the pump
strainer basket while you are winterizing the heater.
The plastic plug heaters like with Pentair or Hayward are easier to winterize than Jandy heaters which use brass drain cocks. The problem with the brass ones is that
the heater case and the plug are made from different metals. This can encourage corrosion in this location. Since the threads on the drain cock are so fine this can
sometimes cause difficulty removing the plug. Brass will strip easily so be sure to use a 9/16" wrench, not an adjustable wrench, pliers, pipe wrench or channel locks
as these will all damage the brass. Additionally these brass drain cocks are usually seized in place and require a fair amount of force to remove. It is also fairly
common for these to break when you try to remove them. If this happens to you then you will need to tap and thread chase this location which requires drilling and a
tap set. Plastic drain plugs from heaters can be left out for the winter similar to all other
winterizing plugs on your equipment. Brass drain cocks should be reinstalled after winterizing the heater. If you leave the brass drain cocks out over the winter then
rust will form on the exposed threads of the heater making a water tight seal much more difficult in the spring.
Blow through the heater - Pool companies use specialty tools to blow the water out of the lines in your pool such as the Cyclone Blower. These provide much more air flow than a shop vac for example. You can also use a leaf
blower if you have one though this would involve some custom modification to make a hose attachment on the end of the blower. If you are a pool owner and you want to
close your pool every year then you might want to use the Cyclone blower but if all you have access to is a standard shop vac this can work also so long as it is at
least 5 horsepower in size.
If you have unions on the inlet and outlet ports of the heater this is ideal for opening the system and isolating the heater as you blow through it. Not every pool
heater will give you this option however. If you do not have union ports on your heater then you will need to open the system in the closest place to the heater in
order to blow through the lines. It is not ideal to blow through a filter to get to the heater so consider adding some winterization unions into your system by your
heater if you don't have any. Almost all of the water will blow out of the heater in the first few seconds once you turn the blower on. Despite looking empty
continue to let the blower run through the heater for a minimum of 5 minutes. After 5 minutes blow through the heater in the opposite direction for another 5 minutes
just to be absolutely sure you have all of the water out of the system. Be sure to reconnect the unions after you are finished to prevent an access point for rodents
to get into your heater or plumbing lines in the off season.
Tips For Winterizing Pool Heaters
This video talks about how to properly winterize a swimming pool heater. This is video 7 in my series on swimming pool winterization. If you would like to see the other videos that discuss how to winterize each component of your pool - pump, filter, heater, skimmer, returns and pipes - you can find this here: Pool Winterization Vlog.
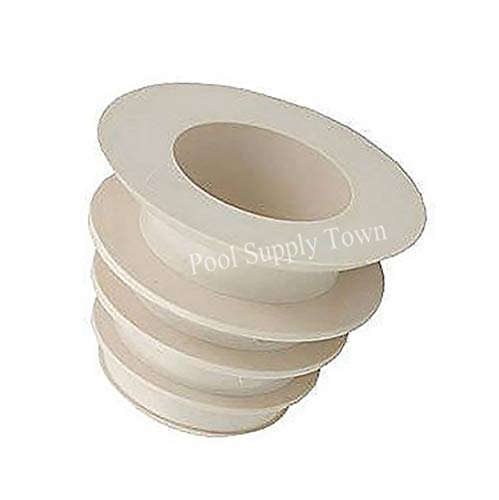
While you can winterize your pool with mostly items you have around your home already there is one pro tool that you should consider getting and that is this cone adapter. Traditionally used for connecting pool vacuums to the skimmer port of pools, this cone adapter is perfect for blowing out pool pipes and ports of all different sizes. Getting a good seal on the pipe with your blower is key to having enough power to evacuate all of the water from the system. This small adapter will help greatly with this process. If you have a pool vacuum hose you can use one length of the pool vacuum hose to perfectly connect into this adapter. You would then use duct tape to connect the vacuum hose to your blower - Cyclone, shop vac or leaf blower.
Top content from www.SwimmingPoolSteve.com
Pool and spa chemistry crash course
New pool owner guide
The Swimming Pool Steve blog
Have a question - ask Steve

Swimming Pool Steve is an award winning, second generation swimming pool specialist from Ontario Canada and one of the most trusted voices in the swimming pool industry. With over 20,000,000 views on the Swimming Pool Steve YouTube Channel, winner of the Pleatco Pool & Spa Industry Leadership award and author of hundreds of pool and spa articles both online and in print. Steve is committed to helping pool and spa owners as well as pool and spa industry workers learn more about the technical side of building, renovating, repairing and maintaining all types of swimming pools and spas. Follow Swimming Pool Steve on Facebook, Twitter and YouTube.
Paid PDF Books From Swimming Pool Steve
 Steve's Pool Survival Guide
The Swimming Pool Steve Pool Survival Guide is intended to help pool owners understand their pool and pool equipment better, understand water chemistry, water testing and chemical corrections to the water, troubleshoot the most common pool problems and have confidence in interacting and caring for their pool in the fastest possible frame of time. Also covers pool safety, things to avoid and how to operate your pool more efficiently.
 Salt Water Recommendations
Are you considering upgrading to salt water in your pool? In this paid PDF Steve talks about which pools should avoid using salt water. Find out concerns about using salt in your pool but also the potential benefits of salt water. Finally hear which specific brand and model of salt chlorine generator Steve thinks is the best option currently available to pool owners and how to choose the right size salt system for your pool.
 New Pool Heater Buyer's Guide
In this guide Swimming Pool Steve will help you to better understand your heater options as well as which would be best suited for your pool. Learn about BTU output and sizing of both gas/propane heaters as well as electric heat pumps for residential swimming pools. You will also learn about which specific brands and models of currently available pool heaters Steve likes to recommend. If you are thinking of adding a new pool heater to your equipment pad this buyer's guide would be a useful resource to help you make a more informed buying decision.
 New Pool Installation Value Guide
This is a value shopping guide written by Swimming Pool Steve to help home owners hiring for a new pool installation to get the maximum value for their investment with tips about how to protect your interests during the vetting, hiring and pool installation process. Anyone serious about having a pool installed will find value in this guide. Pool installers will sell the pool package that is best for them - not for you! Become an informed value shopper with this PDF guide.
Endorsed Brands From Swimming Pool Steve
The following links and products are to affiliates of the Swimming Pool Steve website. These are brands, products and services hand selected by Steve for endorsement. Please note that these endorsements can include monetary compensation, affiliate links and referral fees to Swimming Pool Steve, however there is zero additional cost to you should you use one of these products or services. Income generated from these links helps to keep this pool and spa resource available for everyone. To have your product or service considered for listing here as an endorsed brand email SwimmingPoolSteve@gmail.com.
Amazon Disclosure Statement - As an Amazon Associate I earn from qualifying purchases.

www.PoolPartsToGo.com
New Black + Decker variable speed pumps are available online from www.PoolPartsToGo.com and they are a drop in replacement for many popular pump models including Pentair Superflo and Hayward Super Pumps. With an adjustable platform base, union connections included and a very strong warranty these pumps offer an impressive value to pool owners.
- Swimming Pool Steve